Introduction to LightForce Part 2: Treatment Planning and Clinical Management
Part 1 in this series focused on the rationale for three-dimensionally printed fixed appliances and reviewed the unique features and characteristics of the LightForce* 3D-printed fixed appliance system. Part 2 covers the clinical management of LightForce, from treatment planning to debonding.
Treatment Planning
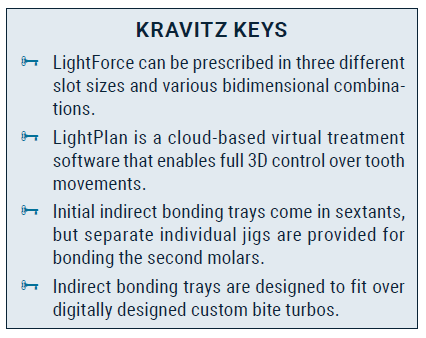
LightPlan,* the cloud-based virtual treatment-planning software for LightForce brackets, enables full 3D control over tooth movements, allowing the orthodontist to program biologically and mechanically appropriate treatment for each patient (Fig. 1). The unique combination of a digital case setup, fully customized prescription, 3D-printed brackets with accurate slot dimensions and anatomical custom bases, and an effective indirect bonding system ensure that the intended orthodontic tooth movements are expressed intraorally.
Similar articles from the archive:
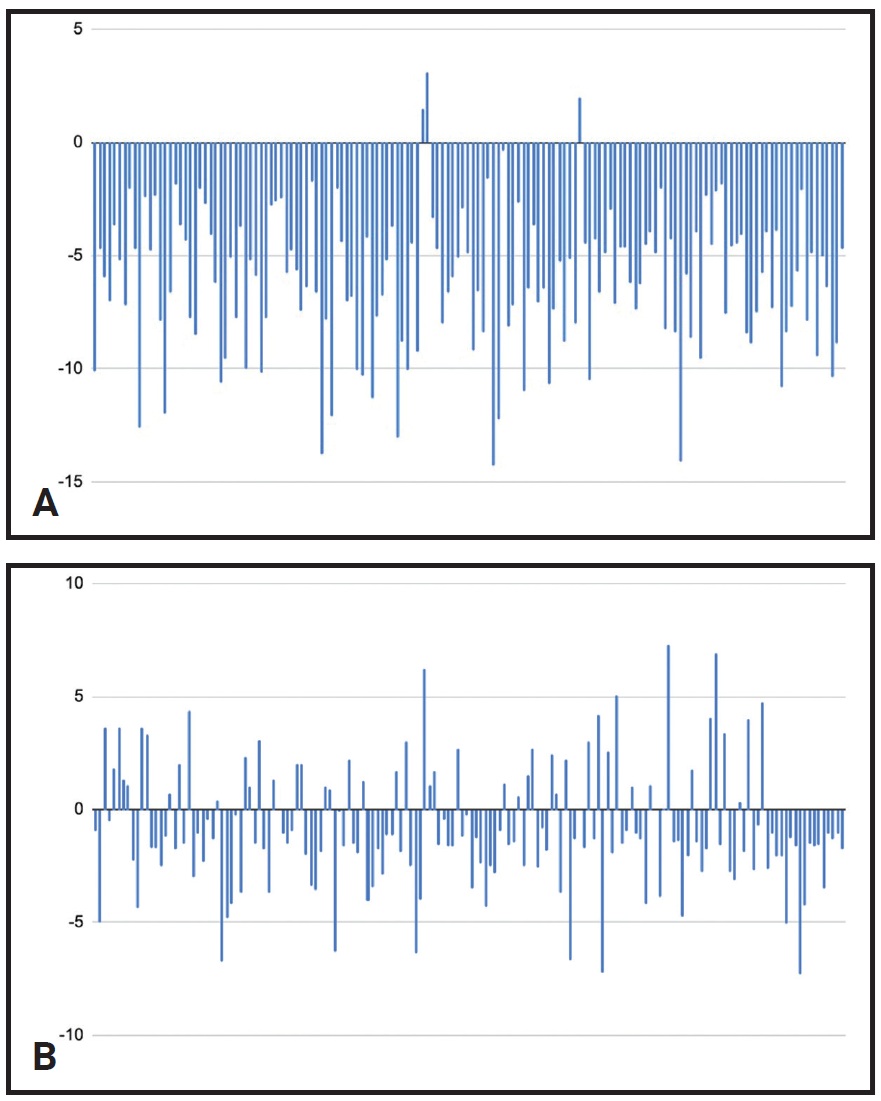
Fig. 1 Programmed variations in torque for upper right first premolar (A) and lower right central incisor (B) in 166 consecutive LightForce* cases treated by one doctor.
While every fixed appliance treatment plan can benefit in some way from customization, an individualized approach is especially useful in cases requiring tooth movements that would otherwise be difficult to plan with traditional analog preadjusted brackets, since the desired movements may not be attainable with any standard prescription. For example, in a case with retroclined lower incisors, a positive lower-incisor crown torque can be designed in LightPlan, as opposed to the negative crown torque of most preadjusted appliances (Fig. 2). Even complex surgical-orthodontic or skeletal-anchorage cases can be effectively planned with this system; a designed “surgical jump” promotes a well-interdigitated result by enabling the clinician to visualize the final postsurgical occlusion with regard to torque, marginal-ridge relationships, and alignment.

Fig. 2 Typical surgical-orthognathic case, with positive torque added to lower incisors to establish ideal final angulation and occlusion. A. Before treatment. B. LightPlan* setup with “surgical jump.” C. Final result after 20 months of combined orthodontic and surgical treatment.
Another example of the advantages of full customization is seen in a patient with a missing maxillary lateral incisor being treated with canine substitution (Fig. 3). In this clinical scenario, the orthodontist can program the ideal position of the canine in LightPlan, and a custom bracket will be designed and 3D-printed to achieve that goal without the need for alternative analog approaches, such as bracket substitution, to achieve the correct torque.
Because of the industry-first adaptive custom-base technology of LightForce brackets, the vertical position of the bracket on the tooth does not affect the torque delivery. In a standard analog fixed appliance system, a change made in the vertical bracket position to achieve an ideal smile arc could alter the effective torque delivery and necessitate manual corrections. In contrast, the custom bases of LightForce brackets automatically adjust to maintain the desired torque delivery to the anterior teeth regardless of vertical position (Fig. 4).
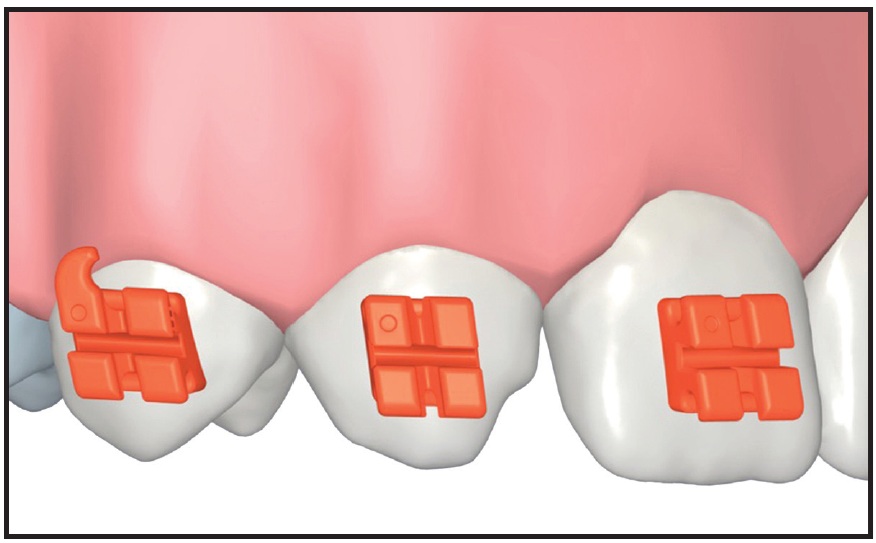
Fig. 3 Torque and vertical position of upper right canine planned for ideal substitution of missing upper right lateral incisor; torque of upper right first premolar customized to mimic upper right canine.
A clinical example is a case in which a significant amount of negative torque was needed in the maxillary premolars, but any addition of positive torque to the maxillary incisors would have been esthetically undesirable (Fig. 5A). In LightPlan, negative torque was applied to the maxillary premolars to level the curve of Wilson and produce a well-interdigitated buccal occlusion without affecting the maxillary incisor torque (Fig. 5B). After 11 months of treatment with LightForce custom appliances—without the use of any other auxiliaries, bracket repositioning, wirebending, or elastics—the posterior torque was improved and the anterior torque was maintained, both of which contributed to a harmonious smile and a well-interdigitated occlusion (Fig. 5C). A standard prescription would have applied insufficient negative torque to the posterior teeth and excessive torque to the anterior teeth.
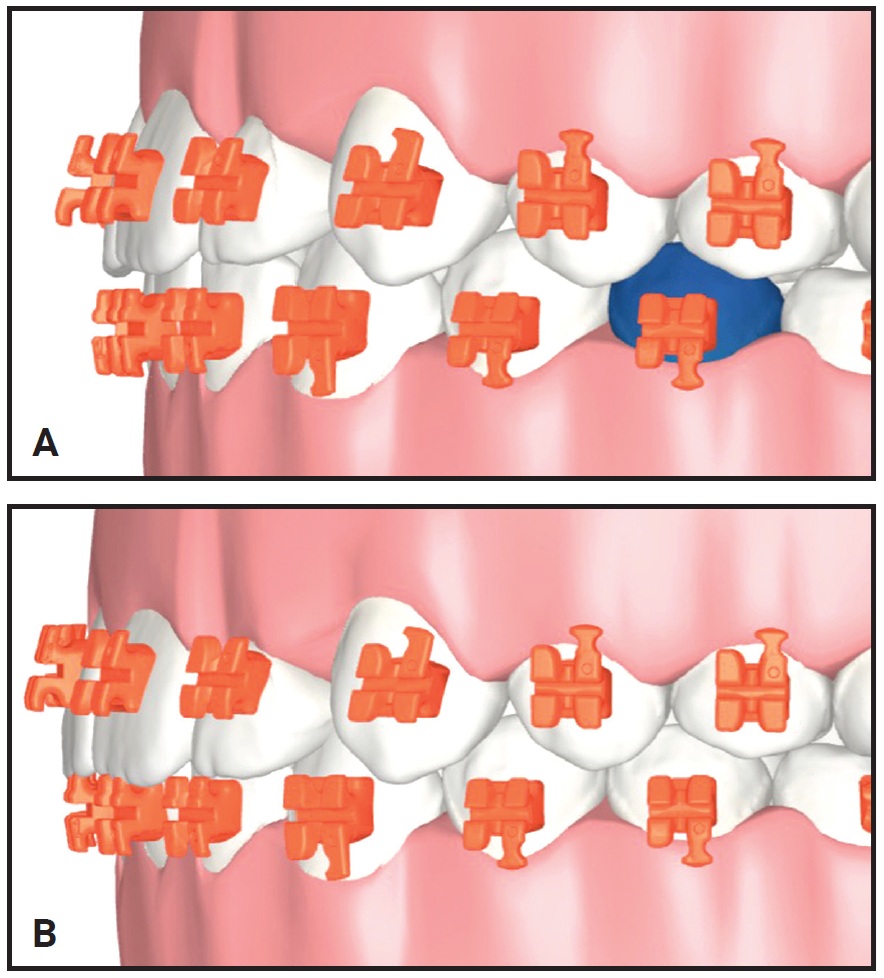
Fig. 4 A. Patient with flat smile arc. B. Increased smile arc. Adaptation of custom base maintains incisor torque despite vertical change in tooth position.
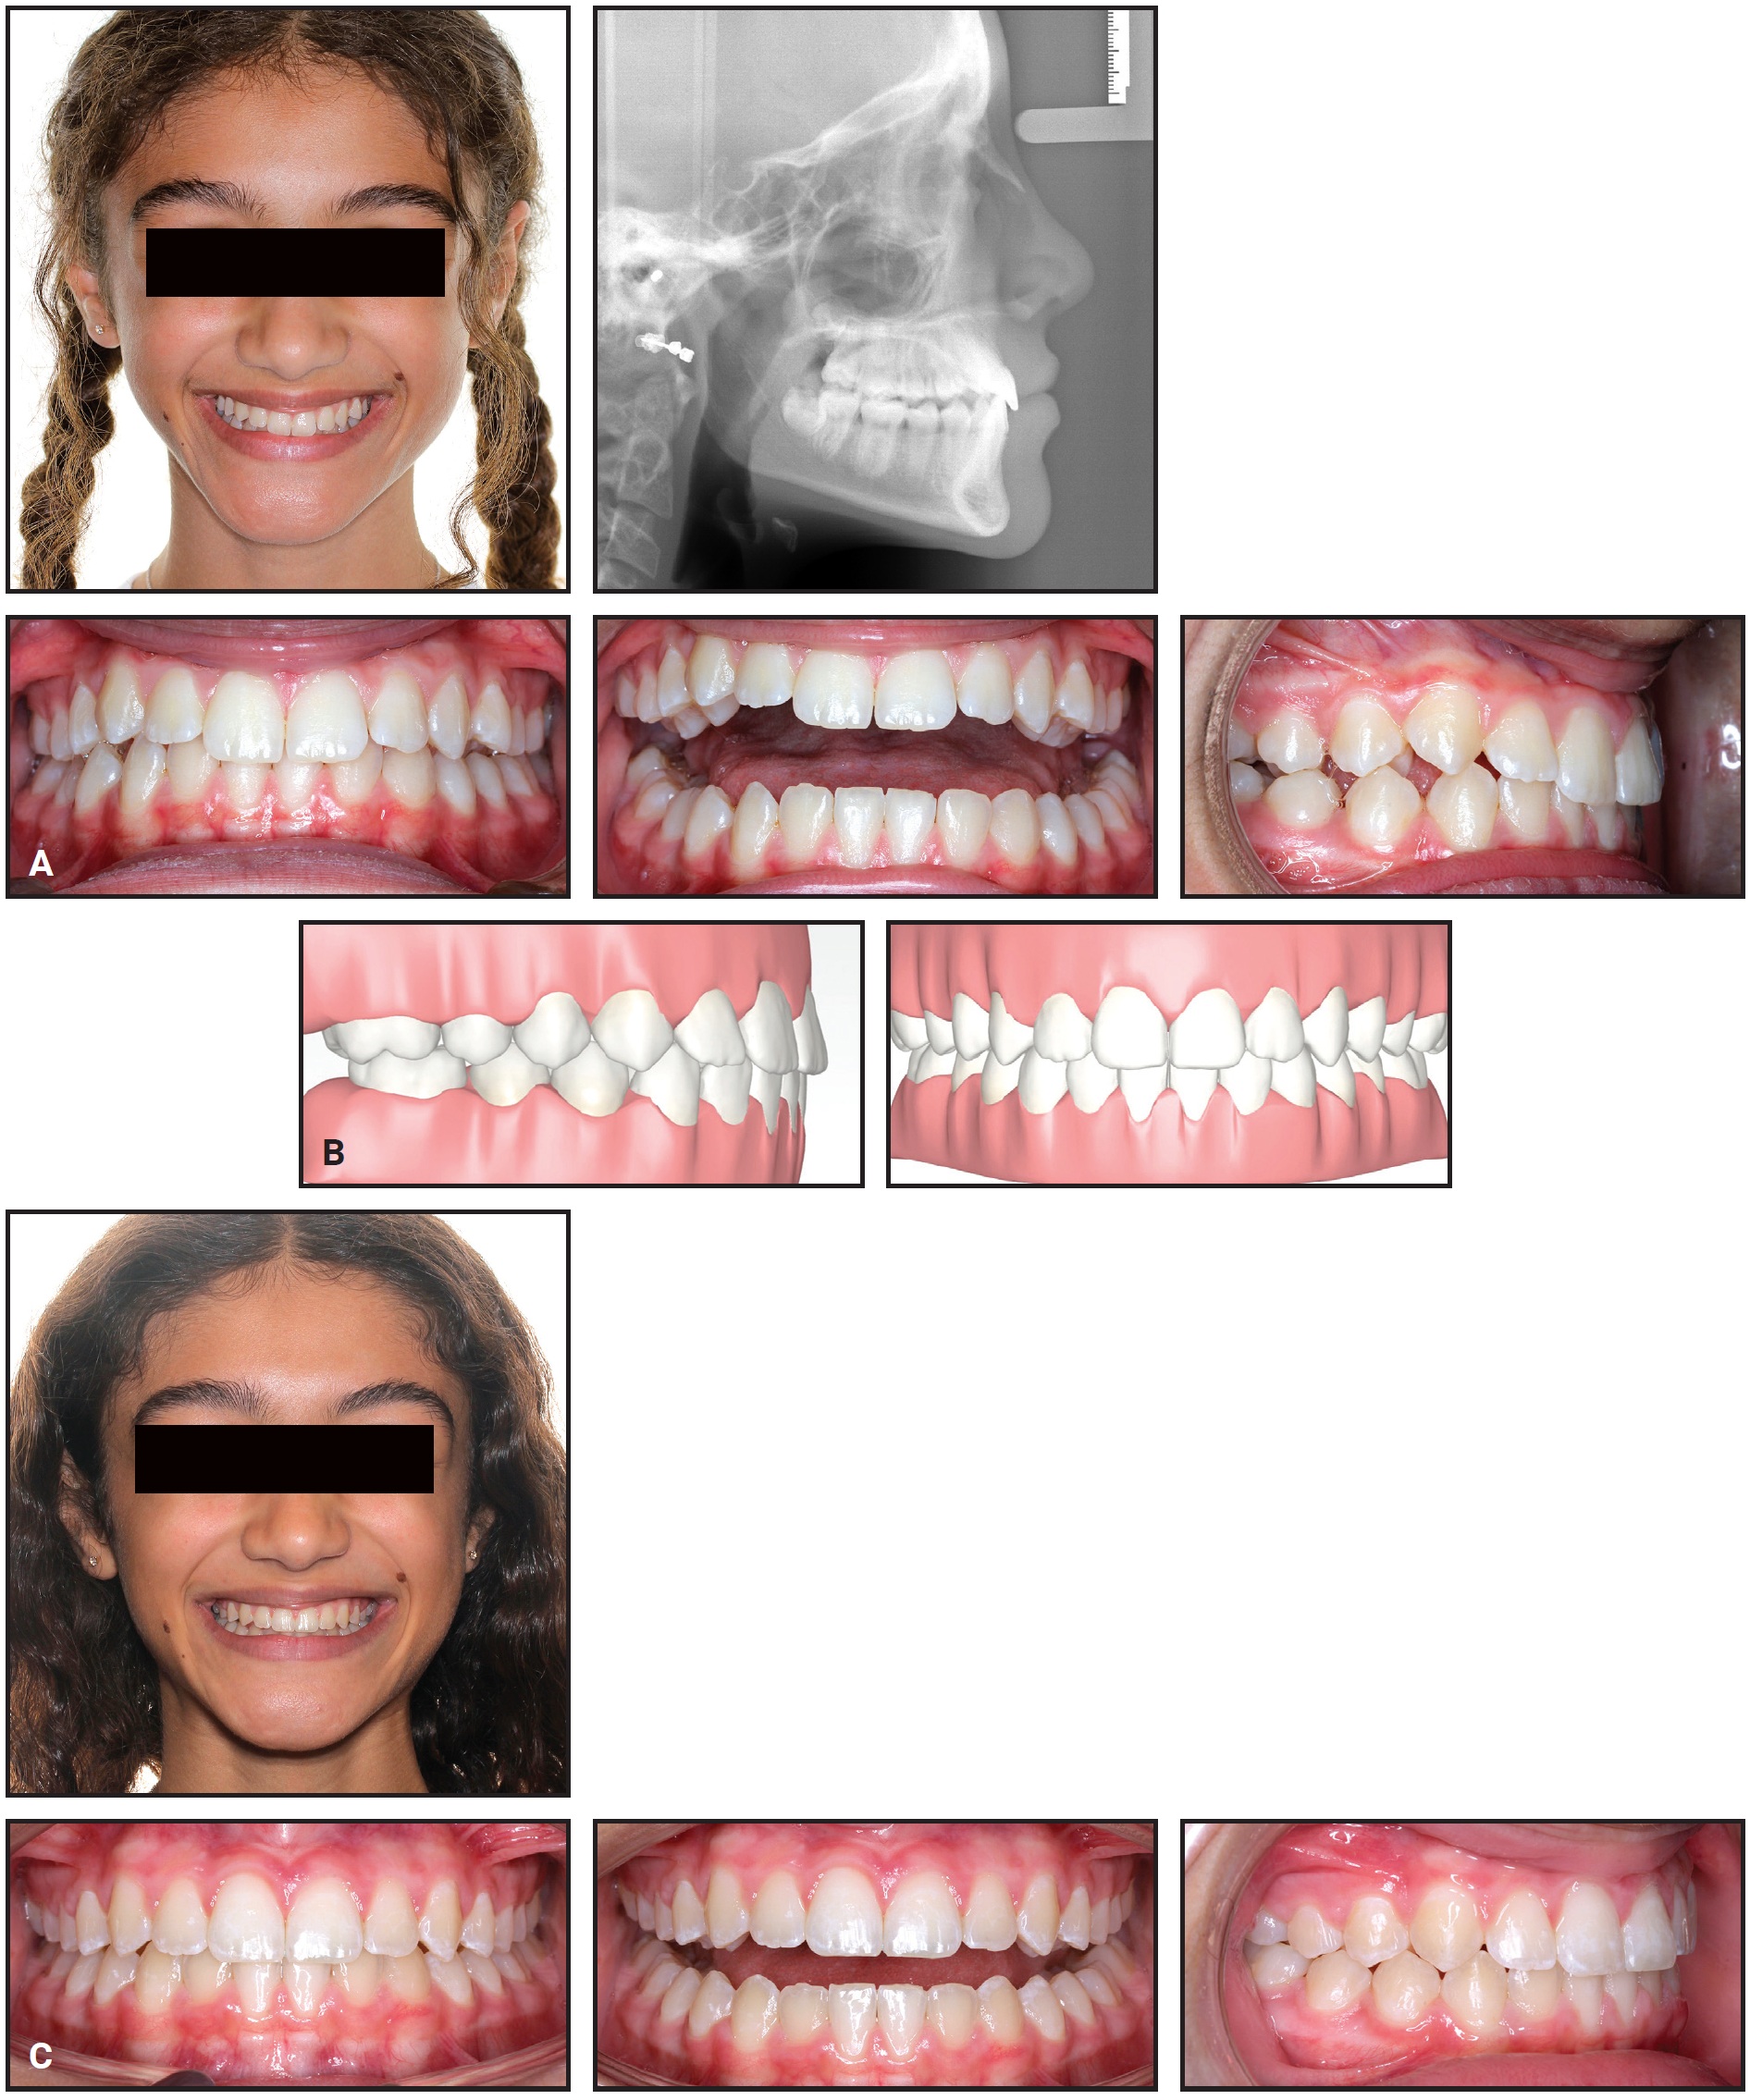
Fig. 5 A. 13-year-old female patient with buccally inclined maxillary premolar crowns and acceptable maxillary incisor torque before treatment. B. LightPlan setup showing correction of maxillary posterior torque and maintenance of anterior torque. C. Patient after 11 months of treatment.
Slot Customization
LightForce can be prescribed in three different slot sizes: .018", .020", or .022", depending on the philosophy of the doctor and the clinical needs of the patient. Additionally, bidimensional1 setups can be created from any combination of slot sizes (for example, .018"/.022" or .020"/.022"). A bidimensional setup, which can be useful in extraction cases or in cases with sensitive anchorage needs, is easy to implement with LightForce because the slot size is digitally programmed and no special bracket inventory is needed. The flexibility of LightPlan digital treatment planning allows even a single quadrant or individual tooth to be programmed as bidimensional.
Indirect Bonding System
Although indirect bonding has long been recognized as an accurate and efficient clinical orthodontic technique,2-4 mass adoption has been inhibited by technical issues such as the time needed for lab setup, or by clinical challenges such as bond failures caused by improper technique.5 LightForce has eliminated many of these problems by developing an advanced system in which the indirect bonding trays are 3D-printed from the same digital file as the brackets. This ensures an intimate fit of the brackets in the tray, accurate positioning of the brackets on the teeth (Fig. 6), and, consequently, excellent bond strength. The indirect bonding trays come preloaded with the LightForce brackets, ready for chairside application of bonding adhesive.
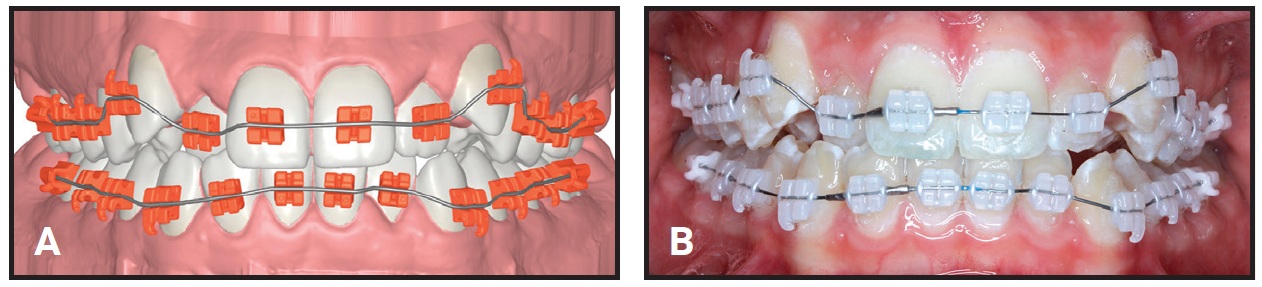
Fig. 6 Comparison of LightPlan setup (A) and actual indirect bonding of brackets (B).
Initial indirect bonding trays are arranged in sextants for ease of clinical management (Fig. 7A). Separate individual jigs are provided for indirect bonding of the second molars (Fig. 7B). A mesial extension of the second-molar tray to the first molar provides stability during bonding, but can easily be removed by breaking it along the seam between the first and second molars. This unique feature adds clinical flexibility in terms of scheduling: if the second molars are to be bonded at a subsequent visit, the mesial extensions should be removed to allow movement of the first molars. Each case comes with a set of backup brackets that are preloaded into individual jigs for accurate rebonding of loose brackets at any stage of treatment (Fig. 7C). These are connected in sextant “trees” and removed individually as needed.

Fig. 7 A. Indirect bonding tray sextant. B. Specialized indirect bonding tray for second molars. C. “Tree” of individual rebonding jigs, easily separated for individual application.
In addition, specialized trays are provided for indirect bonding of digitally designed custom bite turbos on the central incisors, canines, premolars, or molars (Fig. 8A). The individual rebonding jigs delivered with each case are designed to fit over the bite turbos (Fig. 8B).
Indirect Bonding Technique
After a thorough pumice prophylaxis, isolation is established, and the teeth are etched and primed. A universal primer is recommended for optimal bond strength. Either a filled flowable composite resin or a traditional adhesive paste can be used for bonding. In either case, it is important to ensure that the bonding material is engaged into the mechanical undercuts of the bracket bases. Because of the intimate fit of the custom base to the tooth, only a small amount of adhesive is needed.

Fig. 8 A. Bite turbo tray for upper central incisors, filled with blue composite. B. Model showing some bite-turbo options: central incisors, canines, and first molars (also available for premolars and second molars). Individual bracket rebonding jigs are digitally designed to fit over bite turbos.
The posterior sextants are bonded first, followed by the anterior sextants and then the bite turbos. An initial cure is performed before removing the indirect bonding trays, and the final cure is done after the trays are removed from the mouth. Gentle pressure should be applied to each tray while curing to ensure it is well positioned. To bond the custom bite turbos, once the teeth are etched and primed, the wells of the bite turbo trays are filled with composite (Fig. 8A), and the curing is performed as with the other trays.
After the bonding is complete, the initial sextants can be discarded, but the set of individual rebonding jigs should be retained for indirect bonding of any loose brackets in the future. If an individual jig is used at any point, a replacement can be ordered from the LightForce website.
Clinical Management
To maximize the efficiency of the LightForce indirect bonding system, both arches (second molar to second molar) and bite turbos (if planned) should ideally be bonded at the initial visit (Fig. 9).
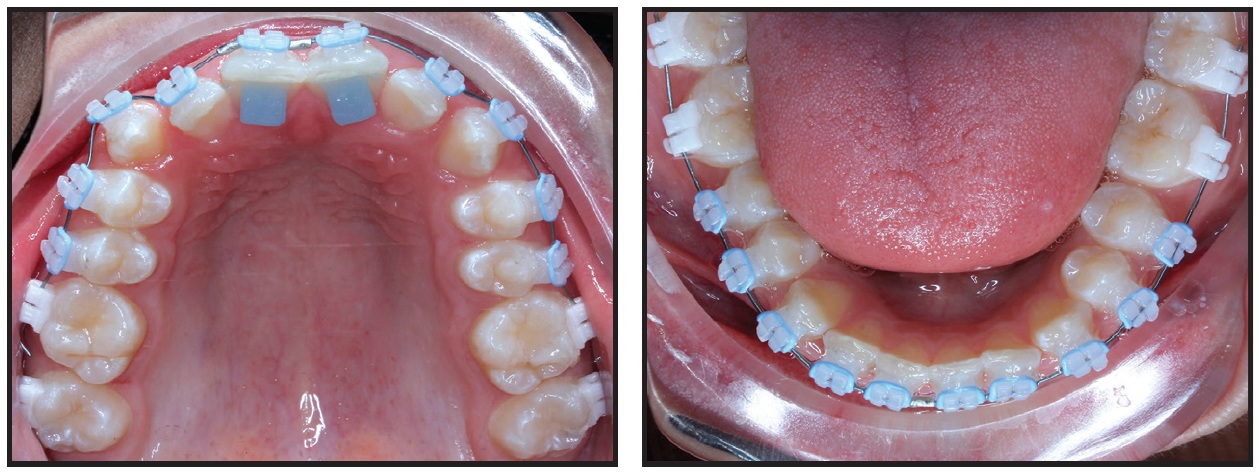
Fig. 9 Fully delegated indirect bonding of custom brackets (second molar to second molar) and bite turbos at initial visit.
Leveling and alignment are facilitated by the accuracy of the indirect bonding system, the fit of the custom bracket bases, and the ability of digitally planned bite turbos to help open the bite and reduce the forces of occlusion. The preprogrammed nature of the LightForce appliance lends itself to longer activation periods with nickel titanium archwires, permitting longer appointment intervals during this stage.
Effective alignment in the initial stage of treatment allows early placement of 3rd-order wires (typically square or rectangular nickel titanium) that will engage in the rectangular slots to activate the custom prescription. This, in turn, enables a smooth transition to the final working wires and an early start of active mechanics, such as space closure. Further clinical efficiency is gained through the reduction or elimination of traditional midtreatment activities, such as direct bonding of the second molars or manual bracket repositioning, that usually require additional visits and a significant amount of doctor time.
The finishing stage of LightForce treatment is shorter than with standard preadjusted brackets because of the reduced need for wirebending—a direct result of the accuracy of the custom prescription and custom bases. Digital planning of the marginal-ridge relationships and wire planes in the LightPlan software may also improve the occlusal fit and thus reduce the need for settling elastics. These clinical efficiencies can combine to save a significant amount of chairtime while reducing overall treatment time.6
Advanced Digital Features
Several other unique digital features enhance the capabilities of the LightForce system.
- Mirrored teeth: LightPlan software can design a bracket for an unerupted or partially erupted tooth by mirroring the contralateral erupted tooth (Fig. 10).
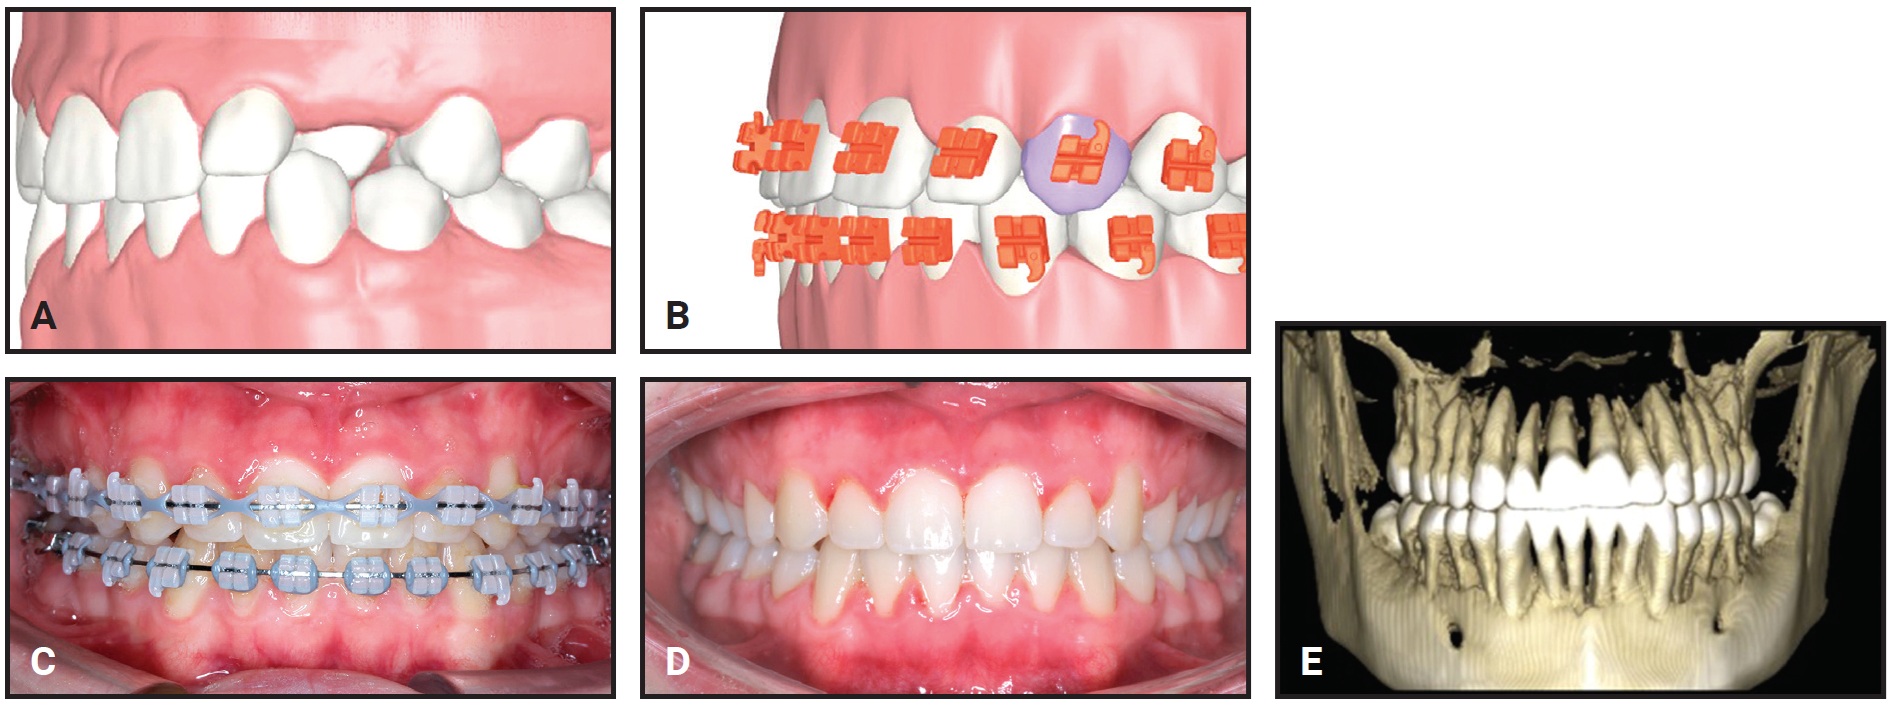
Fig. 10 Clinical example of mirroring feature in LightPlan. A. Insufficient tooth structure available to create bracket for palatally displaced upper left canine. B. Custom bracket created for upper left canine as mirror image of upper right canine. C. Progress after 16 months of treatment. D. After 19 months of treatment. E. Final ultra-low-dose cone-beam computed tomography (CBCT) confirming torque symmetry of upper canines and efficacy of mirroring technology.
- Gingival extensions: For a tooth with a short clinical crown—such as a second premolar or second molar in an adolescent patient—as much as .6mm of the gingiva can be digitally removed to allow for slight subgingival seating of the bracket (Fig. 11).
- Custom mini-tubes: These are available to permit bonding of undererupted or severely rotated first or second molars at the initial visit (Fig. 12).
- Mixed dentition and second-scan support: If treatment is started in the late mixed dentition, a second scan can be utilized to “pick up” the remaining permanent teeth after they erupt. Custom brackets are then designed within the context of the original treatment plan and approved by the doctor in LightPlan. This feature can also be used to fabricate a bracket for a late-erupting or impacted tooth, or for “digital repositioning” during treatment.
Case Report
A 21-year-old female presented with a Class III malocclusion characterized by an anterior edge-to-edge bite, Class III molar and canine relationships, a posterior open bite, upright maxillary incisors, and anterior crowding (Fig. 13). Previous orthodontic treatment involving premolar extractions had been completed in adolescence, and the patient reported having a normal occlusion until TMJ disc-plication surgery was needed to alleviate significant TMJ pain in her late teens. Although the disc surgery was successful in eliminating her pain, it did cause a change in the occlusion; her current goal was to reestablish a functional occlusion.

Fig. 11 Digital gingival extensions (light blue) allow indirect bonding of teeth with short clinical crowns.
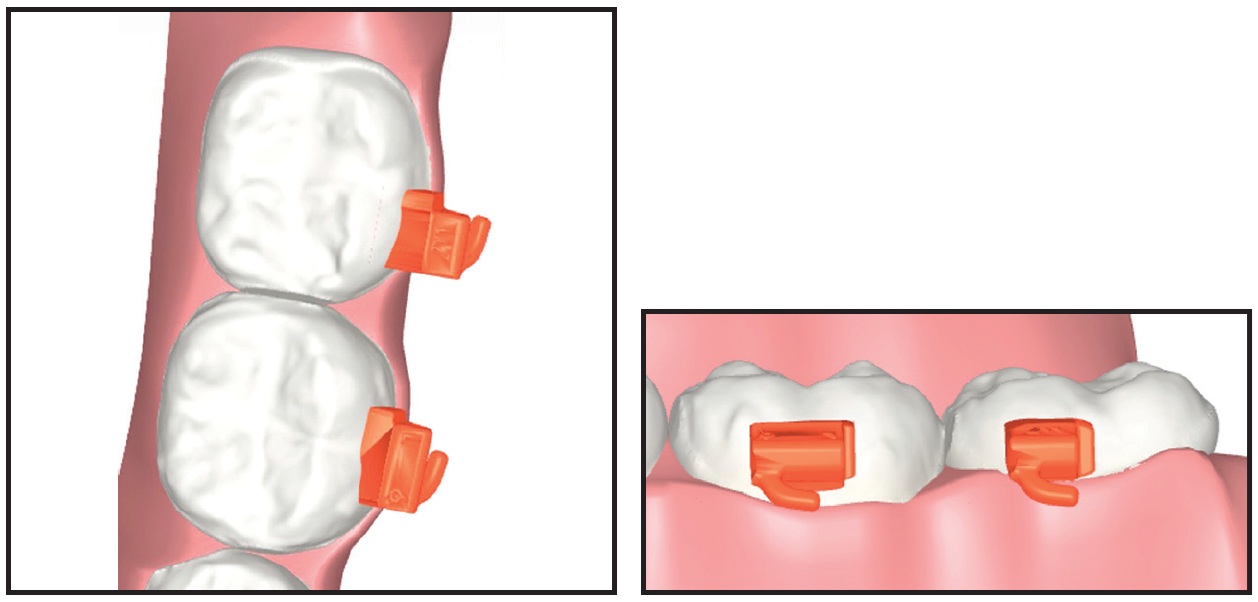
Fig. 12 Custom mini-tube placed on second molar with insufficient clinical crown exposure.
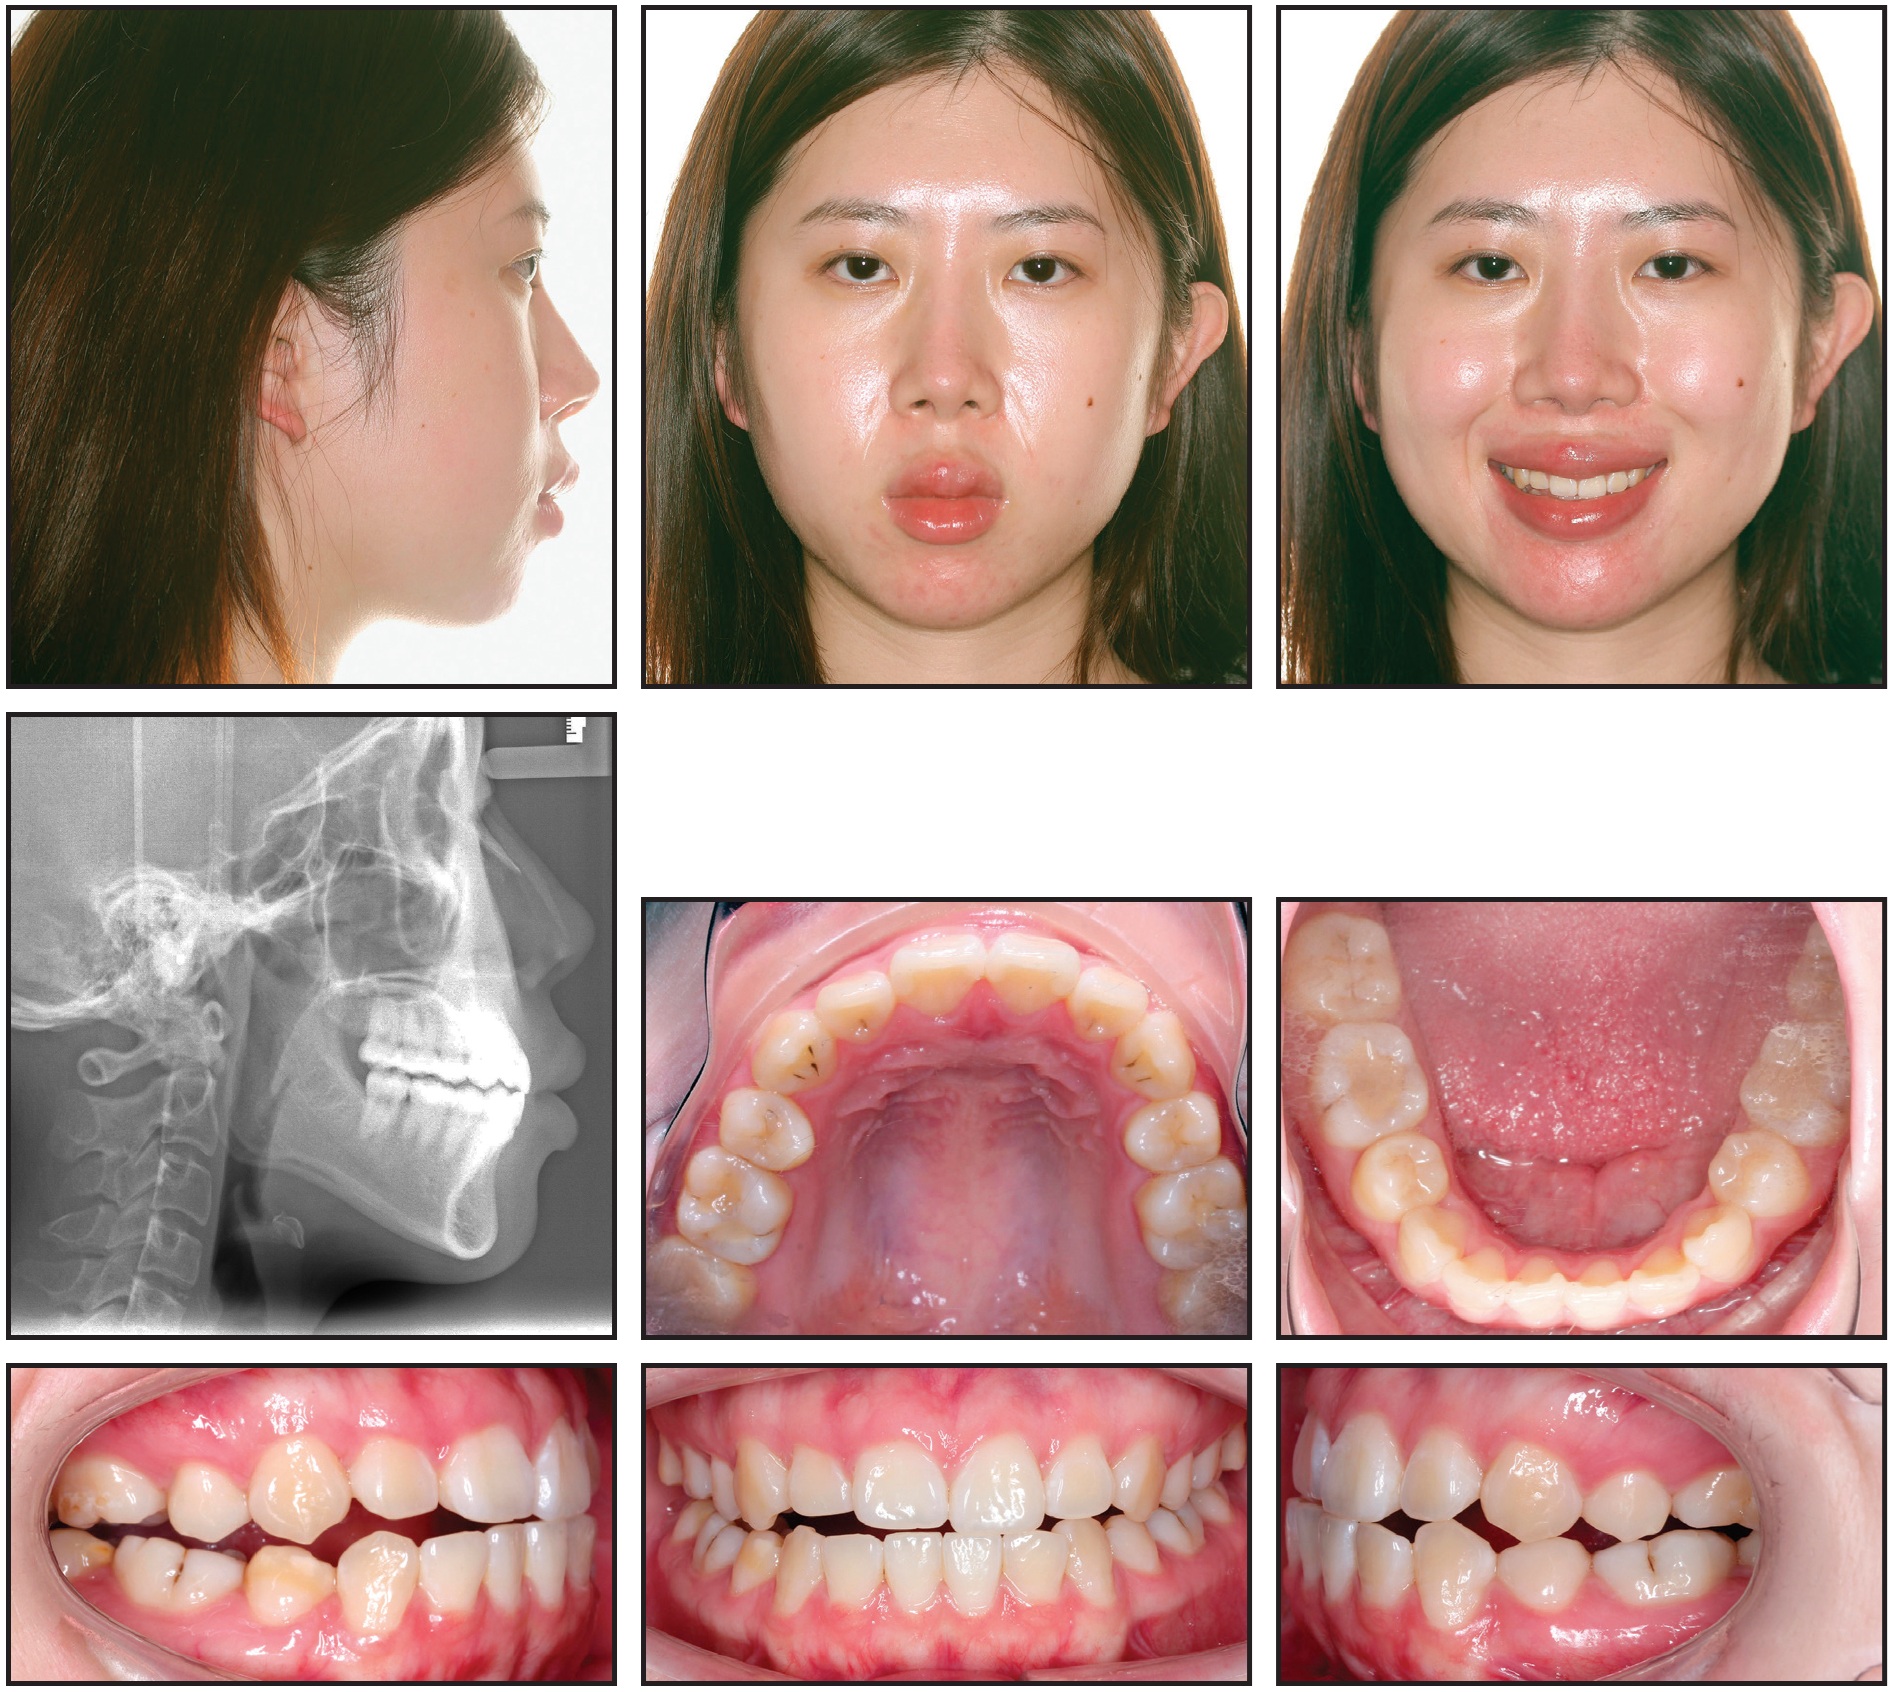
Fig. 13 21-year-old female patient with anterior edge-to-edge bite, Class III molar and canine relationships, posterior open bite, upright maxillary incisors, and anterior crowding after previous orthodontic treatment and TMJ discplication surgery.
Orthognathic surgery was discussed as an option, but the patient declined because of the perceived risks. Since extractions had already been performed during her first round of treatment, that was not presented as an option. Routine orthodontic mechanics with Class III elastics were contraindicated because any intermaxillary force could have resulted in loading of the TMJs and instability of the surgically corrected disc positions. The remaining treatment option was to use mandibular temporary anchorage devices (TADs) to distalize the lower dentition with intra-arch mechanics, in conjunction with custom fixed appliances to correct the torque, alignment, and occlusion. The patient consented to proceed with treatment using TADs and LightForce appliances.
A customized digital setup was critical to obtaining successful results. An occlusal jump was used to design the final occlusion in LightPlan, considering the expected occlusal changes as a result of the TAD-based mechanics (Fig. 14). Labial crown torque was added to the maxillary incisors to improve the anterior envelope of function and to avoid anterior interferences that could lead to posterior displacement of the mandible and pressure on the discs. Labial crown torque was also added to the mandibular incisors to offset retraction forces from the TADs. Special attention was paid to creating a symmetrical smile arc and improving the overall smile esthetics through careful digital planning.
Treatment was rendered using translucent LightForce brackets with .020" slots. All brackets from first molar to first molar were indirectly bonded at the start of treatment using LightForce 3D-printed indirect bonding trays (Fig. 15). Because custom LightForce second-molar brackets were not yet available, standard brackets were directly bonded at a routine adjustment visit.
Four months into treatment, an oral surgeon placed TADs in the mandibular retromolar areas and attached gold chains for easier access (Fig. 16). The TADs were activated by tying elastomeric thread from the gold chains to the first premolars. The mandibular teeth were coligated from first premolar to first premolar to avoid space opening during the retraction mechanics.
Final archwires were upper .019" × .025" G4** nickel titanium and lower .018" × .025" Smart Arch.*** Vertical elastics were worn from the upper canines to the lower canines and first premolars for the last four weeks of treatment.
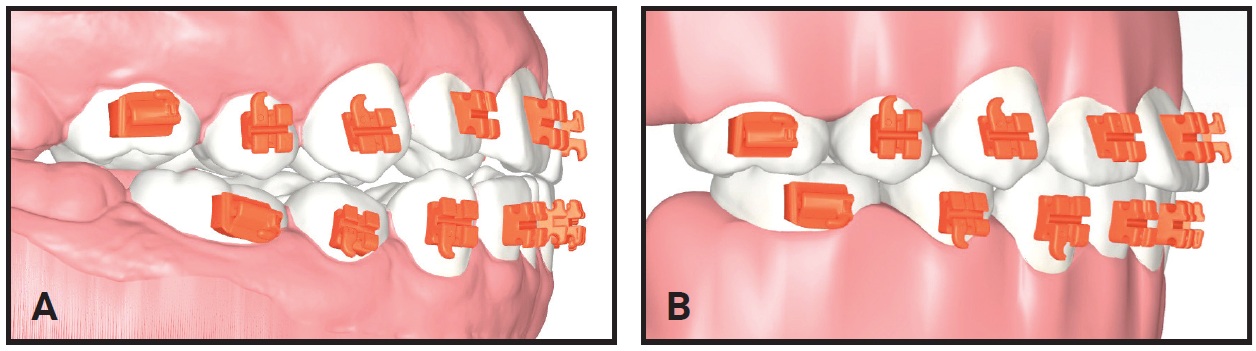
Fig. 14 Custom digital setup in LightPlan. A. Initial malocclusion. B. Final planned occlusion with occlusal jump to visualize occlusal interdigitation (note custom anterior torque prescription).
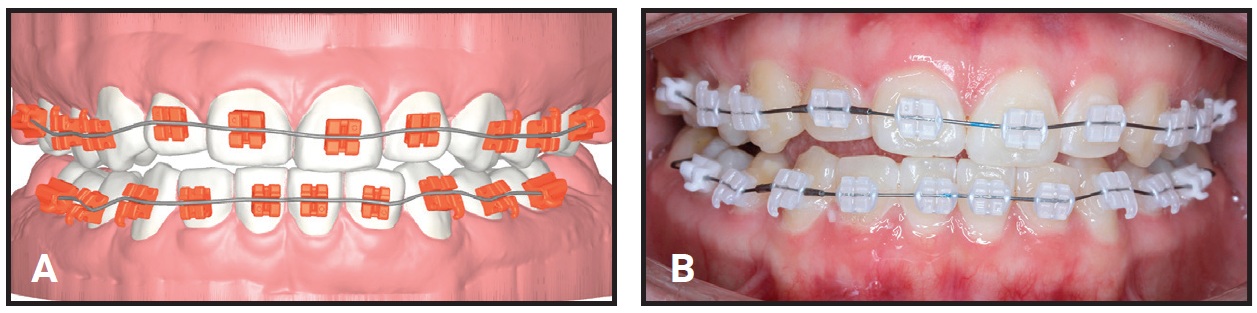
Fig. 15 A. Bracket setup on digital model. B. Accurate transfer of brackets to mouth with indirect bonding.
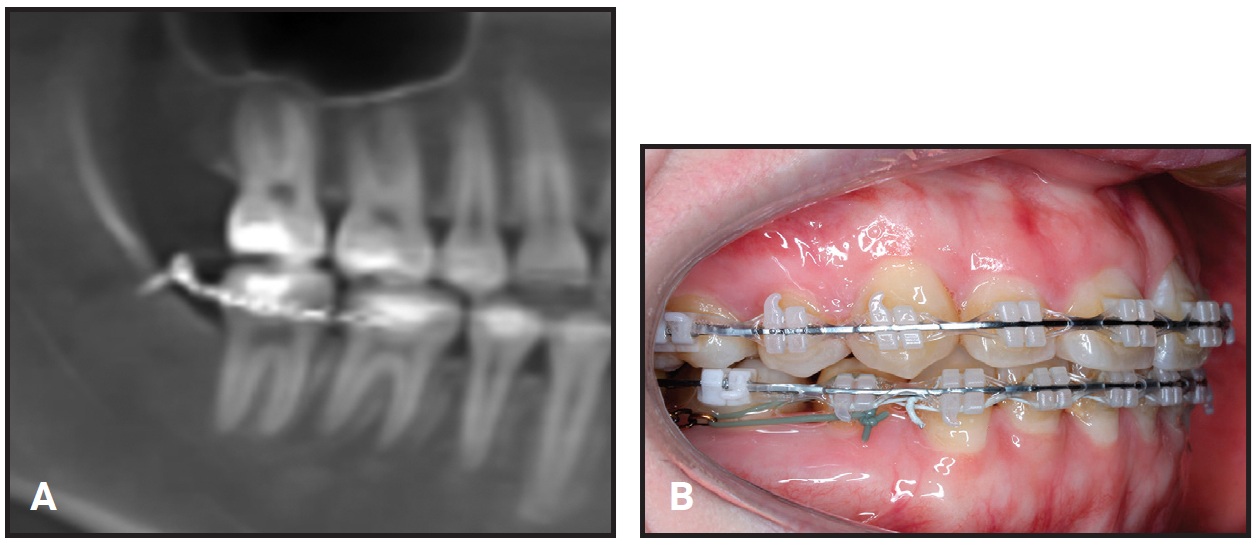
Fig. 16 A. After four months of treatment, gold chains connected to heads of retromolar temporary anchorage devices, and elastomeric thread attached from gold chains to first premolars. B. Clinical progress after five months of TAD-based mechanics.
Total treatment time was 11 months and three weeks, involving nine scheduled visits and one wire-maintenance visit (Fig. 17). No bracket repositioning or wirebending was performed, nor were there any loose or broken brackets throughout treatment.
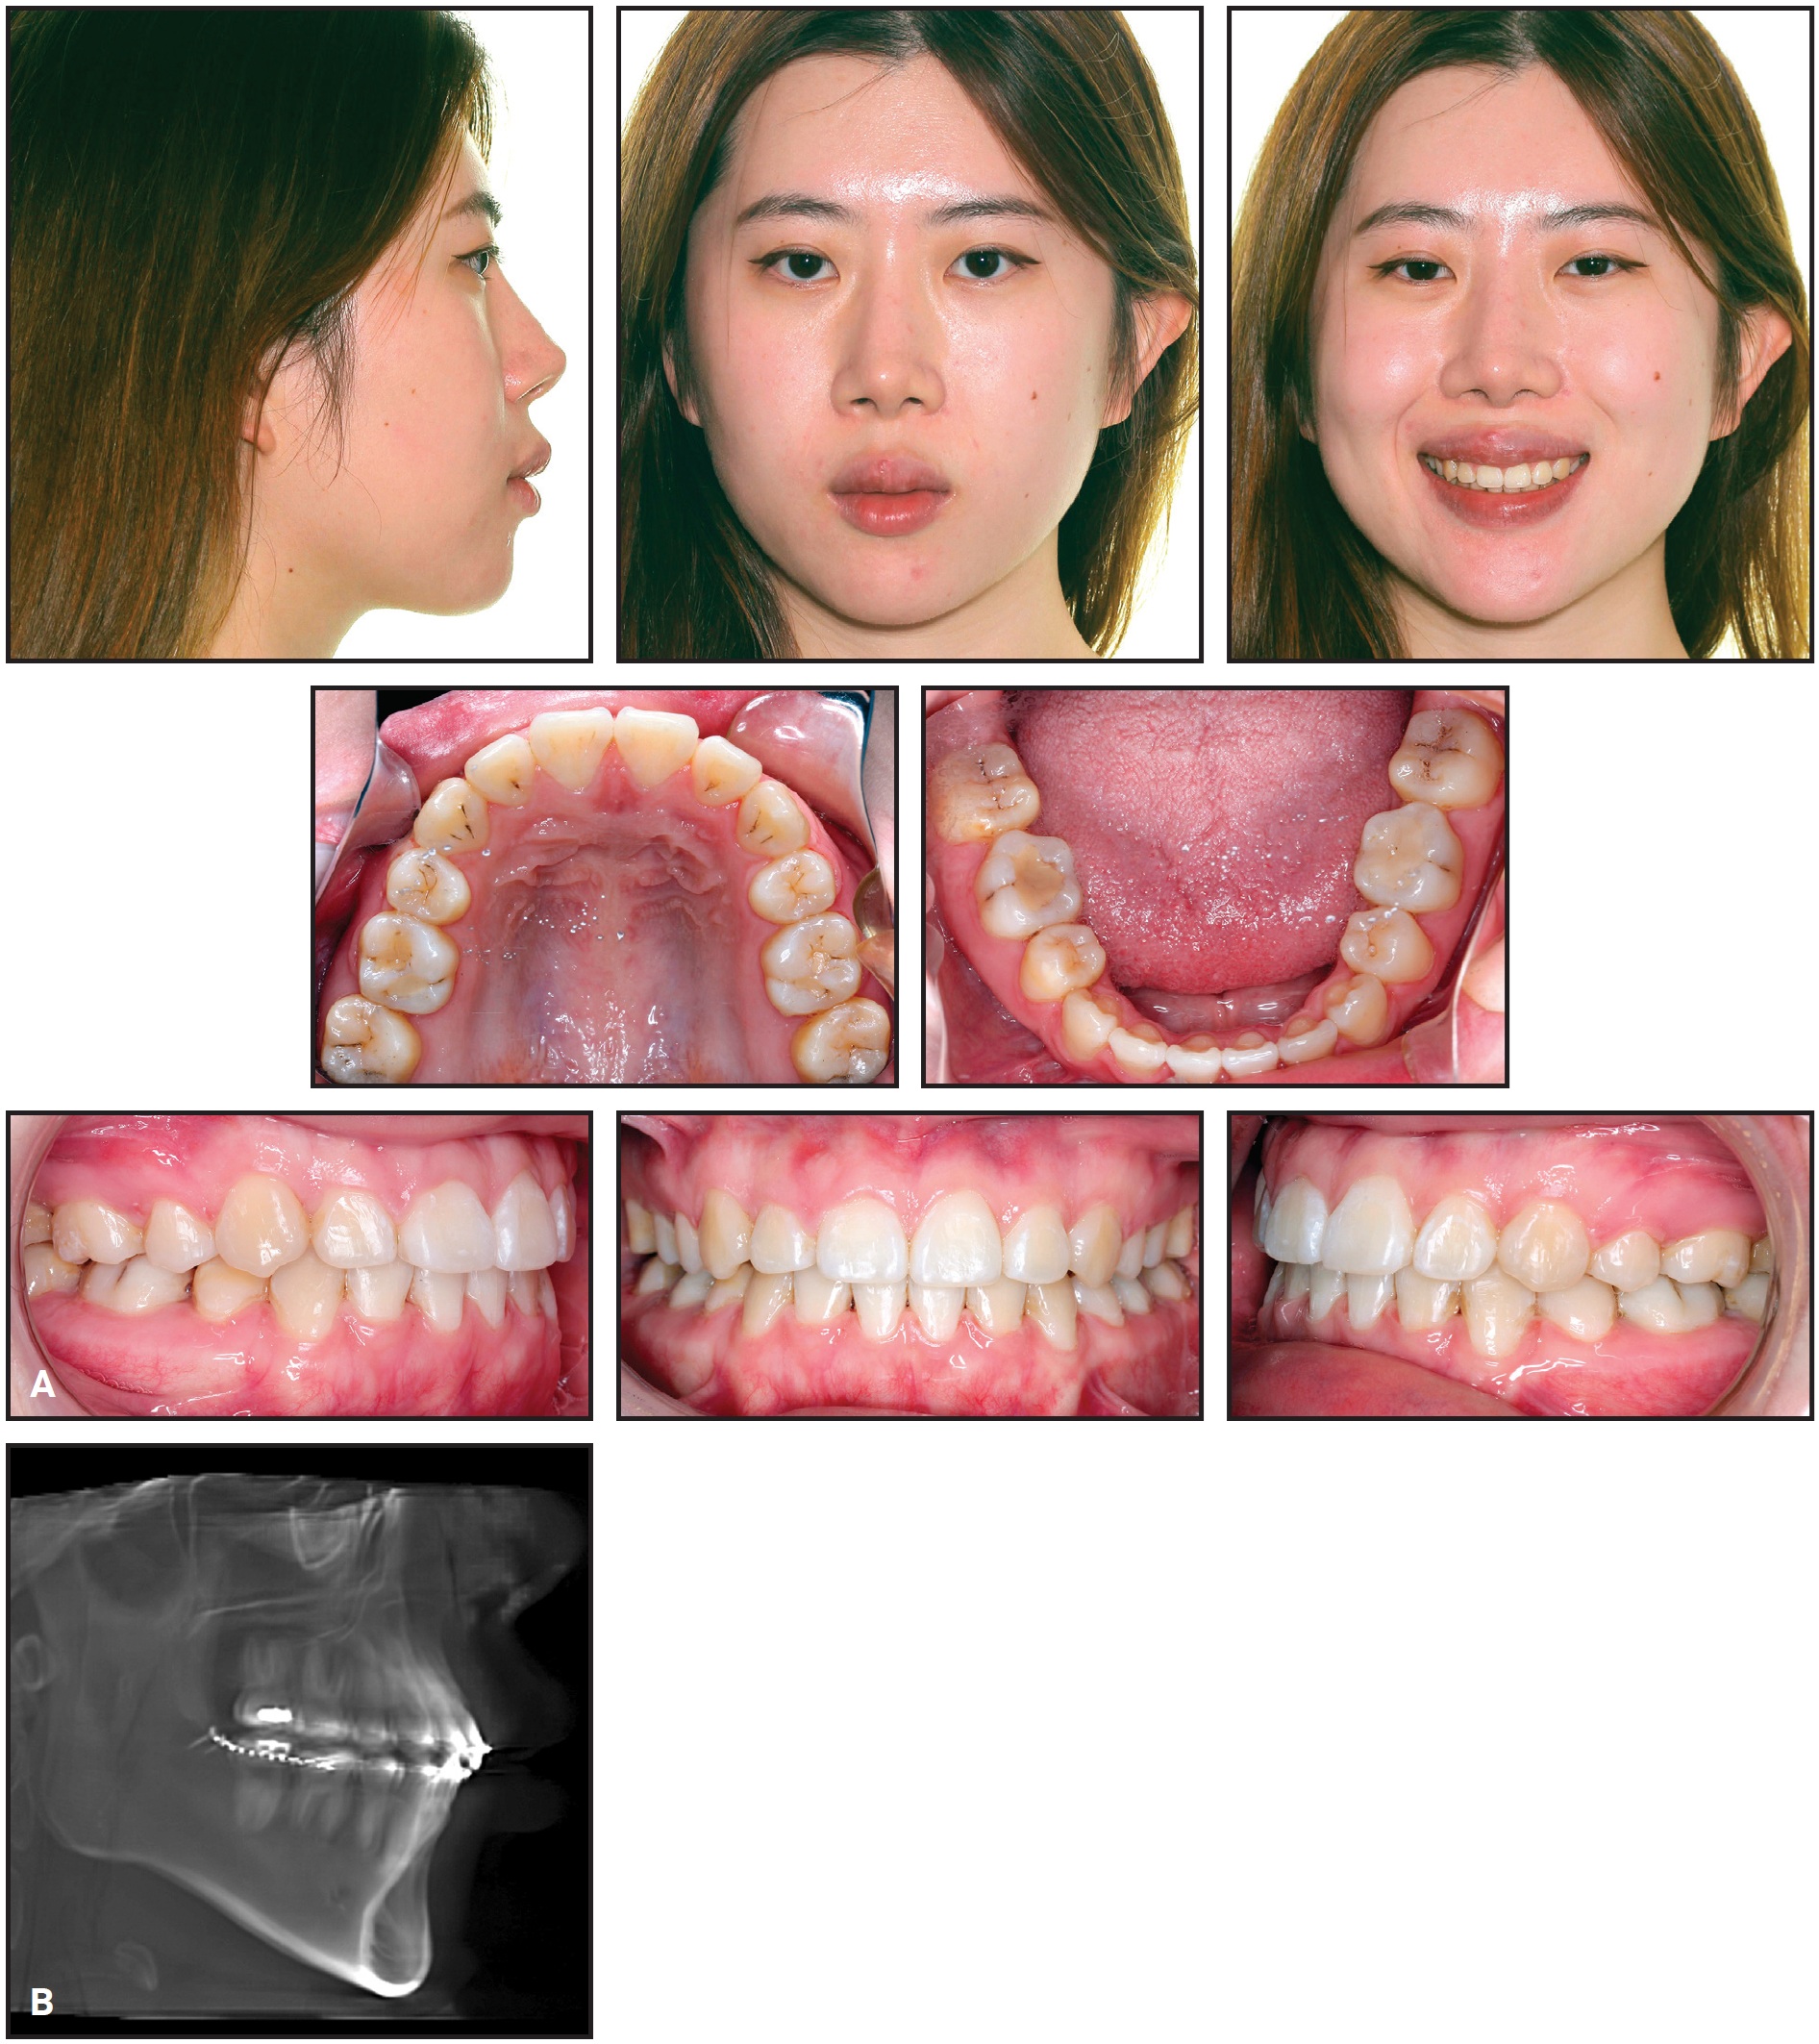
Fig. 17 A. Patient after 11 months and three weeks of treatment. B. CBCT taken just prior to debonding.
Discussion
A patient who undergoes a surgical temporomandibular disc-repositioning procedure can develop a Class III malocclusion with a posterior open bite after the reestablishment of proper disc positions and subsequent downward and forward displacement of the condyles. In the past, these occlusal sequelae have generally been treated with orthognathic surgery7 to avoid the use of Class III elastics that could load the joints and lead to further degeneration of the discs, condyles, or fossae.8 In the case described here, we used TADs for distalization of the mandibular dentition—a novel and conservative approach for managing the clinical sequelae of disc-repositioning procedures without orthognathic surgery. Further clinical research is needed to develop the appropriate scope of this procedure.
LightForce custom appliances were critically important in planning the final occlusion and ideal torque relationships, facilitating an excellent occlusal and esthetic outcome within a reasonable timeframe (Fig. 18). The ability to finish this case in nickel titanium wires and the complete elimination of archwire detailing and bracket repositioning highlight the ability of the LightForce system to manage complex malocclusions without the need for manual adjustments by the orthodontist.
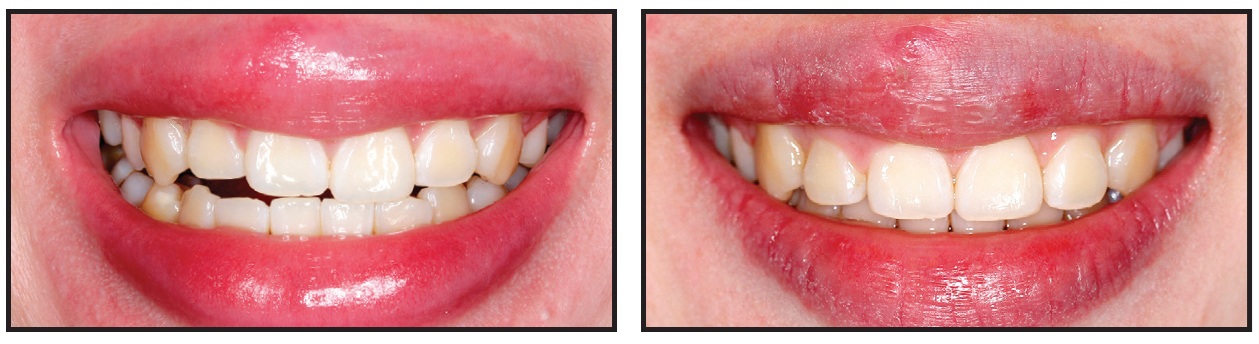
Fig. 18 Improvement in smile arc and symmetry.
Thanks to the accuracy of fully digital planning, individualized prescriptions, and 3D-printed brackets, as described in this series of articles, LightForce can function as a highly effective custom straightwire system. It marks the start of a new generation of 3D-printed fixed appliances that promise to achieve unprecedented levels of clinical efficiency.
ACKNOWLEDGEMENT: Thank you to Dr. Larry Wolford for reviewing the case report and providing references on the topic of TMJ disc surgery. Thank you to Dr. Lisa Alvetro for reviewing the manuscript.
FOOTNOTES
- *LightForce Orthodontics, Burlington, MA; www.lf.co.
REFERENCES
- 1. Gianelly, A.A.; Bednar, J.R.; and Dietz, V.S.: A bidimensional edgewise technique, J. Clin. Orthod. 19:418-421, 1985.
- 2. Panayi, N.C.; Tsolakis, A.I.; and Athanasiou, A.E.: Digital assessment of direct and virtual indirect bonding of orthodontic brackets: A clinical prospective cross-sectional comparative investigation, Int. Orthod. 18:714-721, 2020.
- 3. Sondhi, A.: Efficient and effective indirect bonding, Am. J. Orthod. 115:352-359, 1999.
- 4. Kalange, J.T.: Indirect bonding: A comprehensive review of the advantages, World J. Orthod. 5:301-307, 2004.
- 5. Geenty, J.P.: Indirect bonding, Austral. Orthod. J. 13:182-185, 1994.
- 6. Johnson, E.: Selecting custom torque prescriptions for the straight-wire appliance, Am. J. Orthod. 143:161-167, 2013.
- 7. Mehra, P. and Wolford, L.M.: The Mitek mini anchor for TMJ disc repositioning: Surgical technique and results, Int. J. Oral Maxillofac. Surg. 30:497-503. 2001.
- 8. Wolford, L.M.; Karras, S.; and Mehra, P.: Concomitant temporomandibular joint and orthognathic surgery: A preliminary report, J. Oral Maxillofac. Surg. 60:356-362, 2002.
-
 DR. WALDMAN
 -
 DR. BONEBREAK-JACKSON
Dr. Waldman is in the private practice of orthodontics, 8641 Wilshire Blvd., Suite 310, Beverly Hills, CA 90211; e-mail: alexwaldmandmd@gmail.com. Dr. Bonebreak-Jackson is an Adjunct Faculty, Department of Orthodontics, University of North Carolina at Chapel Hill, Chapel Hill, NC. Dr. Waldman is a Clinical Executive Board member and shareholder and Dr. Bonebreak-Jackson is the Director of Clinical Affairs, LightForce Orthodontics, Burlington, MA.