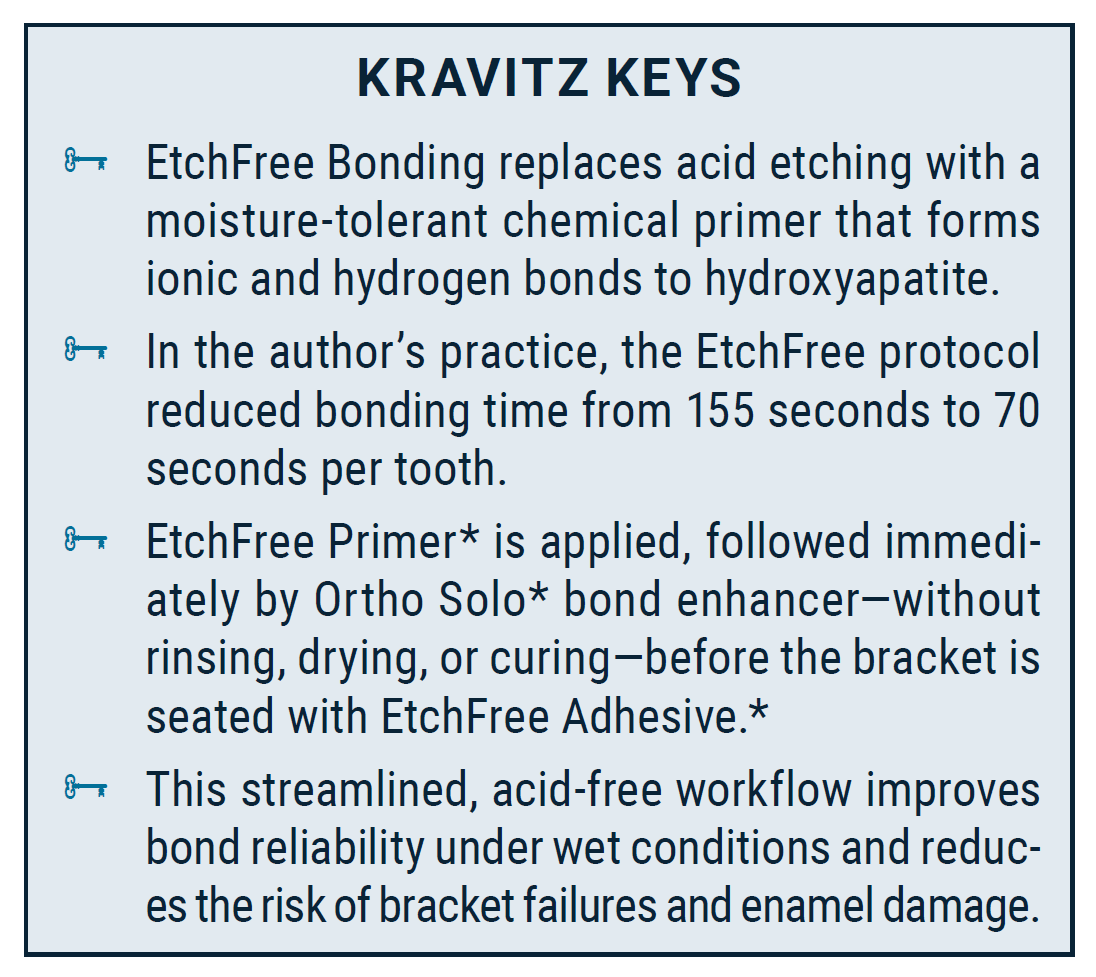
Ormco EtchFree Bonding in Orthodontic Practice
The advent of direct bonding in the 1970s revolutionized orthodontics by eliminating the need for bands on every tooth.1 The standard direct bonding protocol uses the “etch and rinse” method, in which phosphoric acid is applied to enamel to create microporosities for improved mechanical retention of brackets. While phosphoric acid etching promotes bond strength, it remains technique-sensitive and susceptible to operator mistakes, which may be multiplied in growing practices or those with high staff turnover.
Broken brackets, often caused by bonding errors or contamination, are a leading contributor to emergency visits. According to aggregate data from Gaidge Analytics, emergency repair visits accounted for 8% of all orthodontic appointments in 2024.2,3 Of these emergencies, 22% were caused by bonding problems, with moisture contamination identified as a common factor. Every broken bracket interrupts the schedule, places a burden on the team, and reduces profitability.3,4
Ormco’s EtchFree Bonding* system was designed to eliminate technique-sensitive steps such as etching and the associated risks of overetching or contamination, thus avoiding emergency visits while improving efficiency. This article provides a step-by-step workflow and a guide to troubleshooting common problems.
Challenges of Acid Etching
Conventional phosphoric acid etch-and-rinse techniques require precision, since overetching, incomplete etchant removal, saliva contamination, or undercuring can weaken bonds. Moreover, the use of acid etchants introduces potential safety concerns, such as enamel damage from incorrect application5 or chemical burns from accidental contact with skin or oral tissues.6 Repeated rebonding may compromise tooth structure over time, particularly in patients with poor oral hygiene,6 and excessive acid etching can increase the incidence of white-spot lesions.7
An alternative to traditional etching is to use a self-etching primer (SEP), which replaces the rinsing and drying steps of the conventional protocol with mechanical agitation to create enamel microporosities. One commonly used SEP is Transbond Plus Self Etching Light Cure Primer**—often called “L-Pop,” after a similar product—which is supplied in a single-use foil pack with a microbrush for mixing and application. L-Pop contains a phosphoric acid ester SEP that etches and primes in one step without water rinsing; it is scrubbed onto the enamel surface and air-thinned after placement.
Similar articles from the archive:
Despite the convenience of L-Pop and other SEPs, however, they are not moisture tolerant, and they risk causing mild chemical burns or temporary discoloration of the lips and gingiva. Moreover, they typically produce a shallower etch pattern than is seen with phosphoric acid. Clinical studies show that SEPs produce bond strengths that are significantly lower than those of conventional etch-and-rinse systems, albeit within clinically acceptable limits.8,9
The EtchFree Bonding System
In contrast to traditional and self-etching products, EtchFree Bonding entirely removes acid etching from the process. While etch-and-prime protocols involve 11 distinct steps, including multiple rinsing and drying phases that introduce the possibility of operator error, the EtchFree Bonding system consolidates the workflow into nine steps (Fig. 1). Like SEPs, it does not require rinsing with water. Advantages over SEPs include moisture tolerance, elimination of surface scrubbing or thinning, and a reduced risk of soft-tissue irritation. Due to the color and consistency of the adhesive, it is suitable for both aligner attachments and ceramic or metal brackets.
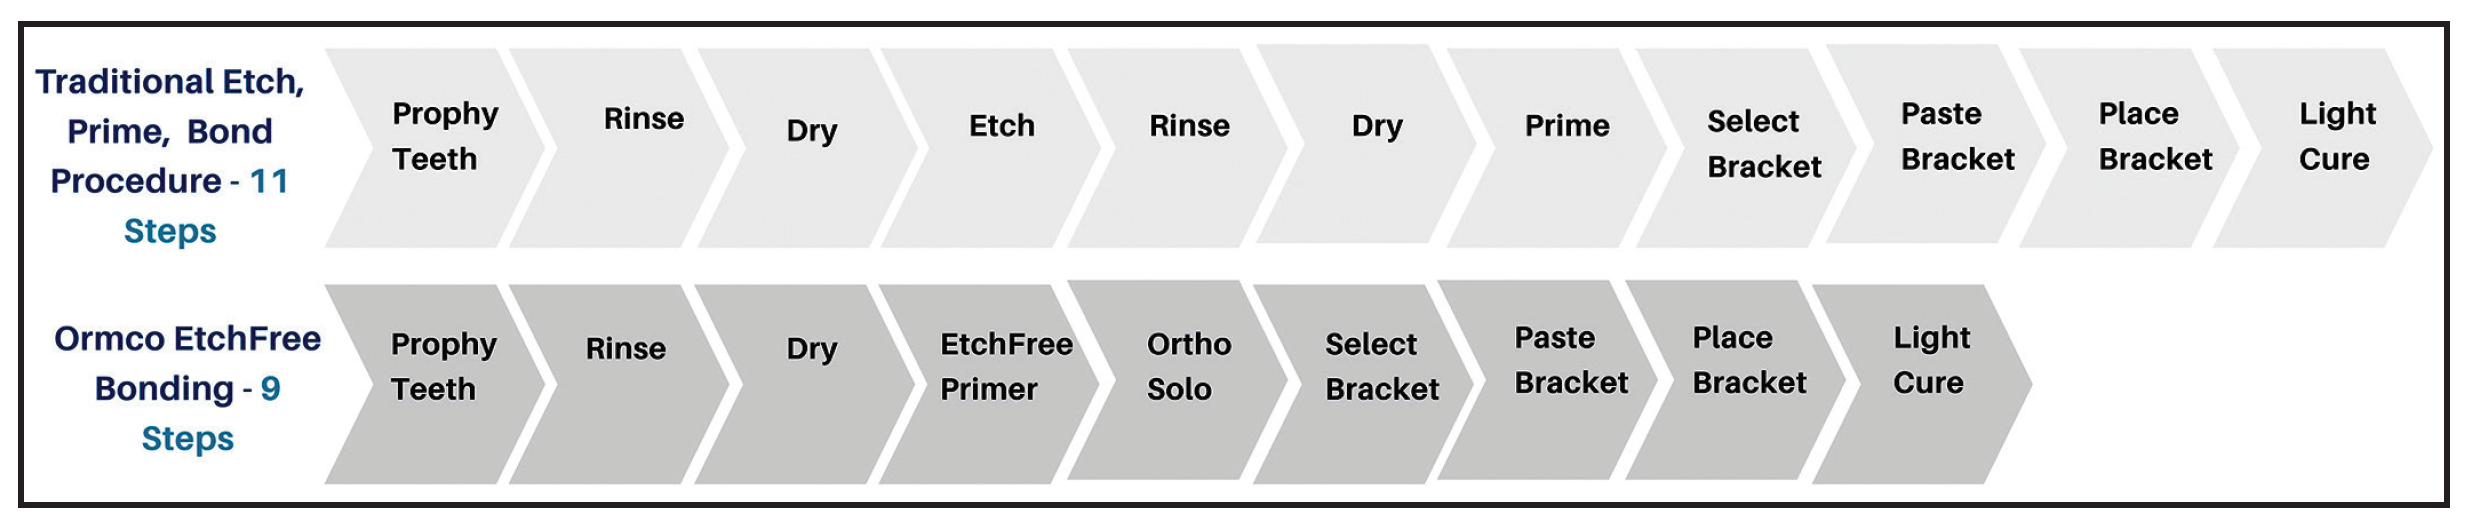
Fig. 1 Comparison of 11-step conventional etching and bonding process and nine-step Ormco EtchFree Bonding* system.
The EtchFree Bonding system includes EtchFree Bonding Primer, Ortho Solo bond enhancer, and EtchFree Adhesive (Fig. 2).
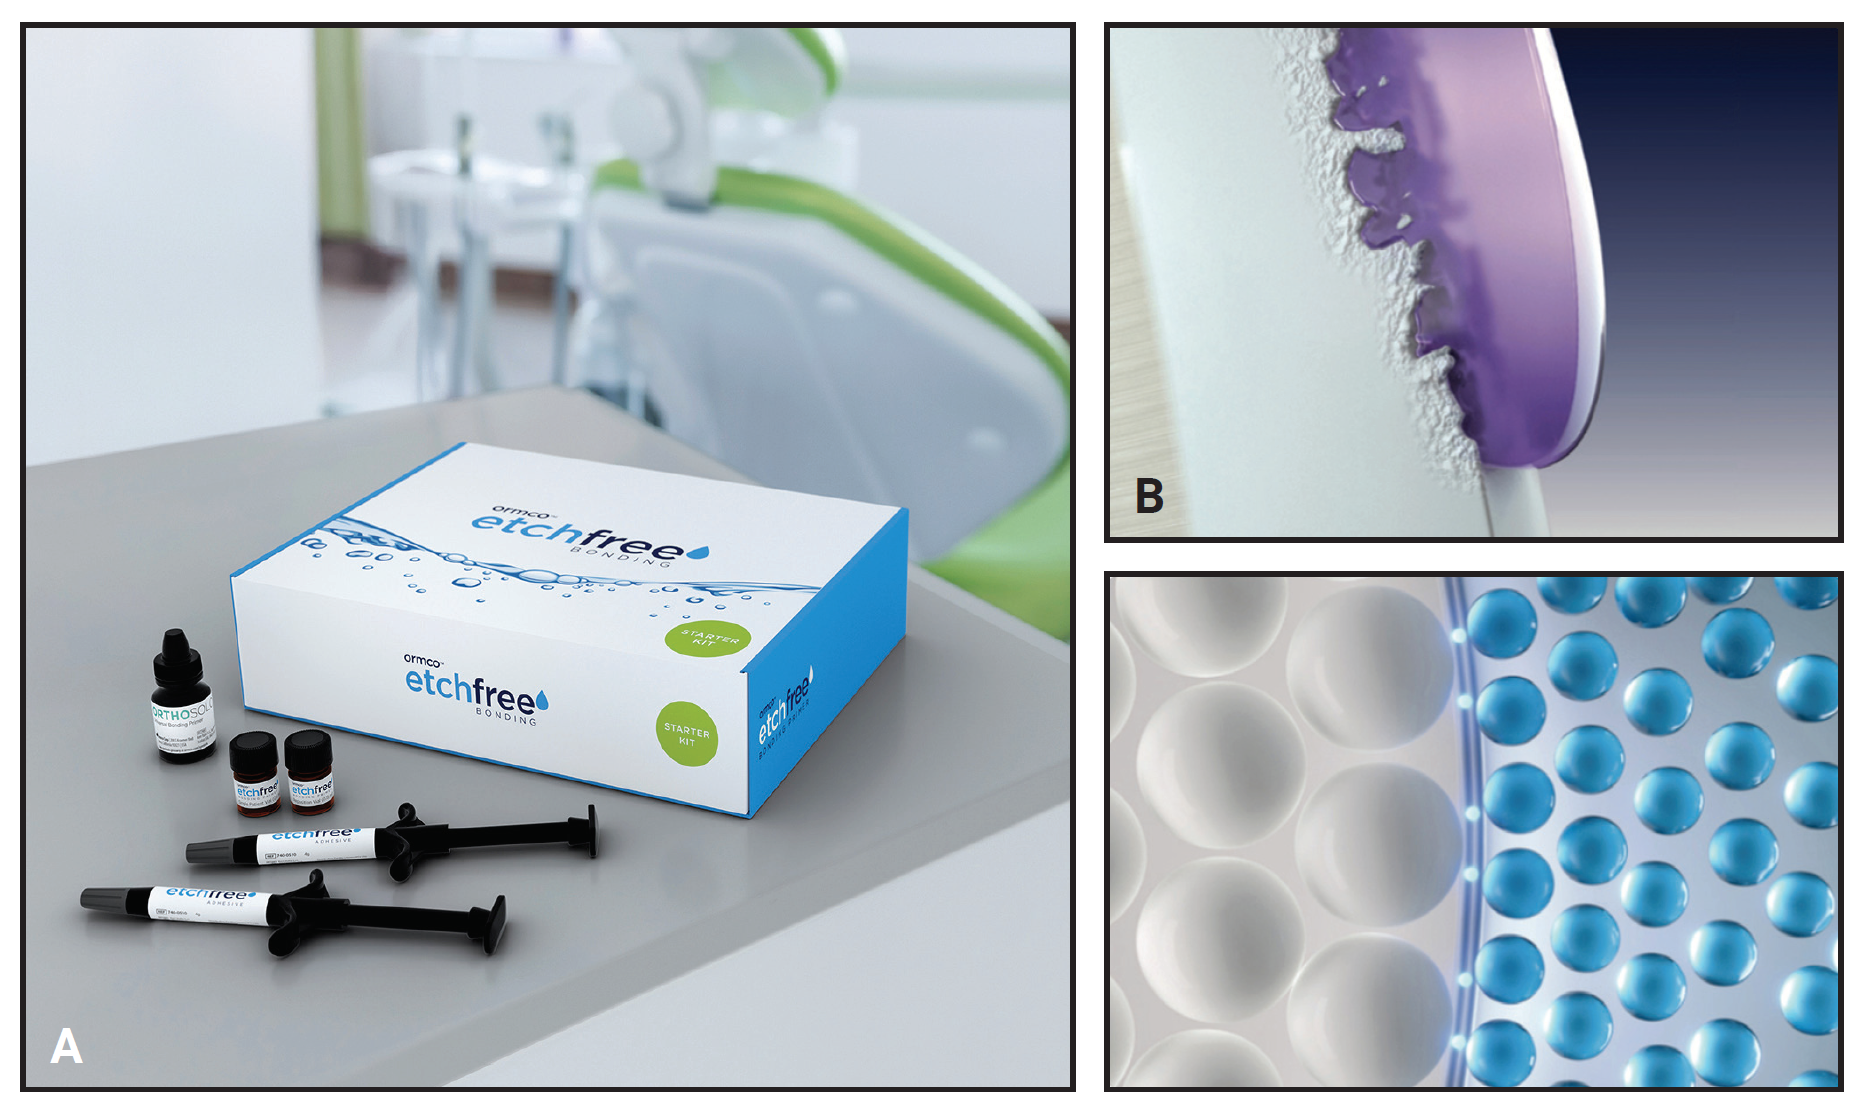
Fig. 2 A. Ormco EtchFree Bonding* kit, including EtchFree Bonding Primer,* Ortho Solo* bond enhancer, and EtchFree Adhesive.* B. Conventional priming etches enamel (top); EtchFree Bonding Primer forms ionic bonds with calcium in hydroxyapatite (bottom).
The chief difference between EtchFree Bonding and other systems is its primer chemistry. A traditional etchant dissolves the enamel surface to create a mechanical bond; in contrast, EtchFree Bonding Primer uses a proprietary monomer, based on proteins found in marine mussels, to chemically prepare the tooth surface. This monomer reacts with both itself and polymers in the primer to form an adhesive polymer matrix. Key chemical functional groups remain unreacted, enabling subsequent ionic bonding to the calcium atoms in hydroxyapatite (which makes up about 96% of tooth enamel by weight). Hydrogen bonds also form between the cross-linked polymers and hydroxyapatite. Because water does not inhibit adhesion between Bonding Primer and the enamel, the EtchFree system provides high bond strength (averaging 11.2MPa in company testing) in the presence of moisture, with fewer technique-sensitive variables than in other popular systems under wet conditions. In addition, because the primer is less corrosive than phosphoric acid, it causes less enamel trauma (Fig. 3).
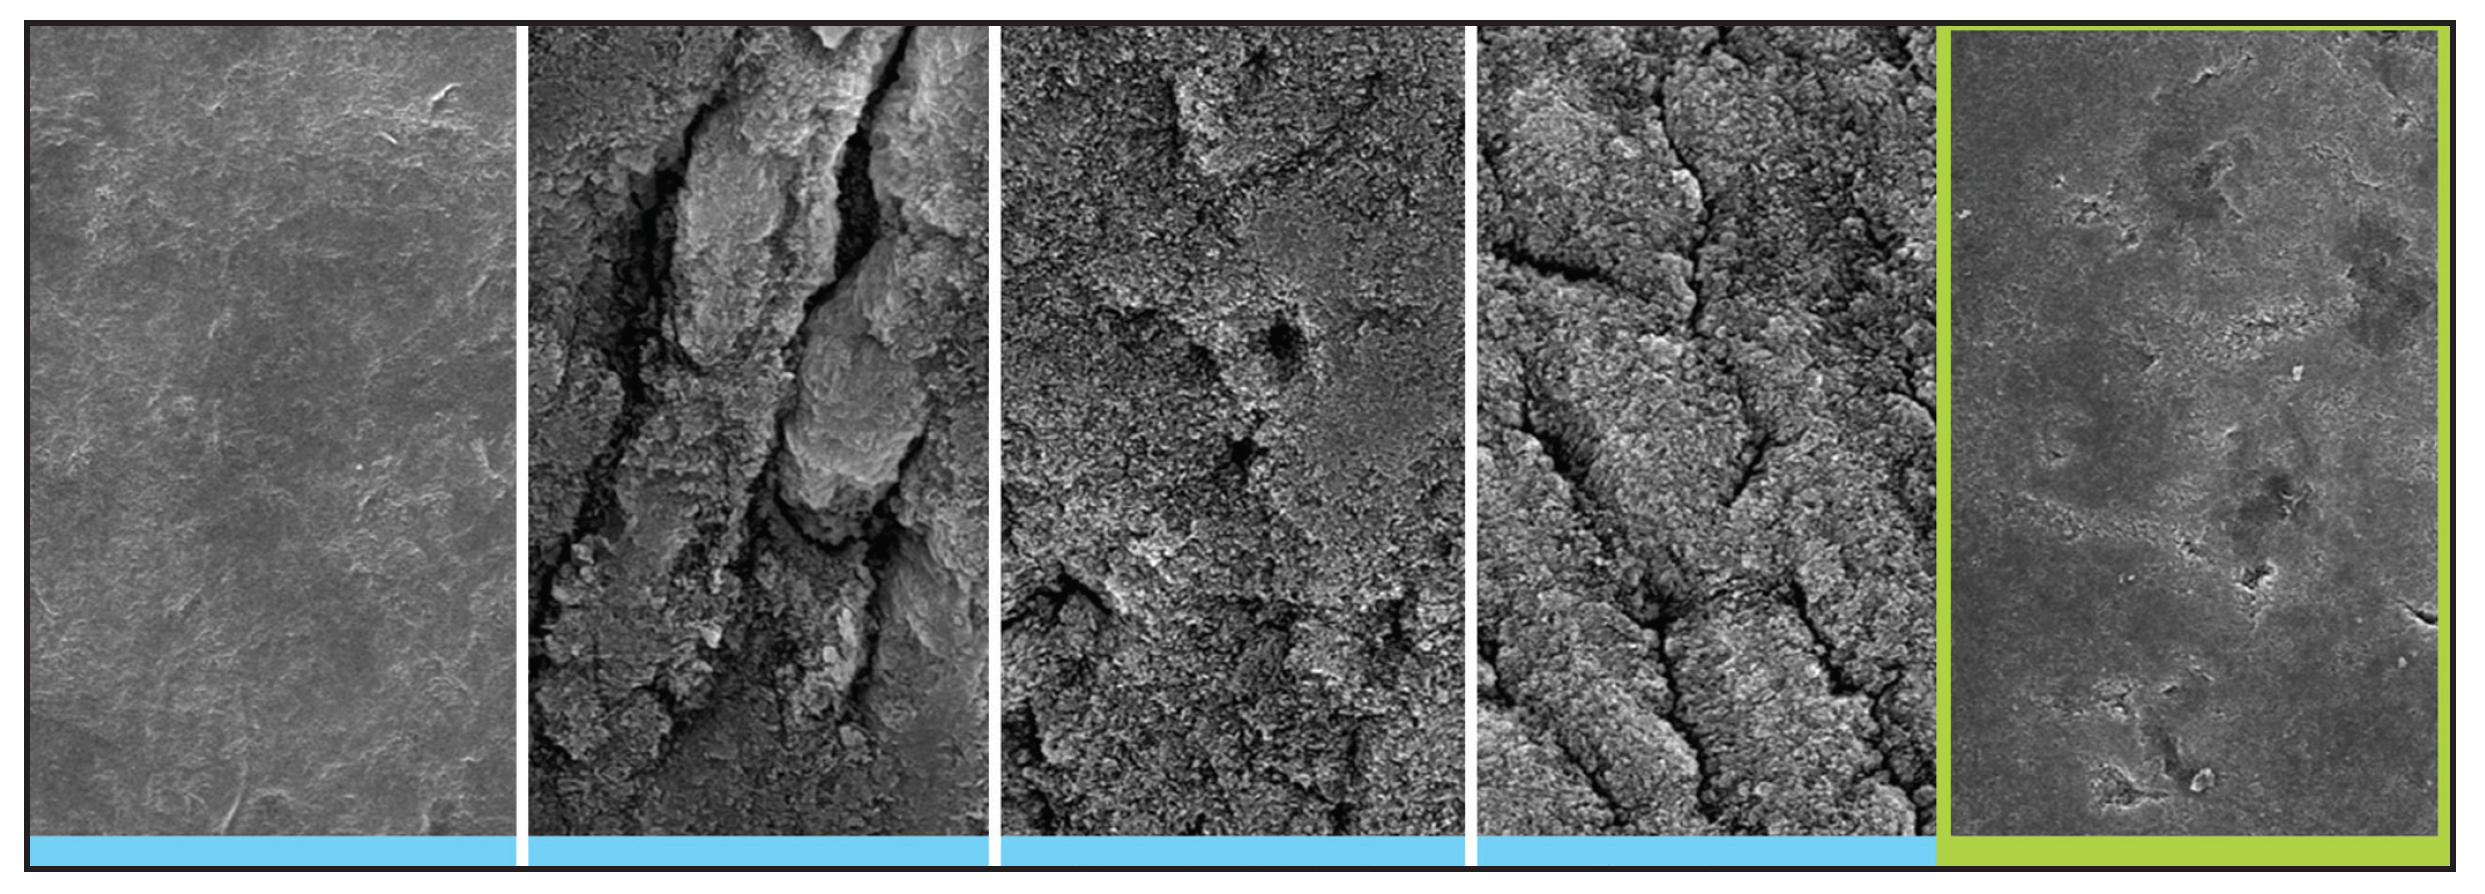
Fig. 3 Scanning electron microscope images of tooth enamel (5,000× magnification). From left: virgin enamel, traditional etchant after 30 seconds, Kerr*** self-etch product, Transbond Plus Self-Etching Primer,** EtchFree Primer.
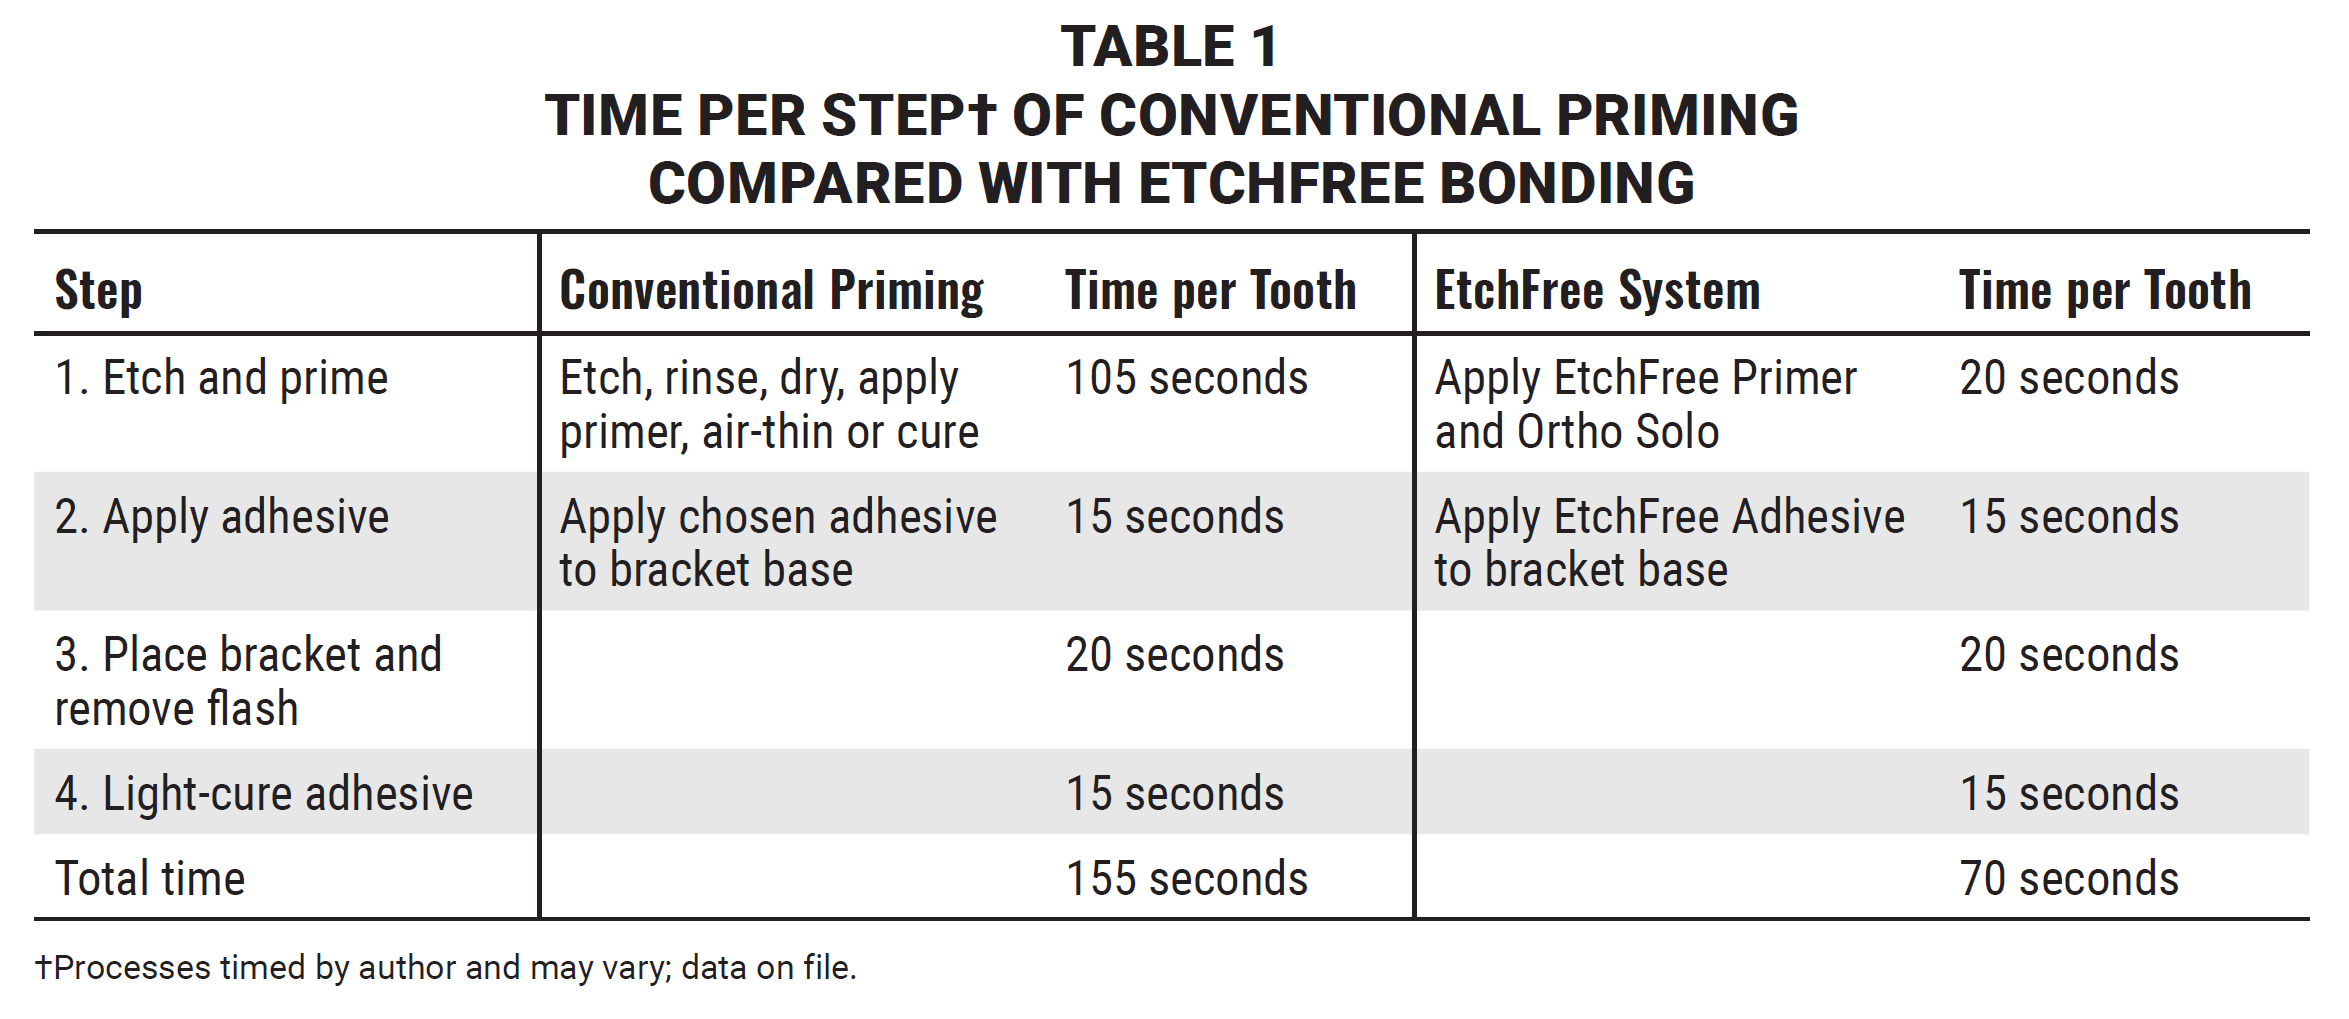
Eliminating the etching step from the workflow substantially reduces bonding time. To time the EtchFree Bonding procedure, my practice prepared 25 arches for bonding with the EtchFree Bonding system and compared them to a control prepared with conventional acid etching (Table 1). When measuring the time elapsed for bonding a single tooth, EtchFree Bonding took a mean 70 seconds, whereas the traditional etch-and-rinse process took 155 seconds per tooth. The difference is attributable to the initial steps: applying EtchFree primer and Ortho Solo, without rinsing or curing, takes 20 seconds on average, while the equivalent steps of the etch-and-prime workflow take 105 seconds. In clinical practice, I have found that using EtchFree saves about three minutes per arch during bonding compared to our previous method.
EtchFree Bonding Protocol
The EtchFree Bonding protocol (Fig. 4A) consists of the following steps:
1. Clean each tooth with pumice for 10 seconds to remove surface contaminants (Fig. 4B).
2. Rinse the teeth thoroughly with water to eliminate all pumice residue (Fig. 4C).
3. Blow-dry the enamel surface to ensure a clean, dry field.
4. Apply EtchFree Bonding Primer (Fig. 4D). First, dip a microbrush into the primer vial. Apply a thin, even layer to the tooth surface. Dip again and repeat for each additional tooth. Do not rinse, air-dry, or light-cure.
5. Apply Ortho Solo bond enhancer (Fig. 4E). Using a fresh microbrush, immediately apply a thin coat of Ortho Solo over the bonding primer. Do not let the primer dry before this step. No air-drying or light-curing is required.
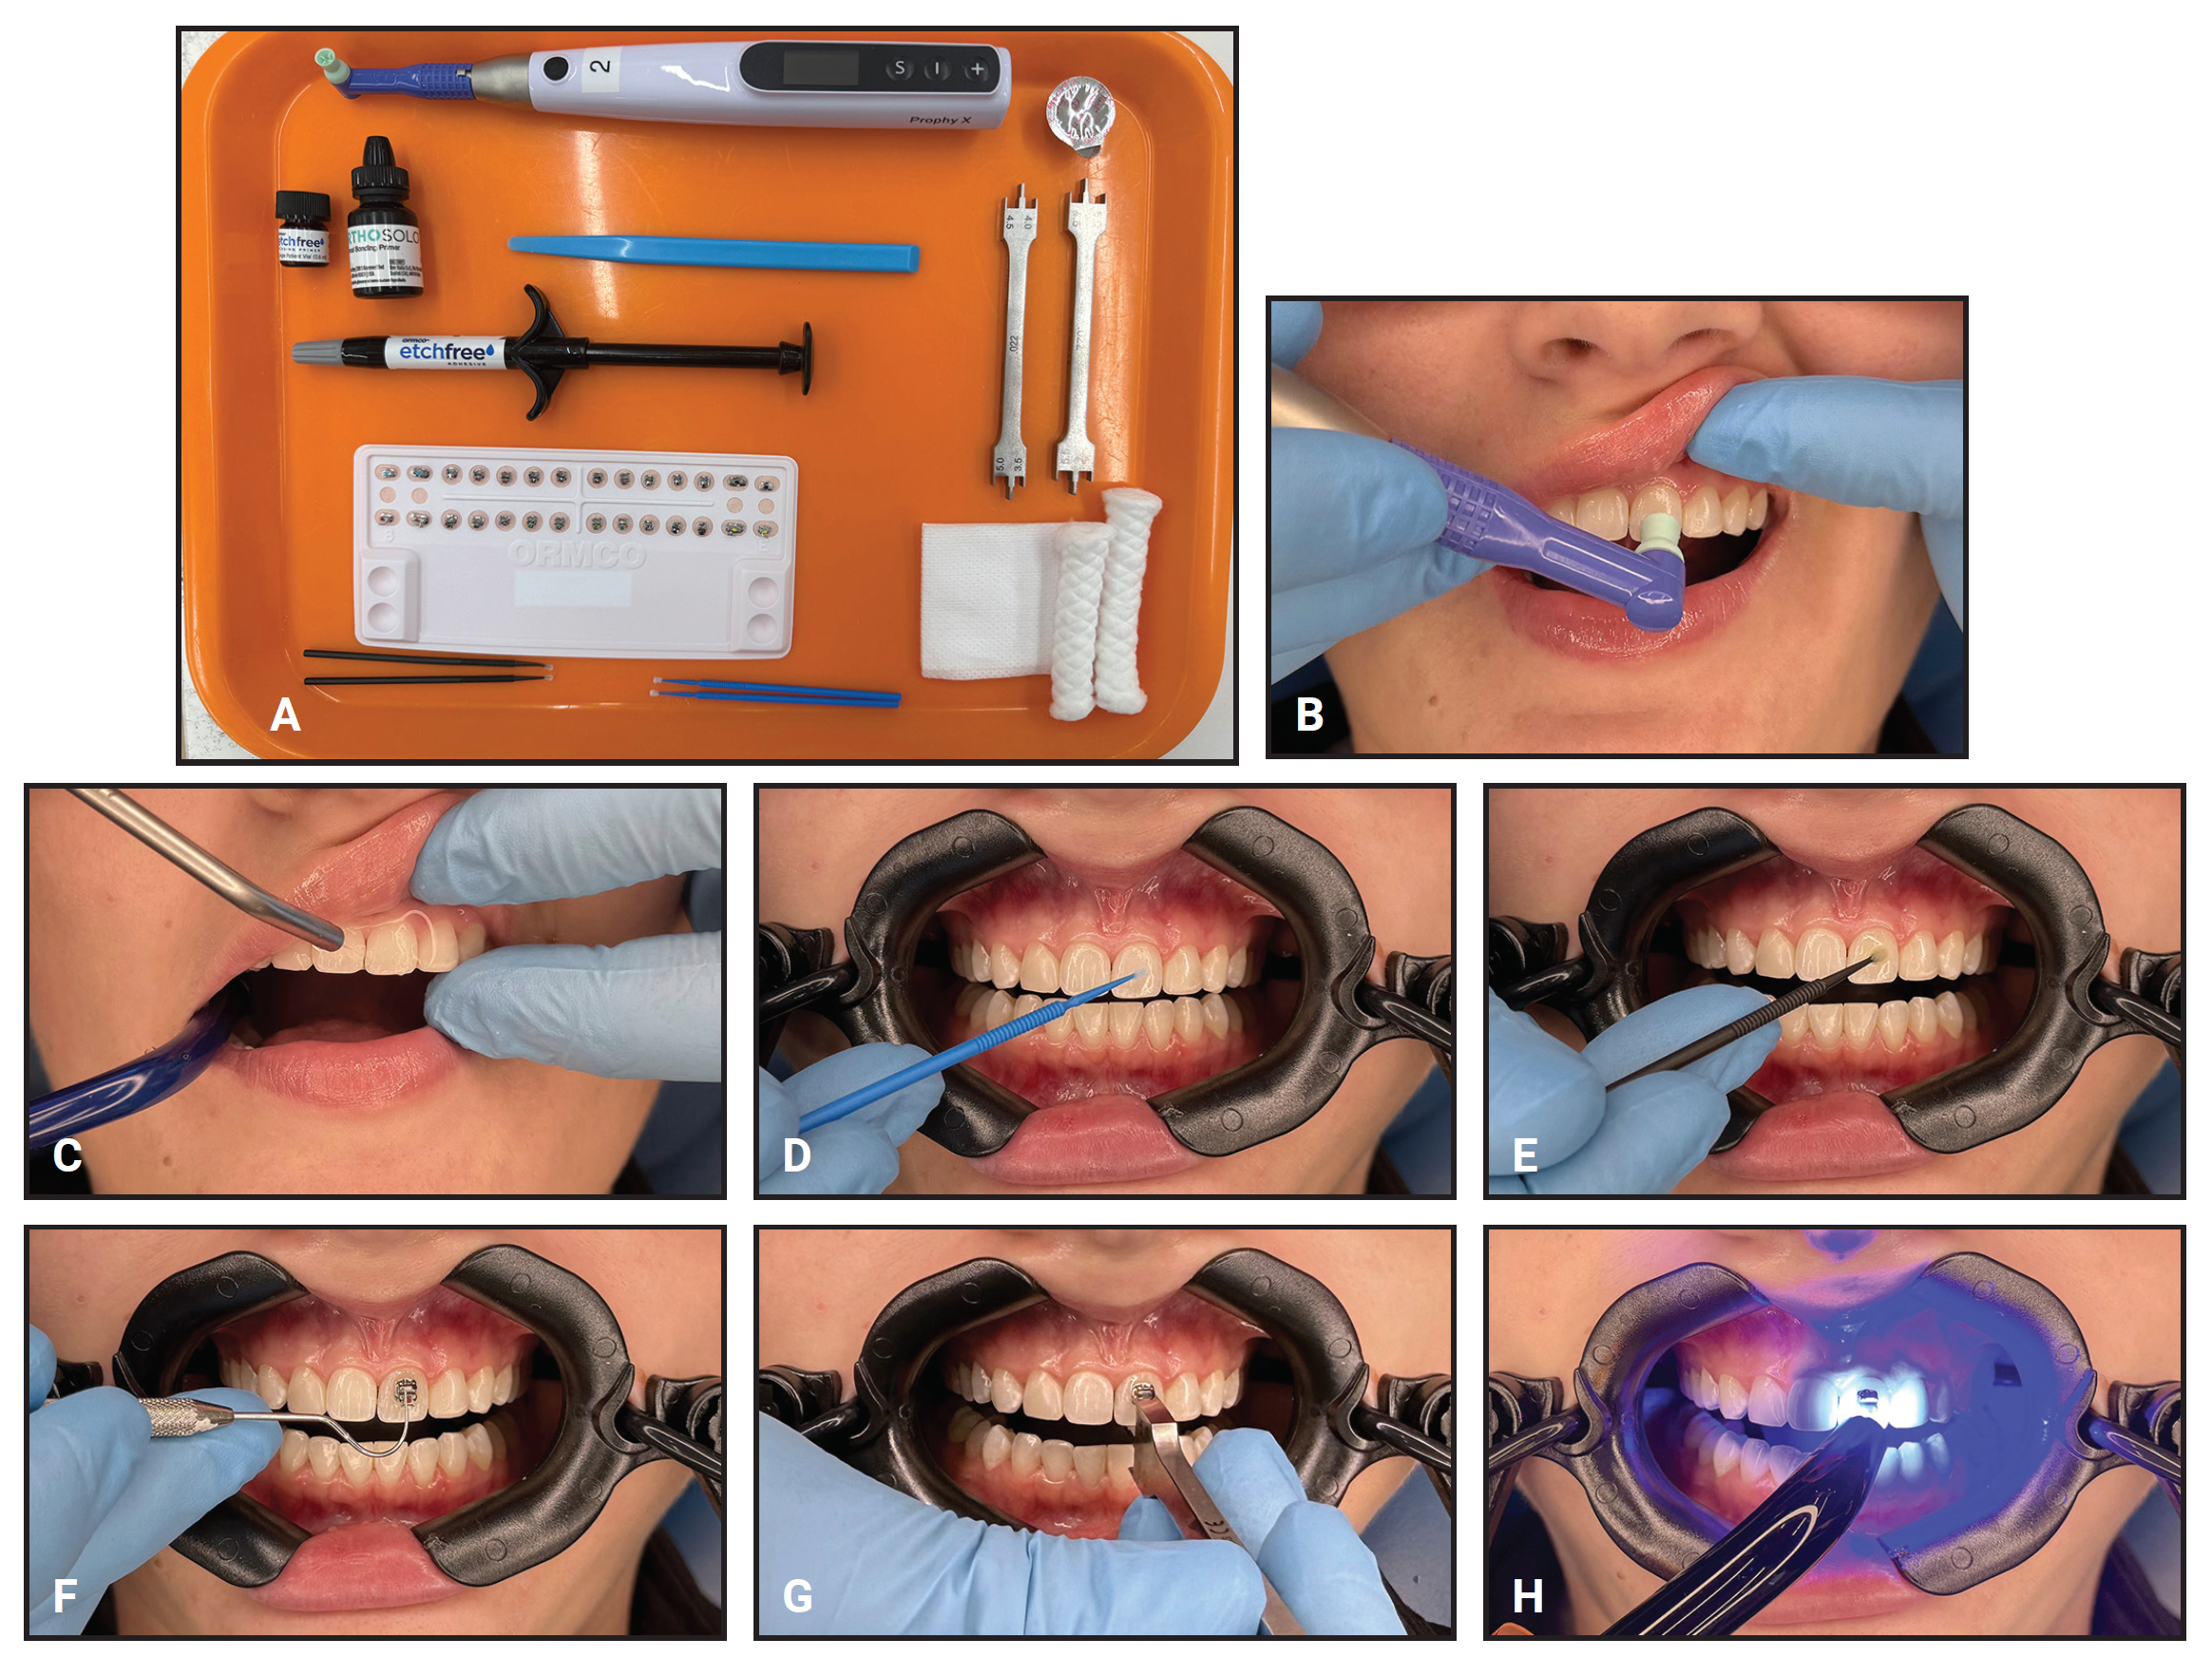
Fig. 4 A. Chairside setup for EtchFree Bonding system. B. Tooth cleaned with pumice. C. Tooth rinsed to remove pumice. D. EtchFree Primer applied; Xerosguard Advanced Isolation System‡ pictured. E. Ortho Solo applied while primer is wet. F. Adhesive applied and bracket placed. G. Height gauge used for accurate bracket placement. H. Adhesive light-cured.
6. Load the bracket base with Ormco EtchFree Adhesive (Fig. 4F). The adhesive’s thick, paste-like consistency makes it easy to spread into the mesh pad of the bracket with a spatula. Push the adhesive into the mesh for full coverage, and make sure it integrates into the bracket pad. Do not touch the adhesive with gloved fingers.
7. Seat the bracket. Press it firmly into place on the enamel, and remove any excess flash with a scaler or dental explorer. An anterior height gauge can be used to promote consistent bracket placement (Fig. 4G).
8. Cure the adhesive with an LED curing light for 10-20 seconds, depending on the light intensity (Fig. 4H).
Troubleshooting Guide
Although the EtchFree Bonding process is simple to learn—allowing rapid training of new assistants with minimal risk of harm to the patient—it is not the same as traditional phosphoric acid etching and priming. To use the system effectively, it is essential to learn certain visual and tactile cues and understand the nuances of application. The following troubleshooting guide is intended to help clinicians and staff anticipate common pitfalls and resolve chairside issues efficiently. These recommendations are based on clinical experience, operator feedback, and real-time adjustments during the integration of EtchFree Bonding into a busy orthodontic setting.
Issue: Burnished calculus on the second molars interferes with bonding.
Solution: A quick pass over the posterior teeth with a carbide bur before starting the bonding procedure can prevent this problem.
Issue: Insufficient EtchFree Primer or improper placement compromises the bond.
Solution: Dip the microbrush into the vial again after every one to three teeth. Apply primer to the entire facial surface of each tooth. If using digital indirect bonding, have the clinical simulation available for reference.
Issue: The patient’s tongue or cheek wipes off primer before Ortho Solo can be applied.
Solution: Gently clean the area with a damp 2 × 2 gauze pad, and reapply the primer. Do not air-thin, and do not proceed further until the tooth surface is properly conditioned.
Issue: Excessive thinning affects bond integrity.
Solution: Apply Ortho Solo exactly as provided by the manufacturer. More product may be needed if the tooth surface is moist. Thinning the product is not recommended.
Issue: Poor adhesive coverage of the bracket base or glove contamination weakens the bond.
Solution: Use a spatula to press the adhesive firmly into the base. Avoid contact between the adhesive and gloves.
Issue: The primer dries excessively because of a delay before bracket placement.
Solution: Apply Ortho Solo immediately after the primer. The tooth should remain visibly wet.
Issue: Selection of a different adhesive alters bond strength.
Solution: Use the EtchFree Bonding system only with EtchFree Adhesive until further compatibility data are available.
Issue: The bracket drifts out of place after placement before it can be cured.
Solution: Use a four-handed or indirect placement method so that brackets can be cured immediately after they are positioned.
Conclusion
By reducing the time and number of steps required to prepare teeth for direct bonding, the EtchFree Bonding system can be particularly beneficial for practices with varying staff experience levels or high turnover, potentially reducing mistakes and thus producing more reliable outcomes. One limitation of the system is that it restricts the choice of adhesive, since EtchFree Bonding Primer can currently be used only with Ortho Solo and EtchFree Adhesive. In addition, the lack of a fluorescent marker may complicate adhesive removal. Nevertheless, the reduced chairtime, ample clinical bond strength in the presence of moisture, and diminished risk to enamel health may make the system a practical solution for busy orthodontic practices.
FOOTNOTES
- *rademark of Ormco Corporation, Brea, CA; www.ormco.com.
- **Trademark of Solventum, St. Paul, MN; www.solventum.com.
- ***Kerr Dental, Brea, CA; www.kerrdental.com.
- ‡Xerosguard Inc., Winnipeg, Canada; www.xerosguard.com.
REFERENCES
- 1. Silverman, E.; Cohen, M.; Gianelly, A.A.; and Dietz, V.S.: A universal direct bonding system for orthodontic attachments, Am. J. Orthod. 62:236-244, 1972.
- 2. Gaidge Analytics, www.gaidge.com, accessed June 1, 2025.
- 3. Epstein, S.Y.: The 411 on 911s in orthodontic treatments, www.oralhealthgroup.com, Oral Health Group, 2023, accessed Oct. 22, 2025.
- 4. Fleming, P.S.; Johal, A.; and Pandis, N.: Self-etch primers and conventional acid-etch technique for orthodontic bonding: A systematic review and meta-analysis, Am. J. Orthod. 142:83-94, 2012.
- 5. Hosein, I.; Sherriff, M.; and Ireland, A.J.: Enamel loss during bonding, debonding, and cleanup with use of a self-etching primer, Am. J. Orthod. 126:717-724, 2004.
- 6. Park, J.H.; Shin, H.J.; Park, S.H.; Kim, J.W.; and Cho, K.M.: Iatrogenic chemical burn on facial skin by 37% phosphoric acid etchant, Restor. Dent. Endod. 34:38-41, 2009.
- 7. Knösel, M.; Bojes, M.; Jung, K.; and Ziebolz, D.: Increased susceptibility for white spot lesions by surplus orthodontic etching exceeding bracket base area, Am. J. Orthod. 141:574-582, 2012.
- 8. Bhattacharjee, D.; Sharma, K.; Sahu, R.; Neha, K.; Kumari, A.; and Rai, A.: Comparative evaluation of shear bond strength of brackets bonded with self-etch primer/adhesive and conventional etch/primer and adhesive system, J. Pharm. Bioallied Sci. 13(suppl. 2):S1168-S1173, 2021.
- 9. Dudás, C.; Czumbel, L.M.; Kiss, S.; Gede, N.; Hegyi, P.; Mártha, K.; and Varga, G.: Clinical bracket failure rates between different bonding techniques: A systematic review and meta-analysis, Eur. J. Orthod. 45:175-185, 2023.
-
 DR. GAGE
Dr. Gage is Adjunct Faculty, College of Dental Medicine, Western University of Health Sciences, Pomona, CA, and in the private practice of orthodontics, LevelUp Orthodontics, 12219 Pine Bluffs Way, Suite 105, Parker, CO 80134; ccolbygage@gmail.com. Dr. Gage is a paid consultant for Ormco and on the advisory board of Xerosguard.