Diagnosis and Treatment Planning
Failure to Recognize Variations in the Alveolar-Housing Anatomy
Cone-beam computed tomography (CBCT) has given orthodontists, for the first time, the ability to visualize variations in alveolar-housing anatomy. While cephalometric analysis generally ignores these variations, CBCT draws attention to differences between patients and even between segments of the same patient’s arch.
This example shows a 27-year-old female patient with a compensated Class II malocclusion (see attached video in the online version of this article). Note that the lower incisors are excessively proclined (IMPA of about 110°) in the pretreatment lateral cephalogram (Fig. 1).
Presenting to our office 18 months after completing a previous treatment, the patient had lost her lower left central incisor (Fig. 2). In an effort to reduce the lower-incisor proclination, the teeth were torqued at levels that might have appeared to be customary but were incompatible with the alveolar-housing anatomy.
Before torquing, we as orthodontic specialists need to understand the alveolar-housing anatomy to prevent dehiscence and fenestrations.
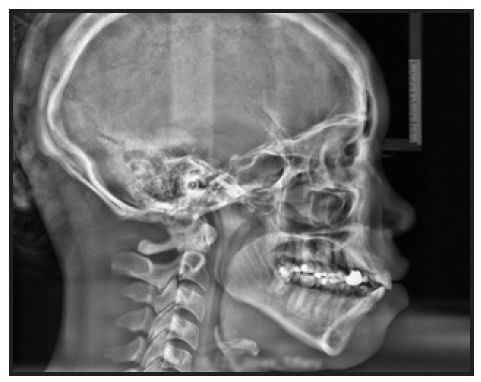
Fig. 1 Patient with compensated Class II malocclusion (Class I dental, Class II skeletal) before treatment. Lateral cephalogram indicates proclined lower incisors, with IMPA of about 110°.
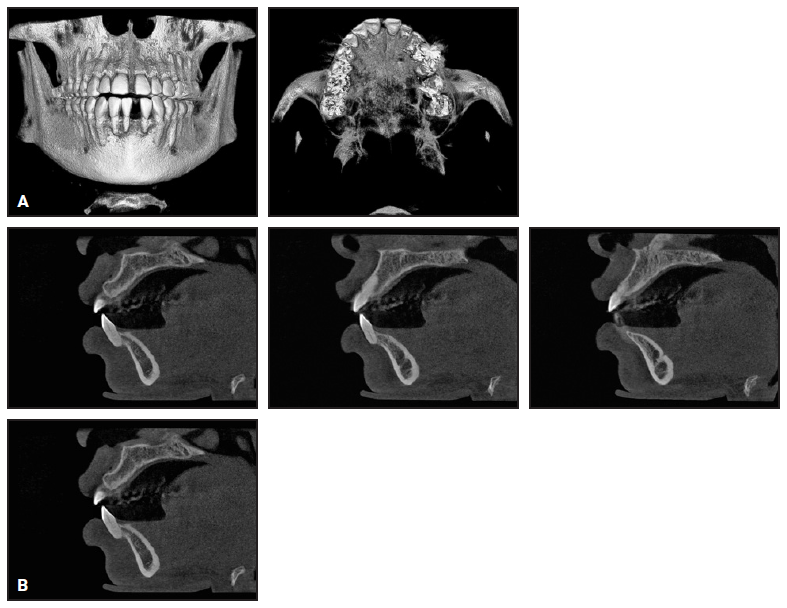
Fig. 2 A. Three-dimensional volumetric reconstruction of cone-beam computed tomography (CBCT) taken 18 months after patient completed treatment with previous orthodontist, showing loss of lower left central incisor and dehiscence of remaining lower-incisor roots from alveolar housing. B. Sagittal CBCT slices of upper right canine, first premolar (missing), second premolar, and first molar, confirming root positions incompatible with alveolar-housing anatomy.

JEFFREY C. MILLER, DDS
Catonsville, MD
ortho606@gmail.com
Food Traps from Incorrect Management of Proximal Contacts During Digital Planning
Digital planning for both aligner design and bracket placement is a rapidly growing and evolving area in orthodontics. Proper planning takes additional time and focus at the start of treatment, but ideally saves time in the finishing stages.
It is important to remember that the initial digital segmentation, landmark identification, and alignment are an automated process for most major companies. A technician may review the results before they are sent back to the orthodontist, but any minor errors in identifying the long axis or mesiodistal orientation of a tooth can create clinically relevant issues with alignment.
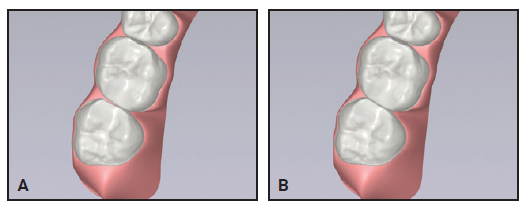
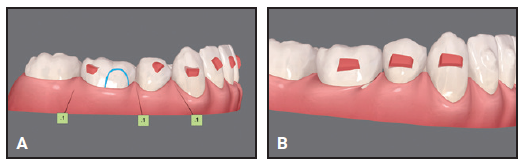
As my office developed digital design systems, we found that mistakes in mesiodistal orientation during LightForce* planning could result in narrow point contacts that produced food traps (Fig. 3). Similarly, unresolved tip issues in planning Invisalign** treatment could lead to unwanted food traps (Fig. 4).
Although these corrections may appear somewhat minor, food traps can be annoying for patients, even changing their perspective on treatment results. The clinician’s immediate response might be to add closing chain with fixed appliances or virtual interproximal reduction (overcorrection) with aligners. We’ve found that paying close attention during the initial planning stages can significantly reduce these problems.

MATTHEW E. LARSON, DDS, MS
Eau Claire, WI
matt@larsonsmiles.com
Clear Aligner Therapy
Unwanted Lower-Incisor Rotations from Premature Contacts
This patient presented with rotations from canine to canine in both arches (Fig. 5A). After 10 months of clear aligner therapy, the most severe rotation (the lower left lateral incisor) had been corrected, but a minor derotation of the lower right lateral incisor was still needed for ideal alignment (Fig. 5B). Even after an extra set of aligners, the rotation of the lower right lateral incisor was still unresolved (Fig. 5C).
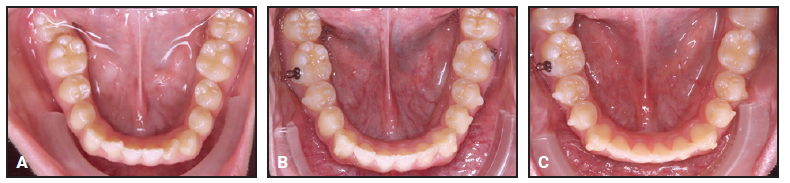
Fig. 5 A. Patient with rotations from canine to canine in both arches before treatment. B. After 10 months of clear aligner therapy, minor rotation of lower right lateral incisor remaining. C. After extra set of aligners, rotation of lower right lateral incisor still unresolved.
Although premature contacts are easily ignored in an orthodontic practice, they can have serious effects on the tooth structure and support. Routine three-dimensional intraoral scans can easily show us where they are located. In this case, there was a strong contact between the upper right central incisor and lower right lateral incisor (Fig. 6). This contact should have been adjusted before more aligners were fabricated, but the premature contact with the distal marginal ridge of the upper right central incisor was clearly preventing derotation of the lower right lateral incisor (Fig. 7).
At this point, a selective occlusal adjustment was performed, and the rotations were entirely corrected with a few additional aligners.
It is not always possible to avoid premature anterior contacts due to the desired tooth positions or anatomy, the tooth-movement plan, or many other treatment-related factors. Nevertheless, occlusal contacts should be checked regularly in all cases. Every clinician should become familiar with the occlusal-adjustment techniques that will enable maximum intercuspation.
Fig. 6 3D intraoral scan showing strong contact between upper right central incisor and lower right lateral incisor.
Fig. 7 Premature contact with upper right central incisor’s distal marginal ridge prevents derotation of lower right lateral incisor.

ROBERTO CARRILLO, DDS, MS, PhD
San Pedro Garza García, Mexico
dr.rcarrillo@gmail.com
Inadequate Root Control of Lower Lateral Incisors
With the growing popularity of clear aligner therapy, it becomes more crucial to address the specific issues of root control. We often focus on the maxillary lateral incisors, due to their challenges in tracking. In extraction cases, we focus on root control of the canines and premolars, aiming for root parallelism. Unfortunately, we tend to overlook the mandibular lateral incisors. If the patient has a deep curve of Spee, the lower lateral incisors often exhibit a mesial angulation that we need to manage. In addition, when planning extraction treatment, we should remember that the incisor retraction can add a distal crown tip, which must be controlled with distal root angulation of the lower lateral incisors. Failure to achieve proper root angulation can lead to such undesirable outcomes as improper alignment, instability, and compromised occlusion.
Although the Invisalign system offers protocols for extraction cases and optimized attachments, the lower incisors lack root-control attachments, obliging us to customize the plan with conventional attachments. Regardless of your preferred clear aligner system, you should consider incorporating distal root movements and adding vertical attachments for the lower lateral incisors to facilitate distal root angulation.
In this case, a 21-year-old female presented with a Class I malocclusion, excessive overjet, deep overbite, severe crowding, and bimaxillary protrusion (Fig. 8).
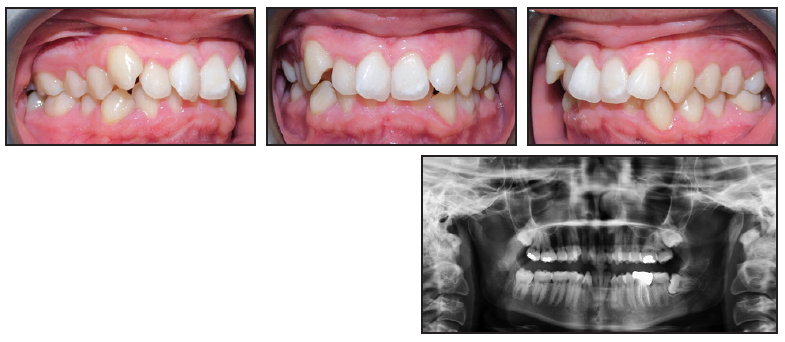
Fig. 8 21-year-old female patient with Class I malocclusion, excessive overjet, deep overbite, severe crowding, and bimaxillary protrusion before treatment.
We planned four premolar extractions, maximum anchorage, leveling of the curve of Spee, and incisor retraction. In the initial treatment design, I made the mistake of not adding attachments to the lower lateral incisors (Fig. 9).

Fig. 9 After 11 months of treatment and initial set of aligners, showing inadequate torque control of lower incisors and posterior open bite.
For the refinement stage, I focused on final space closure, root parallelism at the extraction sites, and finishing of the occlusion to close the posterior open bite. Although I added attachments to the lower lateral incisors for the refinement, the overall distal root angulation as designed and expressed in treatment was insufficient (Fig. 10). (The situation was exacerbated when one of the attachments debonded.)
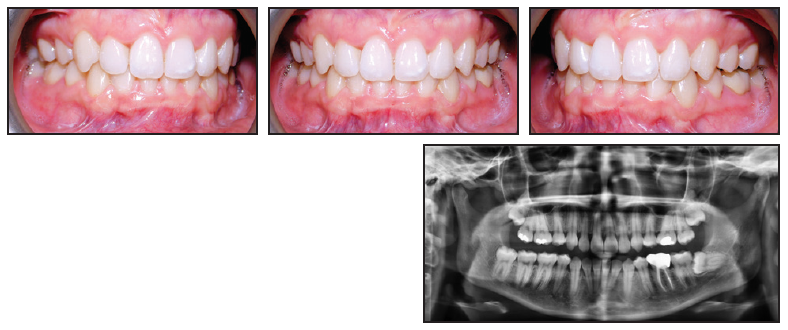
Fig. 10 After one year of refinement, showing insufficient distal root angulation of lower incisors.
Regular monitoring of any orthodontic treatment is of paramount importance. Periodic assessments allow timely adjustments and interventions, ensuring proper root control. Before ordering additional aligners, I recommend that the appropriate root angulation be confirmed with a progress panoramic radiograph. Consider adding new attachments and distal root angulation in the digital setup if the issue persists or if you missed it in the initial treatment design. Such adjuncts to treatment can be applied in any challenging cases, including fixed segmental mechanics.

SEAN HOLLIDAY, DDS, MS
Pearl City, HI
docholliday@yahoo.com
Inadvertent Posterior Open Bites
A posterior open bite is a common unwanted side effect of clear aligner treatment. This problem is often attributable to inadequate buccal root torque of the maxillary posterior dentition or a heavy anterior occlusion, secondary to inadequate leveling of the curve of Spee or inadequate labial crown torque of the maxillary incisors. Improper staging of upper-incisor torque can further exacerbate the posterior open bite by producing unplanned mesial crown tip of the maxillary molars.
The image shown exemplifies all these common errors in one case (Fig. 11).
Fig. 11 Clear aligner patient with posterior open bite due to inadequate buccal root torque of upper posterior dentition, inadequate labial crown torque of upper incisors, and improper staging of upper-incisor torque, causing unplanned mesial crown tip of upper molars.

JEFFREY A. ALBA, DMD, MS
Mechanicsburg, PA
jeffalba@me.com
Treatment Mechanics
Phase I Iatrogenic Cants
Many orthodontic leaders and speakers now advocate taking progress photographs at every visit. The reason is simple: “a photo is worth a thousand words.” When a photo is enlarged on a computer screen, the clinician may see small details that aren’t evident at chairside. Such details can then be methodically analyzed, away from the busy rush of the clinic.
Unfortunately, Phase I patients may not be part of this protocol. With only a few braces and one or no appliances, the clinician might have a sense that there isn’t much to overlook at the chair. In addition, considering the lower required level of precision in alignment and occlusion, there generally isn’t as much attention paid to small details.
One error that became evident to me early in my career was that I was often creating maxillary anterior cants during Phase I treatment. Our typical setup for Phase I involves a maxillary expander and anterior fixed appliances from upper lateral incisor to lateral incisor. With modern intraoral scanning, we can have the lab fit the bands on the 3D-printed models before fabricating the expander. Although the lab generally does a great job with the band fit, the first molars are sometimes out of alignment when that initial scan is taken. The molars may be rotated, but even more important, they may have erupted with a significant mesial tip, sometimes unilaterally.
As we progressed through our expansion, leveling, and alignment with nickel titanium wires, the anterior incisor segment would develop a significant anterior cant due to the tipped unilateral molar and band. This wasn’t being noticed at chairside, since the teeth appeared “straight” and my main focus was on space creation. It was only at the conclusion of Phase I, when the final facial photos were taken, that I would notice the anterior cant.
To rectify this situation, our Phase I protocol now involves routine progress photos (including facial smiling) to check for cants. If a cant is present, rather than recementing a new band to change the tip, we place a stainless steel wire and make an adjustment bend in the anterior segment, usually in the canine region. This “anti-cant” bend is made by stepping down on one side, stepping up on one side, and thus creating a “slanted” anterior segment that corrects and counteracts the cant. Within two or three months and one or two archwire adjustments, the cant is usually corrected entirely. This makes for a much better result, happier parents, and an easier Phase II with leveled anterior teeth.

SHAWN MILLER, DMD, MMSc
Orange, CA
smillerdmd@gmail.com
Improper Bracket Placement for Canine Substitution
In a canine-substitution case, the maxillary first premolar eventually serves as a canine. I used to bond my first-premolar brackets in a normal position, leveling the marginal ridges between the first and second premolars. This mistake would lead to a short-looking “canine” and detract from the esthetics of the final result.
Then I read a JCO article by Rosa and Zachrisson,1 from which I learned to place my first-premolar brackets occlusally so as to intrude the first premolars and thereby level the gingival architecture. When this technique is executed properly, the lingual cusp intrudes and does not have to be altered to prevent occlusal interferences. The premolar will need to be lengthened restoratively into group function, using either composite resin or a porcelain restoration.

ROBERT “TITO” NORRIS, DDS
San Antonio, TX
tito@stoneoakortho.com
Improper Bracket Placement for Space Closure
Sometimes space closure can be slow, especially when it is the last remaining space in the lower arch. The problem may not be just the speed of tooth movement, however, but the orthodontist’s observational capacity.
In this case, I was attempting to pull the molars for three months to no avail (Fig. 12A). A progress photograph finally made me realize that I was being stubborn in trying to close a space that wasn’t going to close, because the problem was vertical and not mesiodistal. To overcome this mistake, I repositioned the first-premolar bracket gingivally and extruded the tooth with an .016" nickel titanium archwire and 3/16" vertical intermaxillary elastics (Fig. 12B). The premolar was large enough to close the remaining space (Fig. 12C).

Fig. 12 A. Lower-molar space remaining after second-premolar extraction and three months of treatment. B. After gingival bracket repositioning, first premolar extruded using .016" nickel titanium archwire and 3/16" vertical intermaxillary elastic. C. Space finally closed, and .018" × .025" stainless steel lower archwire inserted with .010" ligature wire for stabilization.

SERGIO HERNAN VALVERDE MONTALVA, DDS, MS
Lima, Peru
drsergiovm30@gmail.com
Lack of Overjet after Upper First-Premolar Extractions
This 10-year-old female presented with upper crowding and protrusive lower incisors (Fig. 13). The upper first premolars were extracted to relieve the crowding, but no extractions were performed in the lower arch.

Fig. 13 10-year-old female patient with upper crowding and protrusive lower incisors before treatment.
As a result, the lower incisors were further proclined, and we ran out of overjet trying to close the upper spaces (Fig. 14).
Fig. 14 After upper first-premolar extractions and 15 months of treatment, lower incisors further proclined, with insufficient overjet for upper space closure.
We had to extract the lower left first premolar to shift the lower midline and upright the lower incisors enough to permit the upper space closure.
The lesson here is to keep the lower incisors upright. In an asymmetrical Class II case, that might call for a three-premolar extraction pattern. In this particular patient, it also helped with the alignment and allowed complete eruption of the lower left second molar (Fig. 15).

Fig. 15 Patient after 25 months of treatment, following extraction of lower left first premolar to allow uprighting of lower incisors.

MATTHEW C. NG, DMD, MSD
College Station, TX
matthew.c.ng@gmail.com
Undesirable Ramifications of Tooth Development
A young patient presented with a retained deciduous canine and impacted permanent canine. We started routine fixed appliance treatment after surgical exposure of the impacted canine, with an attachment to bring the tooth into the arch. Although parts of an impacted canine usually appear six to nine months into treatment, in this case there was still no erupting canine after 12 months, despite the use of various archwires and elastomerics. At 16 months, we sent the patient back to the oral surgeon for a “re-exposure,” but the family was fed up by then and left the practice. The tooth was ankylosed and was eventually removed by a different oral surgeon; another orthodontist completed the treatment. In retrospect, I should have been more proactive in taking progress radiographs and sent the patient back to the surgeon earlier if there was no radiographic movement of the tooth.
In another case, a friend of mine brought in her child, who was still in the mixed dentition. Because she didn’t want the patient to have braces in high school, she insisted on starting treatment despite my advice to wait until more of the teeth had erupted. One mandibular second premolar was barely formed radiographically at the time treatment was initiated. We extracted the second deciduous molar in an effort to “hurry up” eruption of the tooth, but I really forgot about it being in there. I closed all the spacing in both arches and got everything aligned. It was only when I took the final radiographs after debonding that I “found” the retained premolar, which was more developed but displaced facially. I had to sheepishly ask an oral-surgeon friend to surgically remove the tooth gratis, as neither the mother nor the patient wanted to go back into braces to reopen the needed arch space and realign the lower arch. I was disgusted with myself for the oversight, which meant the child had to undergo an unnecessary surgical procedure. This is where you put a sticky note in the chart to remind you to check the spacing for the unerupted tooth, so that you don’t forget to allow it to finish developing and erupt.
Both of these nightmare cases have kept me awake for years.

SARAH C. SHOAF, DDS, MEd, MS
Winston-Salem, NC
sarahhome@earthlink.net
Hidden Dangers Lurking in the Vertical Dimension
My inattention to the vertical dimension is what has led to those lost hours of sleep. Careless bonding of second molars in a vertically growing patient can result in the rapid development of an anterior open bite.
It has become common practice during initial bonding to place restorative material on the occlusal surfaces of the molars to disclude the bite. Although this supposedly allows the use of lighter forces to move the teeth, the restorative material should not be placed on the first molar without engaging the second molar. Otherwise, the second molar might be supraerupted by the time the patient returns for the next visit. A first-molar attachment with an auxiliary tube can allow the second molar to be engaged without opening the bite; it is also a useful strategy when preparing a patient for orthognathic surgery, since the second molar can cause interferences in the planned new occlusion.
In a patient with minimal overbite, a lower-torque incisor bracket can be selected to avoid relative bite opening by reducing the incisor-crown flaring associated with the use of coil springs to open the lateral-incisor space. Consider staying in lighter wires than you routinely use, and combine these with light anterior vertical elastics for nighttime wear. I am careful to avoid using a large rectangular nickel titanium wire in the lower arch any longer than necessary before placement of the working wire, because that can lead to a rapid escalation of the iatrogenic bite opening and resultant disturbance to my sleep pattern.
This 16-year-old female presented with a maxillary deficiency and missing upper lateral incisors (Fig. 16).
Fig. 16 16-year-old female patient with maxillary deficiency and missing upper lateral incisors before treatment.
After consultation with a maxillofacial surgeon and restorative dentist, she declined orthognathic surgery. The orthodontic treatment objectives were to align the teeth and open spaces for implant restoration of the lateral incisors without iatrogenic worsening of the open-bite tendency. A low-torque bracket prescription was selected, the second molars were not included in the archwire, and light vertical anterior elastics were worn at night. No restorative material was placed on the occlusal surfaces of the posterior teeth to disclude the bite. The 14-month progress records demonstrated an improvement in the occlusion and adequate space for implant placement, although further root parallelism was needed (Fig. 17).

Fig. 17 After 14 months of treatment, showing improved occlusion and adequate space for implant placement.
The vertical danger has not passed once you’ve got the appliances off. Pay attention to your retainer design, since it is possible to create an open bite by failing to control the most posterior teeth. Ensure that a vacuformed retainer covers every tooth, if it is to be used for more than a short period.
I believe remote patient-monitoring apps such as Dental Monitoring*** are worth the investment, because they allow cases that might go off track to be identified while the problems are still easily remedied. Detection of an iatrogenic open bite before it becomes a clinical drama will reduce stress for the clinician and avoid treatment delays.

CHRISTIAN A. ORLOFF, BDS, LDS RCS, MDSC, MRACDS, Grad Dip DSM
Perth, Australia
orloff@westnet.com.au
Risks of Interproximal Reduction
Interproximal reduction (IPR) is the only available solution in some cases requiring equalization of arch length, increased arch length for resolution of crowding, reduction of maxillary or mandibular incisor flaring, or minimization of interproximal dark triangles. Diamond discs, reciprocating handpieces, and perforated or nonperforated diamond strips are the most common methods of performing IPR.
Early in my practice, I commonly used a diamond disc because it was more time-efficient and comfortable than the other options. If not used with great caution, however, a diamond disc can cause the most significant injuries, due to slippage or “catching” that propels it into either lip or tongue tissue. This happened to me many years ago, when I sliced into a patient’s lower lip significantly enough that I sutured it myself then and there. As you might imagine, this changed my IPR protocol.
I started mitigating the injury risk by using disc guards, which are metal or plastic attachments that snap onto the nose cone, limiting exposure of the disc to intraoral tissues. The most significant disadvantage of the disc guard is that it can affect direct visualization of the disc’s relationship to the axes of the teeth. Such visual limitation can result in “leaning” the disc mesially or distally during the procedure, permanently altering the tooth anatomy. Over time, I realized that I was sometimes leaning the disc a bit in one direction or another, even though I thought my parallelism was perfect. This left the patient’s incisors converging toward the incisal. I quickly realized that patients were generally opposed to having incisors that resembled A-frame houses. Even subtle deviations in axial inclination during IPR with diamond discs can be enough to create obvious esthetic and even functional compromises.
To avoid these issues, I explored and experimented with various IPR techniques. I tried them all, including expensive, dedicated IPR reciprocating handpieces. Ironically, the most straightforward technique turned out to be the most efficient and predictable method in my hands. For many years now, I have been doing IPR with perforated diamond strips. I can achieve as much IPR as I need with as much (if not more) time economy and far more control.

JOHN W. GRAHAM, DDS, MD
Salt Lake City, UT
orthograham@gmail.com
Surgical-Orthodontic Treatment
Never Underestimate the Tongue
Dental decompensation is a key goal of presurgical orthodontics. The mistake shown here reminded me never to underestimate the power of the tongue.
A late-teen patient was undergoing orthodontic treatment to set up for a Le Fort surgical advancement and downgraft. The completed surgical setup was held in place with elastic chain (Fig. 18). For patient comfort, I waited to place surgical lugs and final stainless steel ligatures until a day or two prior to surgery.
The surgeons and I completed our virtual planning, but because of the COVID-19 pandemic, we were unable to schedule an operating room until three months after the records were taken. When the patient returned to me, two days before surgery, considerable maxillary spacing had opened (Fig. 19). Oops!
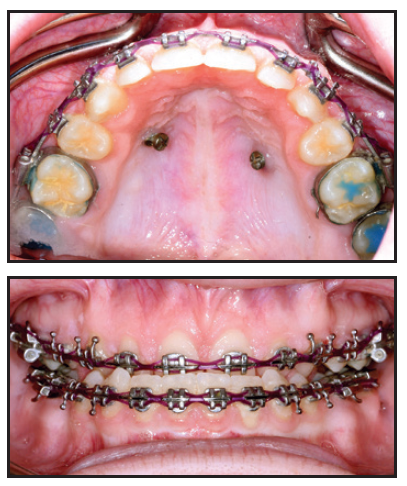
Fig. 18 Elastic chain used to retain completed orthodontic setup of late-teen patient for Le Fort surgical advancement and downgraft.
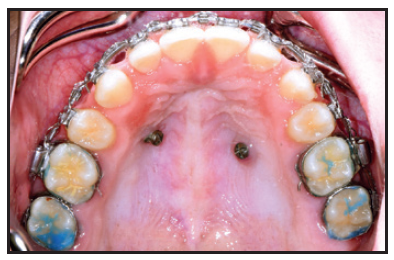
Fig. 19 Patient two days before surgery, with considerable maxillary space opening (note new surgical lugs and stainless steel ligatures).
I immediately called the surgeons, and after assessing the impact on our plan, we decided to press on with the surgery. I made impressions for our reference and attached surgical lugs and stainless steel ligatures. Two amazing oral surgeons, Drs. Dan Schlieder and Corey Toscano, were able to complete the surgery and fabricate new surgical splints during the procedure. Although the patient, family, and team were pleased with the outcome, we would have preferred not having to scramble at the last minute.
This mistake could have been avoided by placing standard stainless steel ligatures under the archwire once the spaces had been closed. My advice can be applied in many situations, but especially when trying to stabilize a decompensated patient, in whom all the soft tissue is fighting against the presurgical dental decompensations.
CHAD B. CARTER, DDS, MS
Offutt Air Force Base, NE
chadbcarterdds@gmail.com
FOOTNOTES
- *LightForce, Burlington, MA; www.lf.co.
- **Registered trademark of Align Technology, Inc., San Jose, CA; www.aligntech.com.
- ***Dental Monitoring SAS, Sydney, Australia; www.dentalmonitoring.com.
REFERENCES
- 1. Rosa, M. and Zachrisson, B.U.: Integrating esthetic dentistry and space closure in patients with missing maxillary lateral incisors, J. Clin. Orthod. 35:221-234, 2001.
-
 DR. KRAVITZ
Dr. Kravitz is the Editor-in-Chief of the Journal of Clinical Orthodontics, an Assistant Clinical Faculty at the Harvard School of Dental Medicine Department of Orthodontics, and in the private practice of orthodontics, 25055 Riding Plaza, Suite 110, South Riding, VA 20152; e-mail: nealkravitz@gmail.com. The other participants are members of the JCO Editorial Board or Clinical Advisory Council.
COMMENTS
.