CASE REPORT
Correction of an Asymmetrical Class II Malocclusion Using Predictable Force Systems
Asymmetrical malocclusions can be caused by a number of skeletal, dental, and soft-tissue factors.1-3 If the etiology is mainly dental, the asymmetry may have developed from abnormal dental eruption, premature loss of deciduous teeth, or loss of permanent teeth. If the etiology is primarily skeletal, the patient may have a developmental or acquired asymmetry in either or both arches.4
It is extremely important to differentiate between dental and skeletal asymmetry before establishing treatment alternatives and objectives. Computed tomography, anteroposterior and 45º lateral oblique cephalograms, and submental-vertex radiographs can aid in the diagnosis and treatment planning of these cases. The most important tool, however, remains the clinical examination of the patient.3 An asymmetrical patient usually presents with a Class I occlusion on one side and a Class II or III occlusion on the other, so that the upper and lower midlines do not coincide with each other or the facial midline.5
The following case shows how a dental asymmetry can be corrected using predictable force systems.
Diagnosis and Treatment Plan
A 14-year-old patient in the permanent dentition presented with the chief complaint of crowded and overlapping anterior teeth. She had a Class II subdivision left malocclusion (Fig. 1).
Similar articles from the archive:
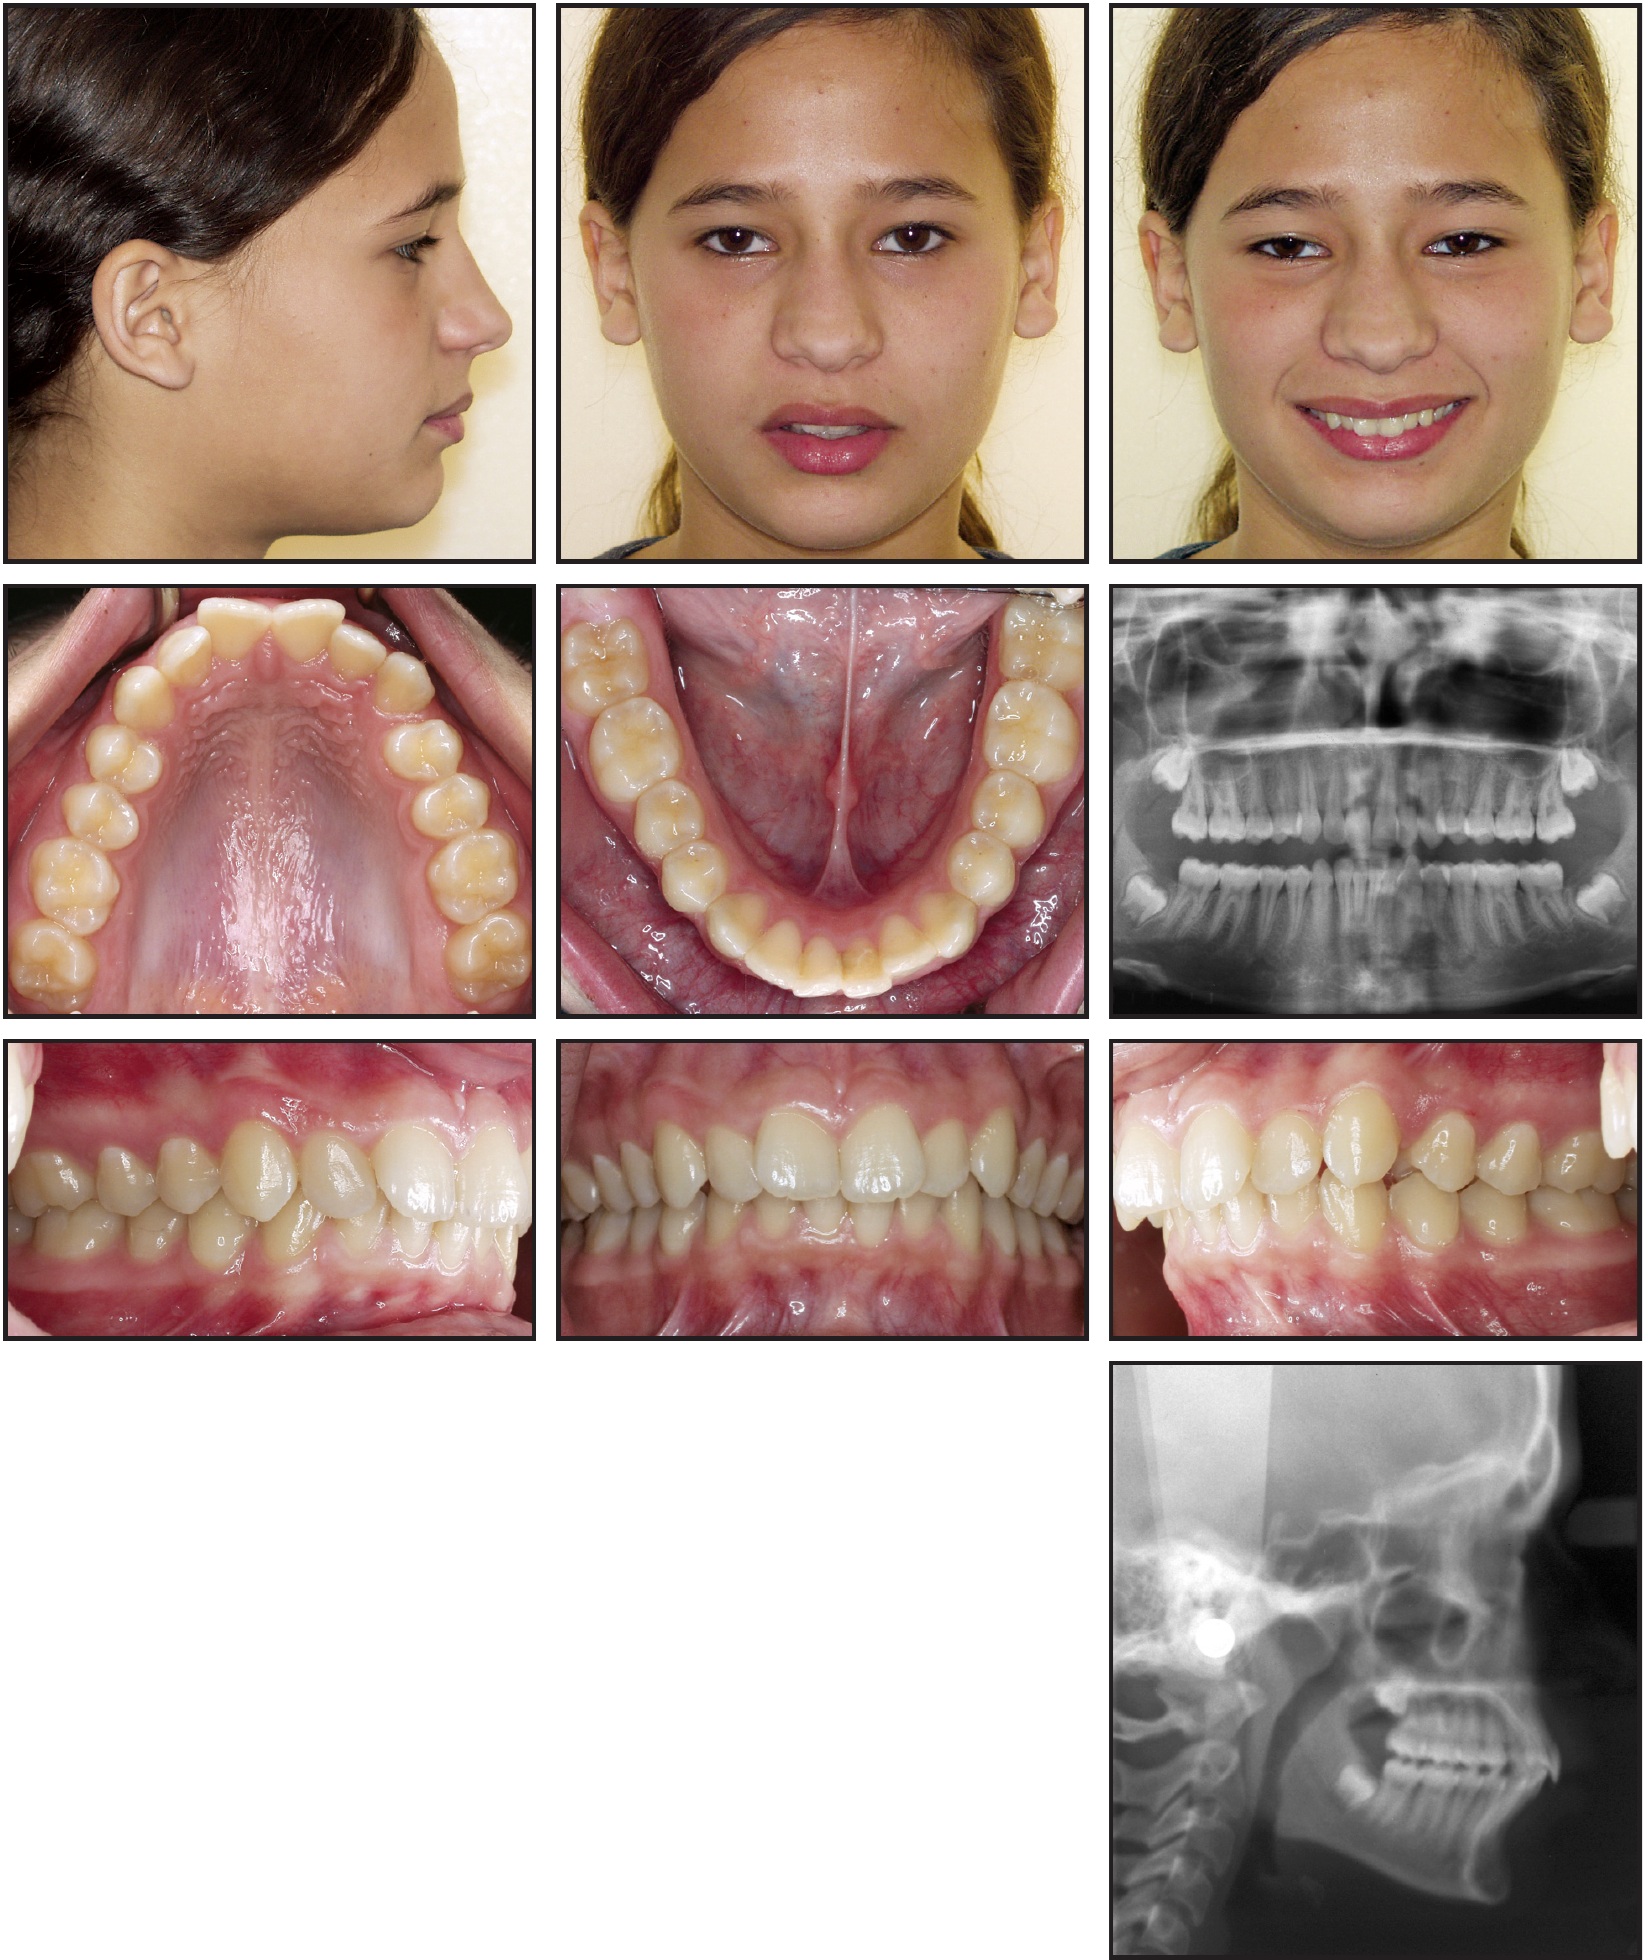
Fig. 1 14-year-old female patient with Class II subdivision left malocclusion and mandibular dental asymmetry caused by premature loss of deciduous teeth.
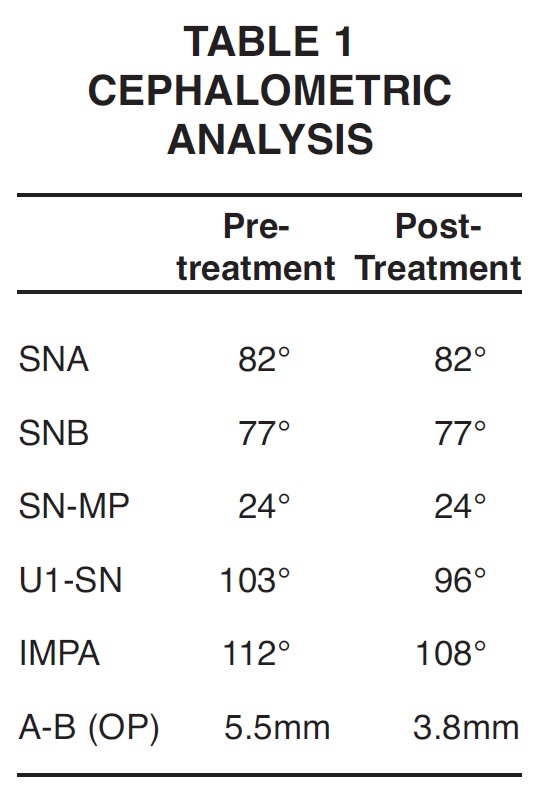
The maxillary midline had shifted 1mm to the right and the mandibular midline 2mm to the left from the facial midline. Cephalometric analysis indicated a retrognathic mandible with lower incisor flaring and a lower arch that was skewed to the left (Table 1). The overjet was 4.5mm, and the overbite was 50%. The patient reported premature loss of the mandibular deciduous teeth on the left side, which was diagnosed as the major etiologic factor in the dental asymmetry.
Following a comprehensive clinical and data-base analysis, we devised a treatment plan involving extraction of the upper and lower first premolars to achieve a symmetrical buccal occlusion, midline correspondence, appropriate overjet, and adequate retraction of the flared lower incisors.
Treatment Progress
Full-arch .022" appliances were bonded, and leveling and alignment were carried out with continuous .014" nickel titanium archwires. This caused the mandibular midline deviation to become even more evident. Maxillary space closure was begun with separate canine retraction, using an .016" x .022" stainless steel continuous base archwire and an overlaid .017" x .025" Beta III CNA* intrusion arch, engaged from the first molar auxiliary tubes and tied to the four anterior teeth (Fig. 2). The intrusion arch was designed to provide two mechanical advantages: molar tipback moments for intraoral anchorage, and an intrusive force on the incisors to prevent any deepening of the bite from archwire deflection as the canines were retracted6 (Fig. 3).
To correct the mandibular midline, an .017" x .025" stainless steel archwire was split into buccal segments between the first molars and second premolars and an anterior segment from canine to canine, with a passive loop extending apically toward the center of resistance of the anterior teeth. An .017" x .025" Beta III CNA cantilever from the right first molar auxiliary tube was bent buccally and connected to the loop with elastomeric chain (Fig. 4). The cantilever was activated to achieve an efficient midline correction through pure translation of the anterior segment5 (Fig. 5).
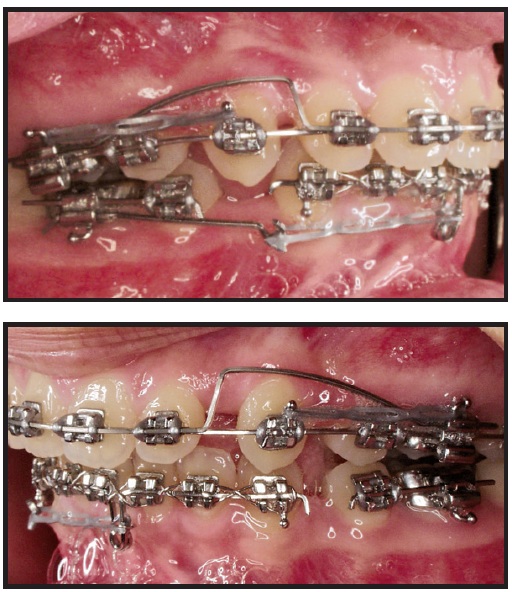
Fig. 2 Maxillary canine retraction using .016" ✕ .022" stainless steel base archwire and overlaid .017" ✕ .025" Beta III CNA intrusion arch, with elastomeric chain from molars to canines.
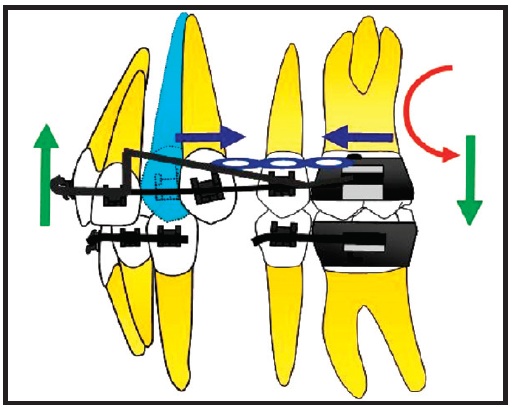
Fig. 3 Intrusion arch produces tipback moments on first molars for anchorage and intrusive force on incisors to prevent increase in overbite during canine retraction.
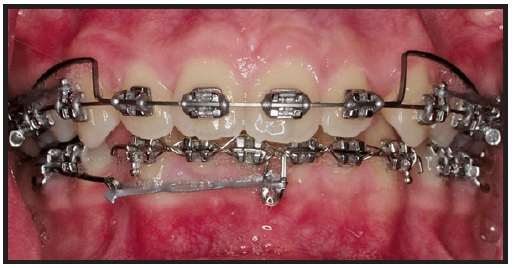
Fig. 4 Lower midline correction with segmented .017" ✕ .025" stainless steel archwire, including passive loop bent apically toward anterior center of resistance, and .017" ✕ .025" Beta III CNA cantilever, bent buccally from lower right first molar tube and connected to anterior loop with elastomeric chain.
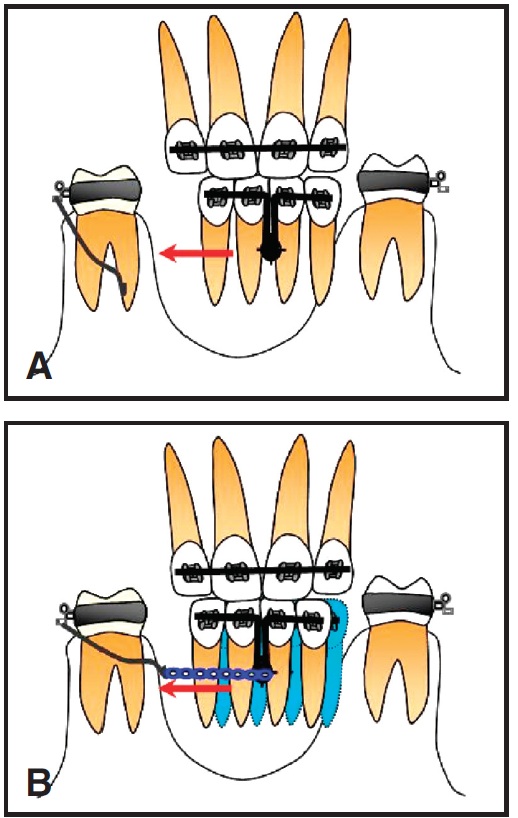
Fig. 5 A. Anterior wire segment with loop extended apically toward anterior center of resistance provides contact point for force of buccal cantilever. B. Force applied through center of resistance produces translation for lower midline correction.
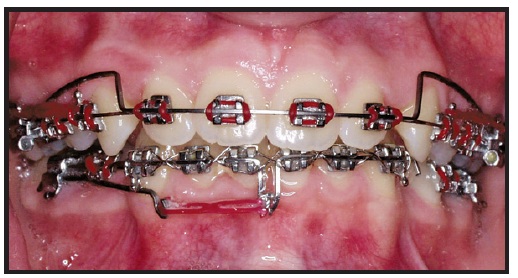
Fig. 6 Lower midline correction after eight weeks of translatory movement.
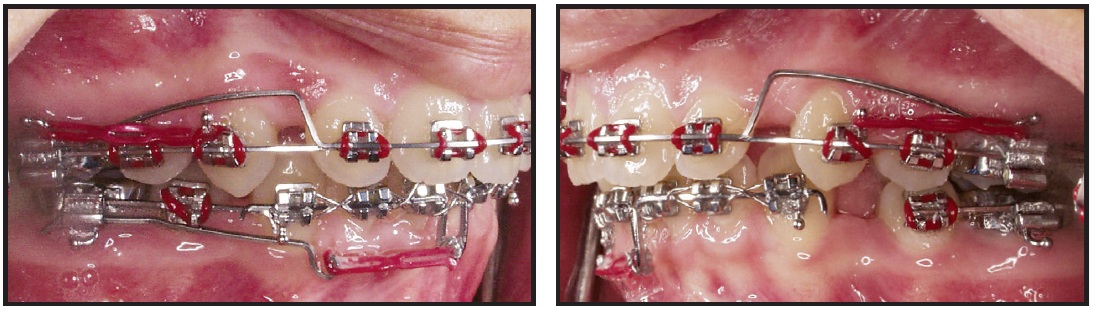
Fig. 7 Patient after 12 weeks of canine retraction, with no increase in overbite or anchorage loss.
The maxillary incisors were then retracted with Beta III CNA mushroom loops*, allowing the use of differential moments during space closure6,7 (Fig. 8).

Fig. 8 Maxillary .017" ✕ .025" Beta III CNA mushroom loops for retraction of maxillary anterior teeth; mandibular .017" ✕ .025" stainless steel archwire with Class II elastics for simultaneous protraction of lower molars.
Activation of the M-loop increases the applied moment and thus the moment-to-force ratio, providing better anterior root control and posterior anchorage (Fig. 9). In the lower arch, an .017" x .025" stainless steel archwire was placed with Class II elastics to achieve simultaneous protraction of the mandibular molars.
After 16 more weeks of treatment, the upper incisor retraction was finished, but a small space remained on the lower left side. An .016" x .022" stainless steel archwire was placed, with an off-center V-bend distal to the lower left canine for space closure using differential moments8 (Fig. 10, Fig. 11).
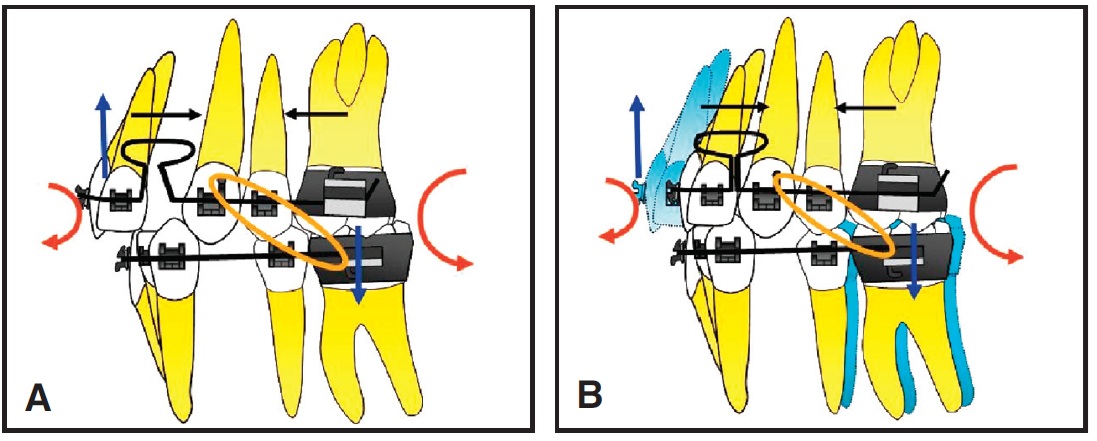
Fig. 9 A. Mushroom loop reduces applied force and increases moment, raising moment-to-force ratio to 10:1 for better root control and anchorage. B. Maxillary anterior teeth are translated with ideal root positions, while Class II elastics simultaneously protract lower molars.
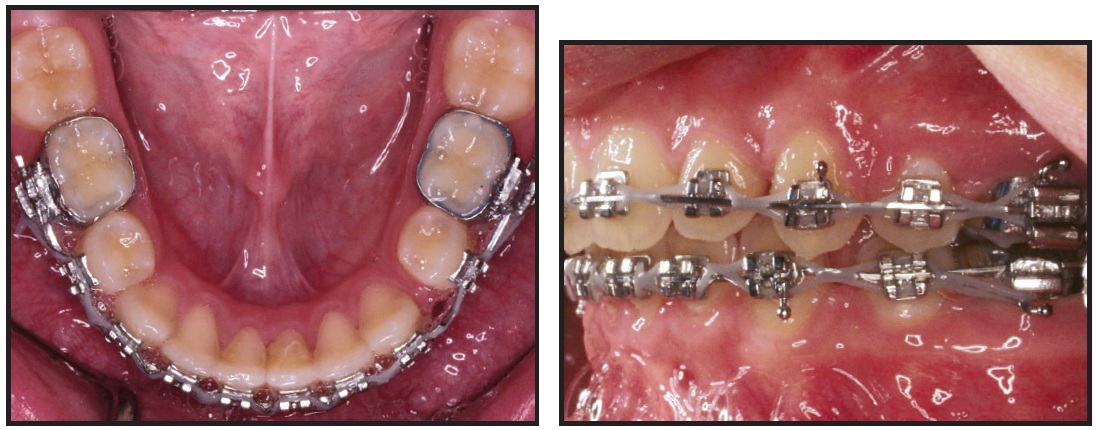
Fig. 10 After 16 weeks of maxillary incisor retraction, remaining space on lower left side closed using .016" ✕ .022" stainless steel archwire with off-center V-bend distal to lower left canine.
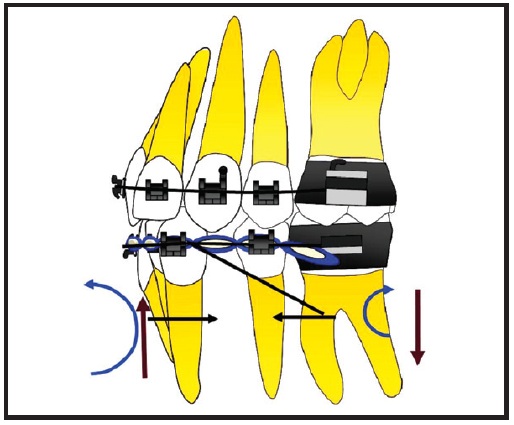
Fig. 11 Off-center V-bend distal to lower left canine protracts lower molars using differential moments to prevent anterior anchorage loss.
The space was closed in eight weeks, after which the roots were uprighted and the case finished. Total treatment time was 23 months (Fig. 12).
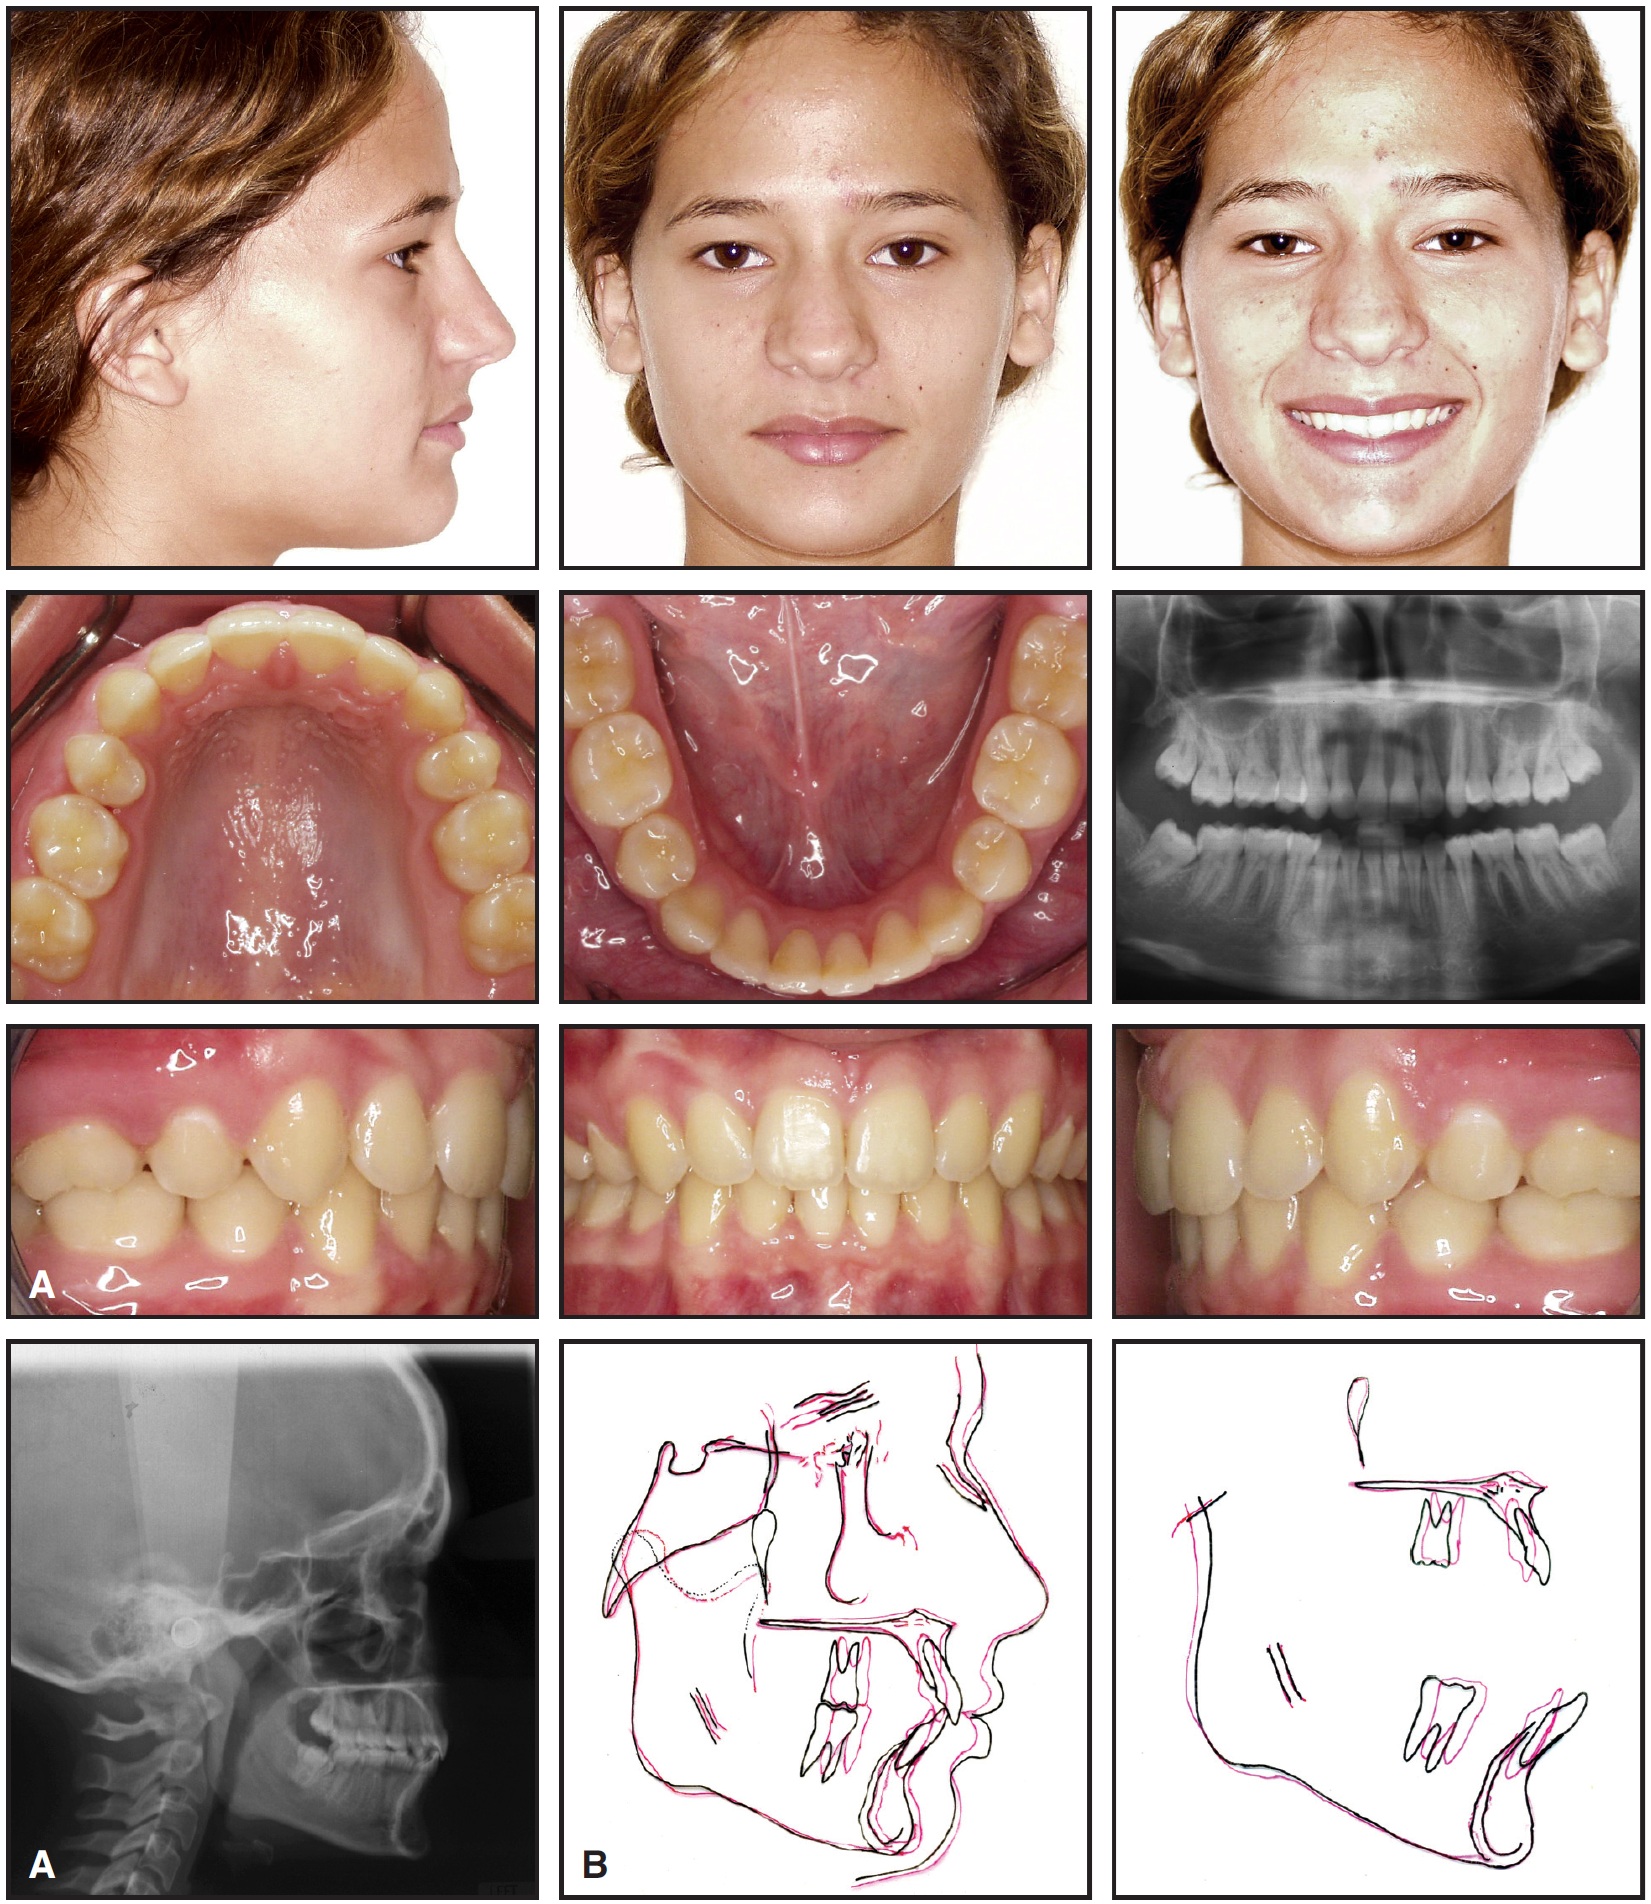
Fig. 12 A. Patient after 23 months of treatment. B. Superimposition of cephalometric tracings before and after treatment.
Discussion
Asymmetrical malocclusions, although commonly seen in orthodontic practices, are among the most difficult cases to treat. As this case shows, an ideal result can be achieved with minimal side effects in a relatively short time, as long as the clinician makes an appropriate diagnosis, sets reasonable objectives, and uses predictable and efficient mechanics.6
FOOTNOTES
- *Trademark of Ultimate Wireforms, Inc., 200 Central St., Bristol, CT 06010; www.ultimatewireforms.com.
REFERENCES
- 1. Sheats, R.D.; McGorray, S.P.; Musmar, Q.; Wheeler, T.T.; and King, G.J.: Prevalence of orthodontic asymmetries, Semin. Orthod. 4:138-145, 1998.
- 2. Kronmiller, J.E.: Development of asymmetries, Semin. Orthod. 4:134-137, 1998.
- 3. Van Steenbergen, E. and Nanda, R.: Biomechanics of orthodontic correction of dental asymmetries, Am. J. Orthod. 107:618-624, 1995.
- 4. Burstone, C.J.: Diagnosis and treatment planning of patients with asymmetries, Semin. Orthod. 4:153-164, 1998.
- 5. Nanda, R. and Margolis, M.J.: Treatment strategies for midline discrepancies, Semin. Orthod. 2:84-89, 1996.
- 6. Uribe, F. and Nanda, R.: Treatment of Class II, division 2 malocclusion in adults: Biomechanical considerations, J. Clin. Orthod. 37:599-606, 2003
- 7. Nanda, R.; Uribe, F.; and Kuhlberg, A.: Biomechanic basis of extraction space closure, in Biomechanic and Esthetic Strategies in Clinical Orthodontics, ed. R. Nanda, Elsevier Saunders, St. Louis, 2005, pp. 194-210.
- 8. Siatkowski, R.E.: Optimal orthodontic space closure in adult patients, Dent. Clin. N. Am. 40:837-873, 1996.
-
 DR. PALACIOS
 -
 DR. URIBE
 -
 DR. NANDA
Dr. Palacios is Chief Resident and Dr. Uribe is Assistant Professor and Program Director, Division of Orthodontics, and Dr. Nanda is Professor and Head, Department of Craniofacial Sciences, Alumni Endowed Chair, School of Dental Medicine, University of Connecticut, Farmington CT 06032. Dr. Palacios is also in the private practice of orthodontics in Miami, FL. Dr. Nanda is an Associate Editor of the Journal of Clinical Orthodontics. E-mail him at nanda@nso.uchc.edu.