Although skeletal anchorage is here to stay in orthodontics, there are still many unanswered questions.1 This article will describe the development of skeletal anchorage and provide an overview of the current systems and their advantages and drawbacks.
Evolution of Skeletal Anchorage
Skeletal anchorage systems have evolved from two lines. One category originated as osseointegrated dental implants, which have a solid scientific base of clinical, biomechanical, and histologic studies. The orthodontic mini-implants were smaller than the dental implants, but their surfaces were treated in the same way. Included in this category are the retromolar implants described by Roberts and colleagues2 and the palatal implant introduced by Wehrbein and Merz.3 Both are used for indirect anchorage, meaning they are connected to teeth that serve as the anchorage units.
The other category developed from surgical mini-implants. Creekmore and Eklund inserted one such device below the nasal cavity in 1983,4 but it was not until 1997 that Kanomi described a mini-implant specifically designed for orthodontic use.5 Both of these were used as direct anchorage. The following year, Costa and colleagues described a screw with a special bracket-like head that could be used for either direct or indirect anchorage.6 In contrast to the osseointegrated implants, these devices are smaller in diameter, have smooth surfaces, and are designed to be loaded shortly after insertion.
Similar articles from the archive:
Few of the surgical miniscrews have, to my knowledge, been subjected to systematic studies analyzing the tissue reaction to loading. Aarhus Mini-Implants* were placed in monkeys and immediately loaded with 25-50cN of force by Melsen and colleagues.7,8 Titanium screws were inserted in dogs and loaded after six weeks with 150g coil springs by Ohmae and colleagues.9 Deguchi and colleagues also loaded titanium screws in dogs after three weeks with 200-300g elastomeric chains.10 All three studies confirmed that mini-implants loaded immediately or shortly after placement can be successfully used for anchorage.
Indications
Precise indications for skeletal anchorage are not well documented. Most of the published articles have been case reports in which new devices have been described as alternatives to other anchorage methods--for example, in extraction cases using implants instead of headgear.11,12 Mini-implants have replaced other types of fixed appliances for the delivery of differentiated force systems for posterior tooth movement13 or extrusion of impacted canines.14
Miniscrews have also been used as anchorage for tooth movements that could not otherwise have been performed. Since 1997, we have placed the Aarhus Mini-Implants in many of these cases, which fall into the following categories:
- Patients with insufficient teeth for the application of conventional anchorage (Fig. 1).
- Cases where the forces on the reactive unit would generate adverse side effects (Fig. 2).
- Patients with a need for asymmetrical tooth movements in all planes of space (Fig. 3).
- In some cases, as an alternative to orthognathic surgery (Fig. 4).
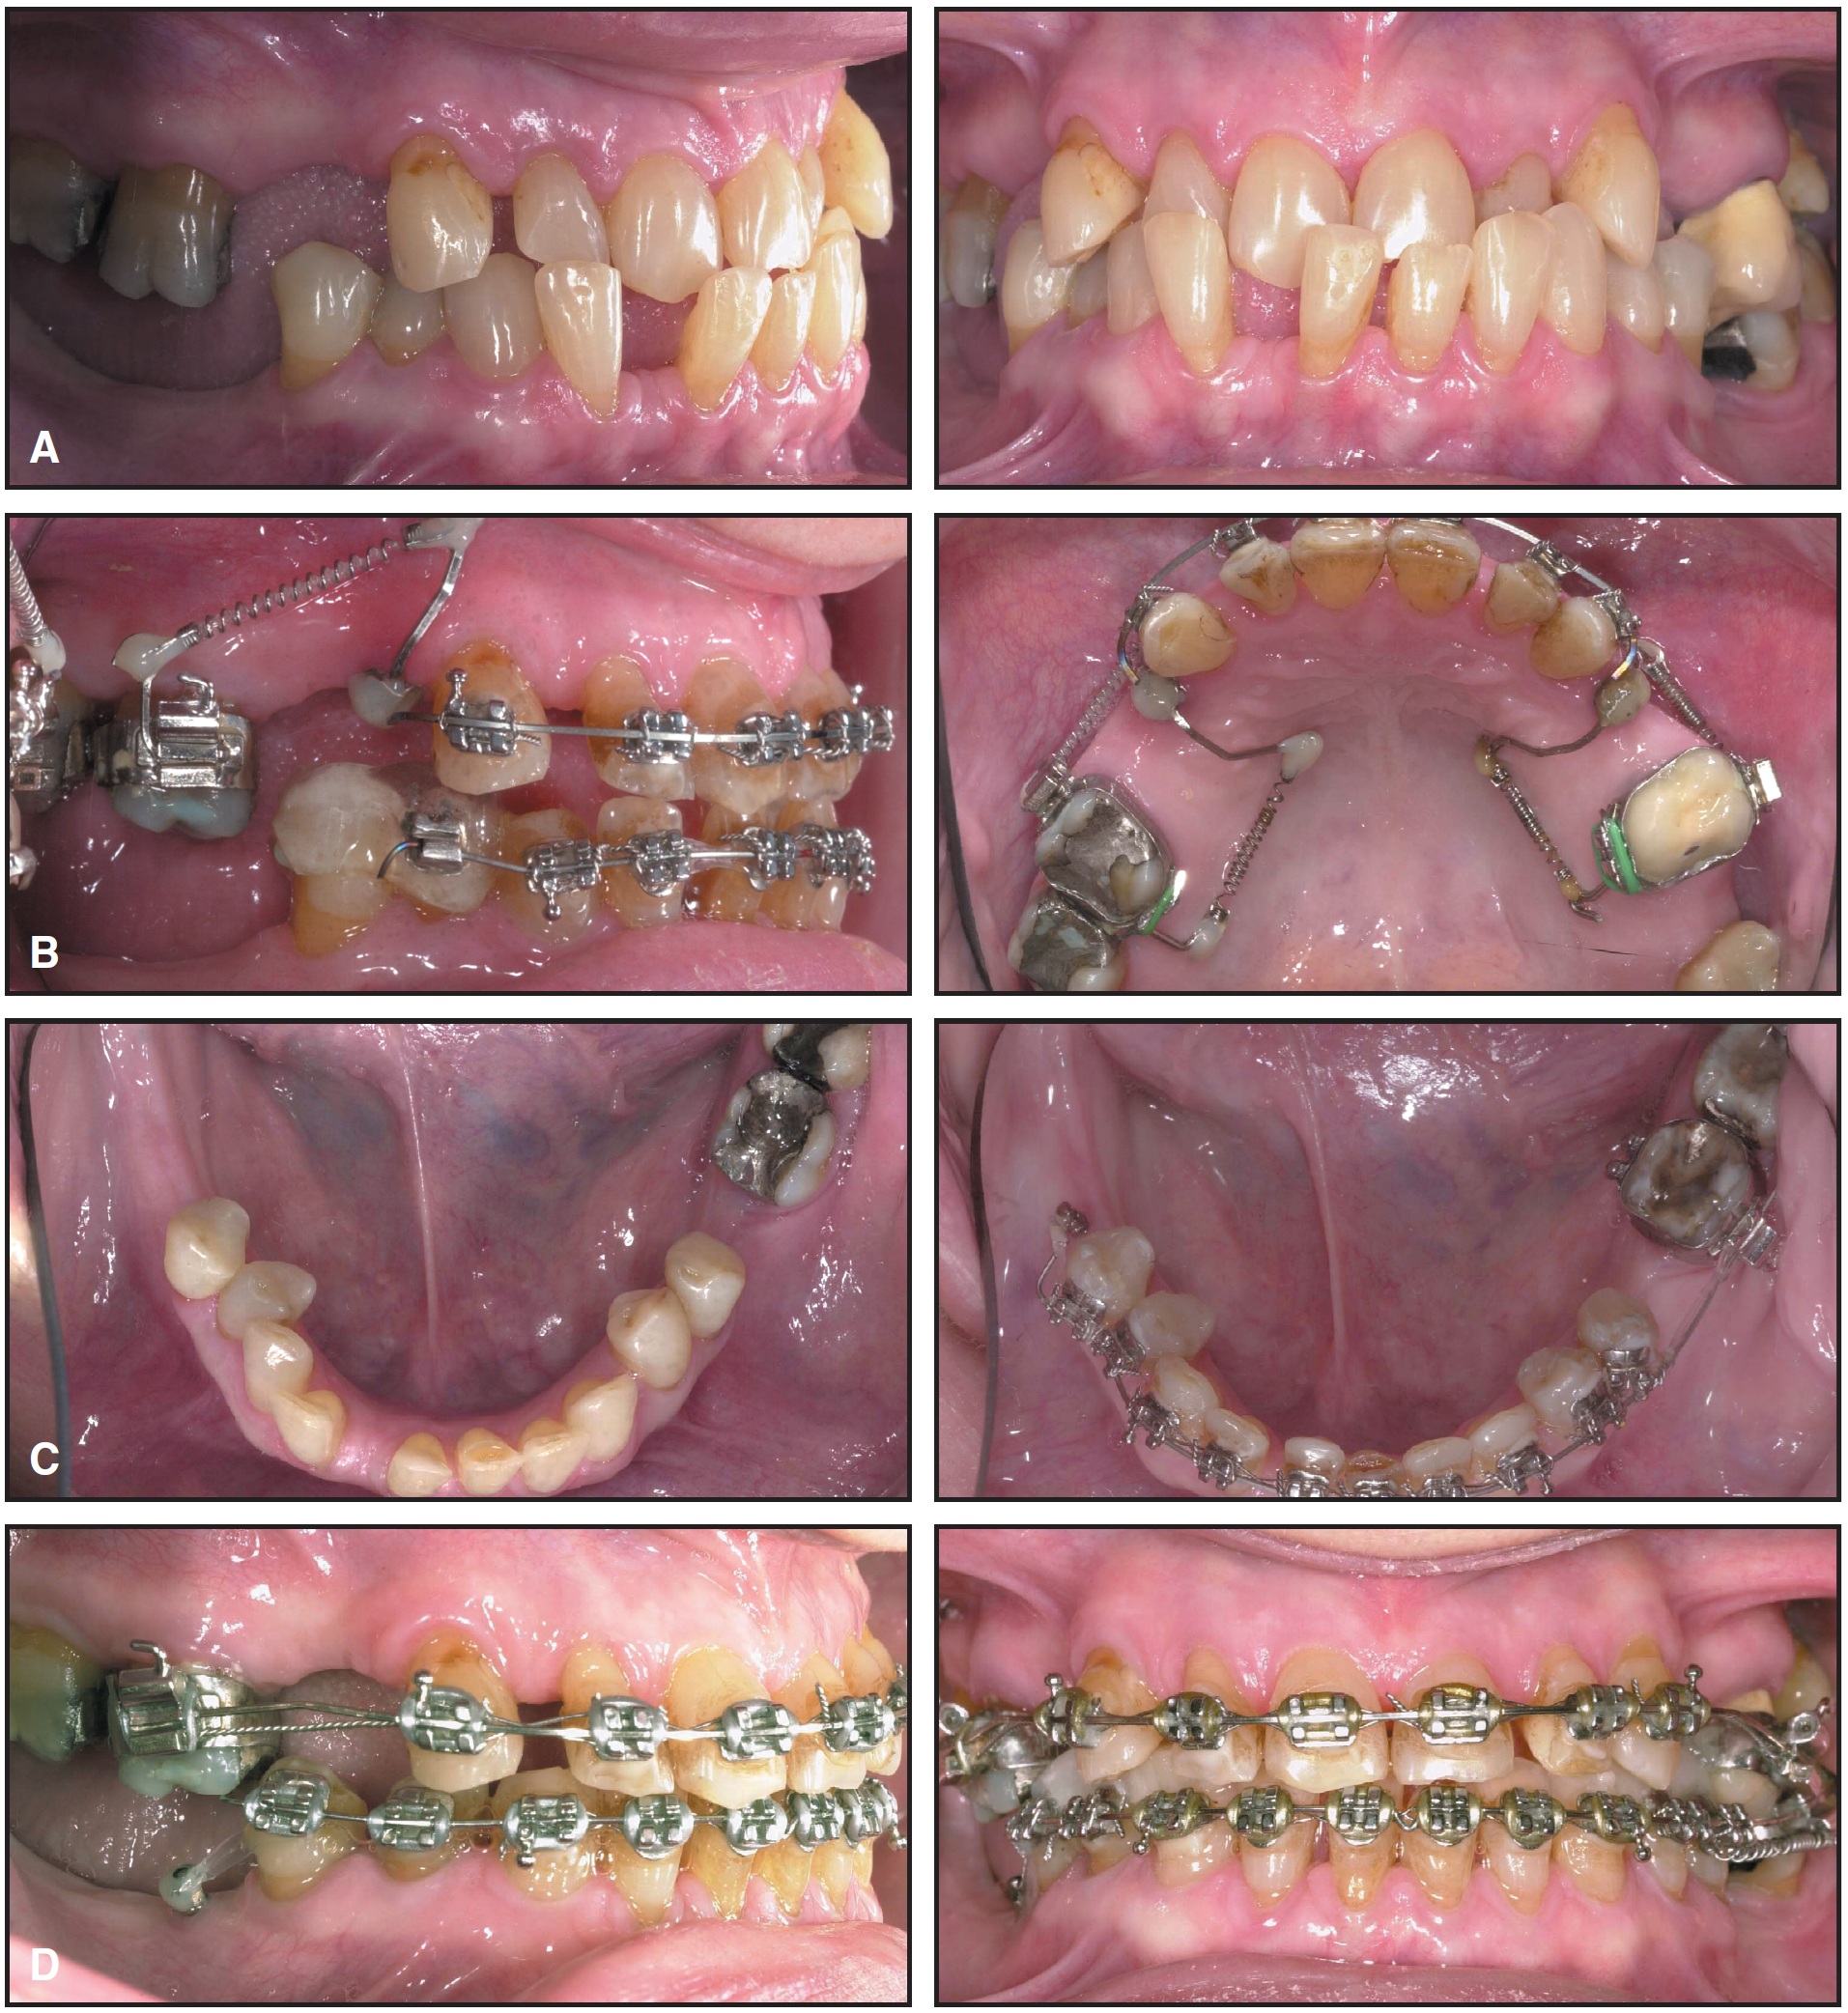
Fig. 1 A. Patient requiring mesial movement of upper molars without distalization of anterior segment. B. Two mini-implants inserted in upper premolar regions; buccal and lingual nickel titanium coil springs used to move molars mesially. C. With no molars present to anchor distally directed forces in lower right quadrant, mini-implant placed in molar area. D. Patient after orthodontic treatment, ready for placement of prosthodontic implants in upper premolar and lower molar regions. (Treated by Jörg Thormann.)

Fig. 2 A. Patient with agenesis of four lower premolars. B. Mini-implant serving as anchorage for mesial molar movement, avoiding adverse distal forces on anterior teeth. C. Patient after orthodontic treatment, awaiting sufficient maturity for implant placement.
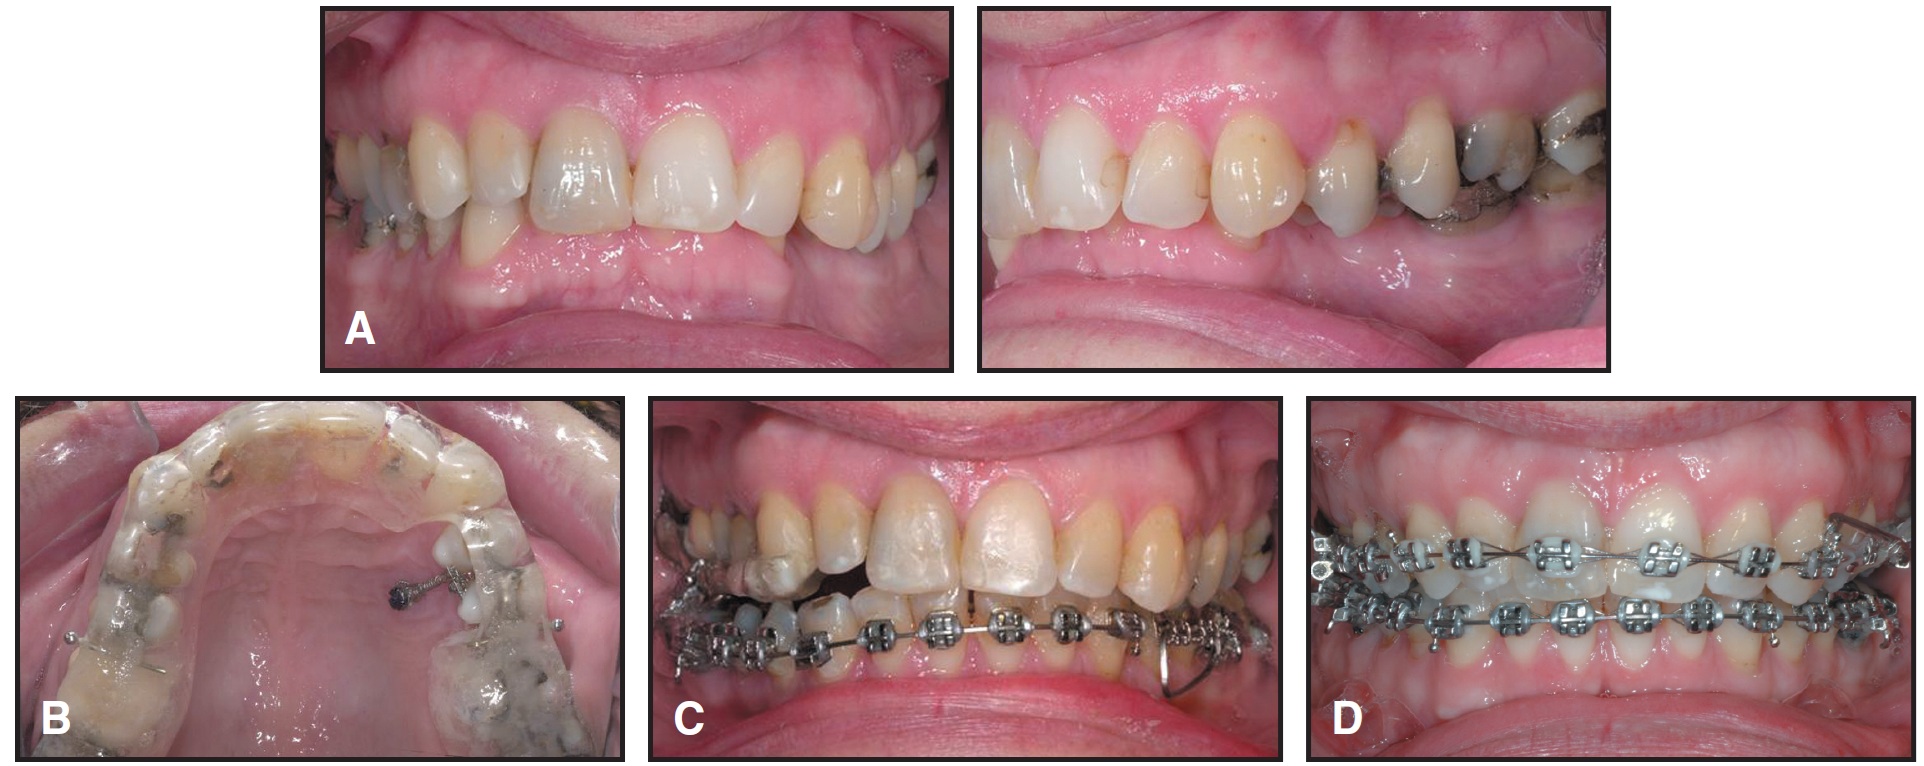
Fig. 3 A. Patient with asymmetrical occlusal plane due to overerupted premolars in scissor bite. B. Upper acrylic splint worn during fixed appliance treatment of lower arch, with palatal mini-implant used for simultaneous intrusion and lingual tipping of upper left premolars. C. Splint reduced after correction of scissor bite, with palatal implant remaining as anchorage for intrusion of premolars. D. Occlusal plane corrected after first phase of treatment. (Treated by Guillaume Guilbert.)
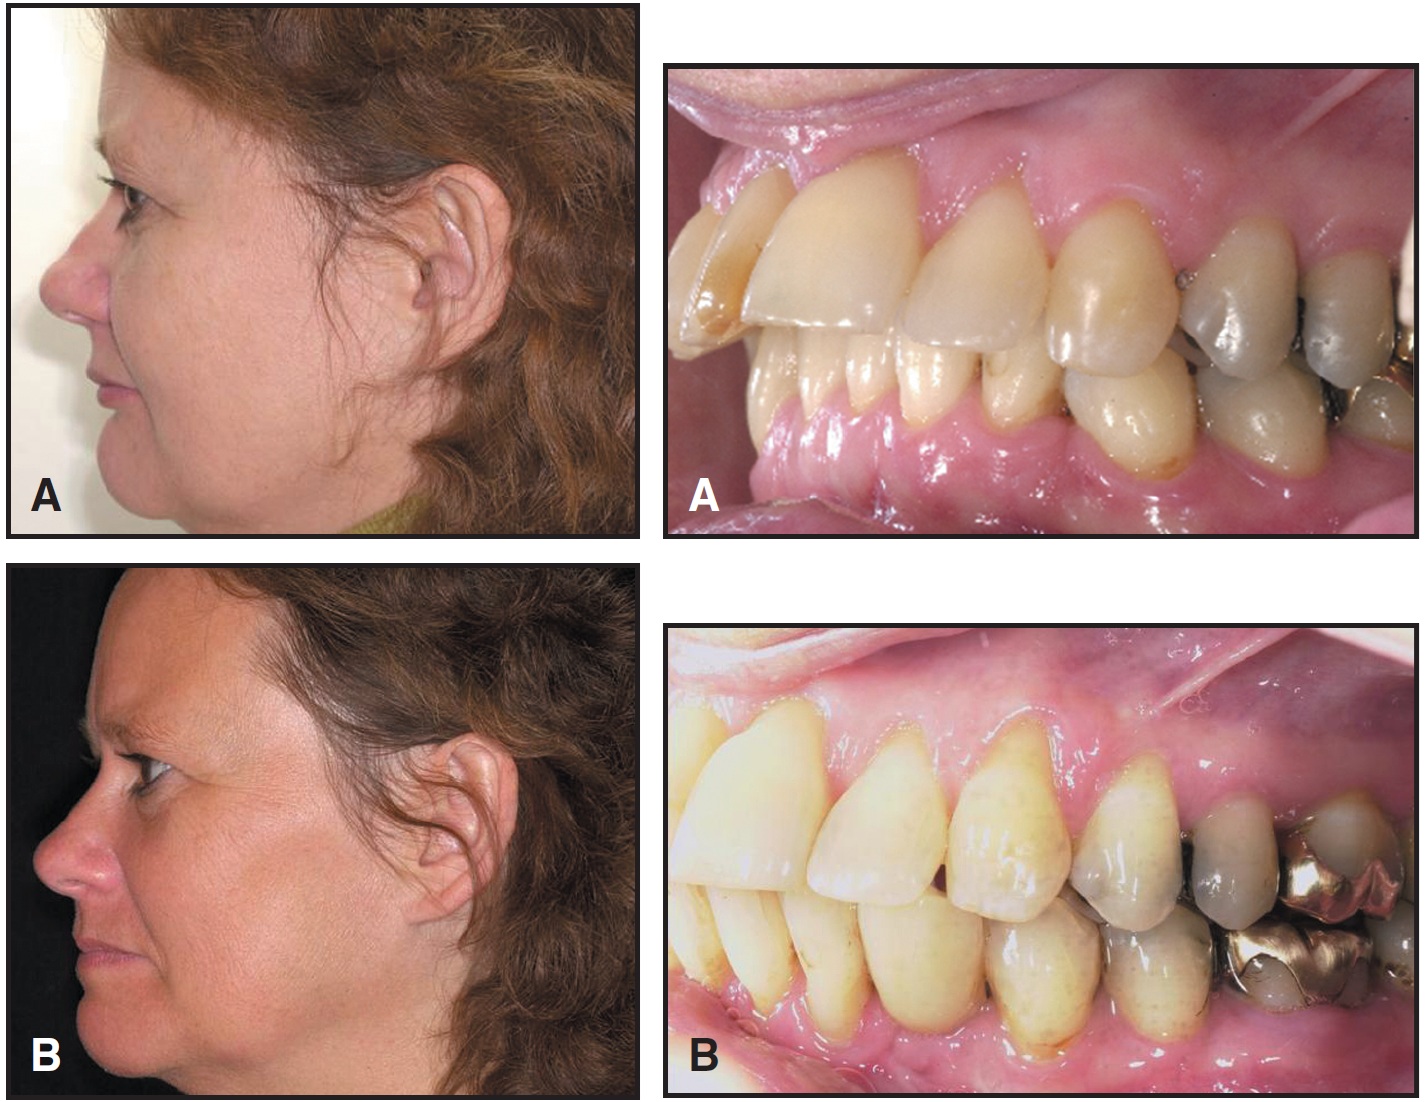
Fig. 4 A. 50-year-old female patient with extreme overjet, distal occlusion, and missing lower left canine due to ankylosis. Because problem was dentoalveolar, two mini-implants were placed in mandibular symphysis as direct anchorage for mesial displacement of lower dentition. B. Space opened for implant in place of lower left canine.
Materials and Design
Although precise specifications are not available for many mini-implants, most are made from titanium alloys. The alloy used for the Aarhus Mini-Implant is Ti6AL-4V ELI accASTM F 136-02a. The Orthodontic Mini Implant(OMI)** is made of implant steel 1.4441, which is still used in traumatology but has been prohibited for neurosurgery.
The diameter of the threaded portion of miniscrews varies from 1mm to 2mm.5,15,16 The advantage of a thin screw such as the AbsoAnchor*** is the ease of insertion between the roots without the risk of root contact. The drawback is the potential for fracture, which is closely related to the diameter of the screw17 (Fig. 5A).
As bone density increases, the resistance created by the stress surrounding the screw becomes more important in removal than in insertion of the screw. At removal, the stress is concentrated in the neck of the screw (Fig. 5B). If an Allen wrench is used for insertion and removal, the hole in the center of the screw will weaken the neck, which may lead to fracture. A hollow neck facilitates the insertion of a ligature, but also weakens the neck. The strength of the screw is optimized by using a slightly tapered conical shape and a solid head with a screwdriver slot.
The head of the mini-implant can be designed for one-point contact with a hole through the neck, as in the Dual-Top Anchor System†, the Lin/Liou Orthodontic Mini Anchorage Screw (LOMAS)‡, and the Spider Screw††. A hook (LOMAS) or a button (AbsoAnchor) can also be used. A bracket-like head design, on the other hand, offers the advantage of three-dimensional control and allows the screw to be consolidated with a tooth to serve as indirect anchorage. A patent for this design was granted to the Aarhus Mini-Implant in 1997 (Fig. 6), but minor variations have been produced by many companies, including the Dual-Top Anchor System and the Temporary Mini Orthodontic Anchorage System(TOMAS)‡‡.
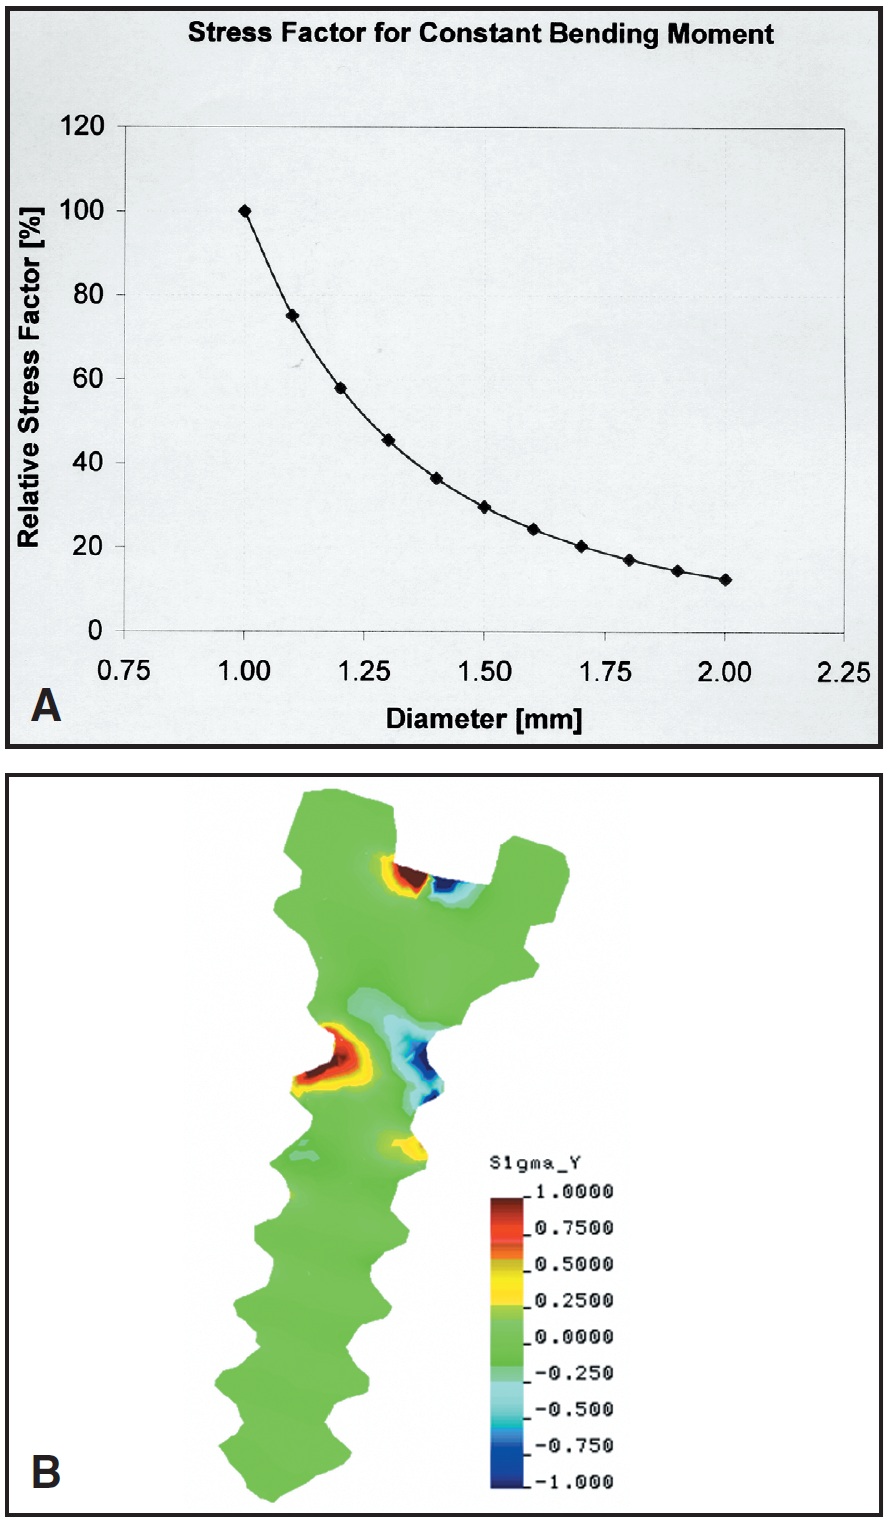
Fig. 5 A. Relationship between internal stress and diameter of mini-implant. (Reprinted by permission. 17) B. Stress distribution at implant removal, concentrated at neck of screw.
Another design factor is the cut of the threads. With self-drilling miniscrews (Aarhus Mini-Implant, Dual-Top Anchor System, and LOMAS), the apex of the screw is extremely fine and sharp, so that pilot drilling is unnecessary in most cases.
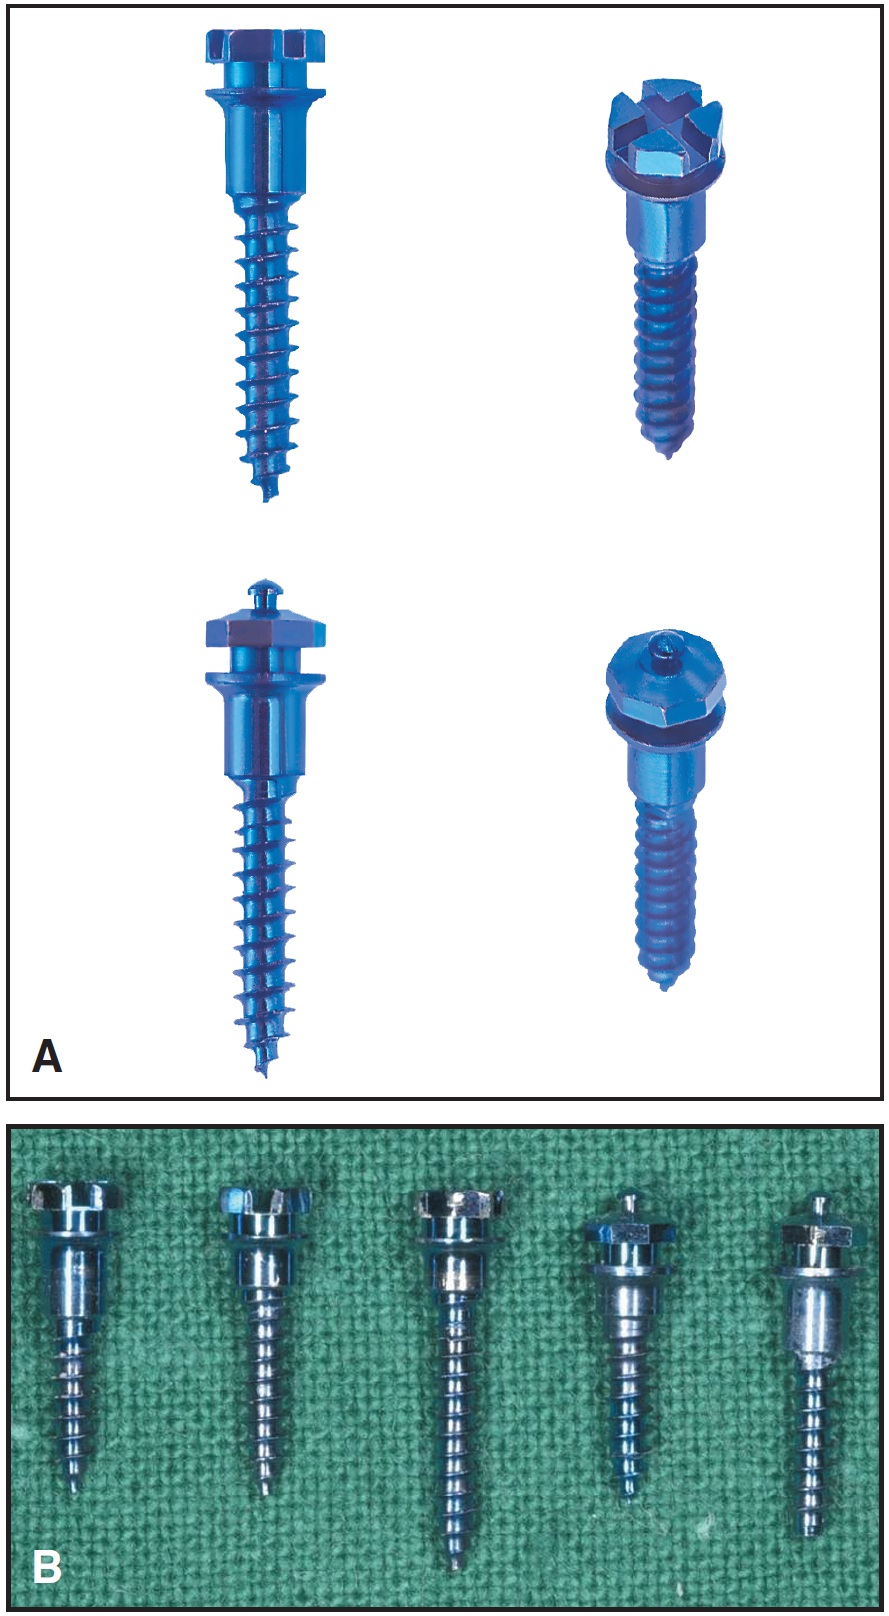
Fig. 6 A. Aarhus Mini-Implant has two different heads, one bracket-type (top) and one with button for coil springs (bottom). Cut of threads makes screws self-drilling. B. Various lengths of threaded portions and smooth transmucosal necks.
The transmucosal portion of the neck should be smooth. It is also important, however, that screws be available with different neck lengths for various implant sites (Aarhus Mini-Implant, AbsoAnchor, and OMI).
Selection of Mini-Implant Size and Location
The diameter of the miniscrew will depend on the site and space available. In the maxilla, a narrower implant can be selected if it is to be placed between the roots. If stability depends on insertion into trabecular bone, a longer screw is needed, but if cortical bone will provide enough stability, a shorter screw can be chosen. The length of the transmucosal part of the neck should be selected after assessing the mucosal thickness of the implant site.
Possible insertion sites include, in the maxilla: the area below the nasal spine, the palate, the alveolar process, the infrazygomatic crest, and the retromolar area (Fig. 7); in the mandible: the alveolar process, the retromolar area, and the symphysis (Fig. 8).

Fig. 7 Maxillary mini-implant locations. A. Below nasal spine. B. In the palate. C. Infrazygomatic crest.
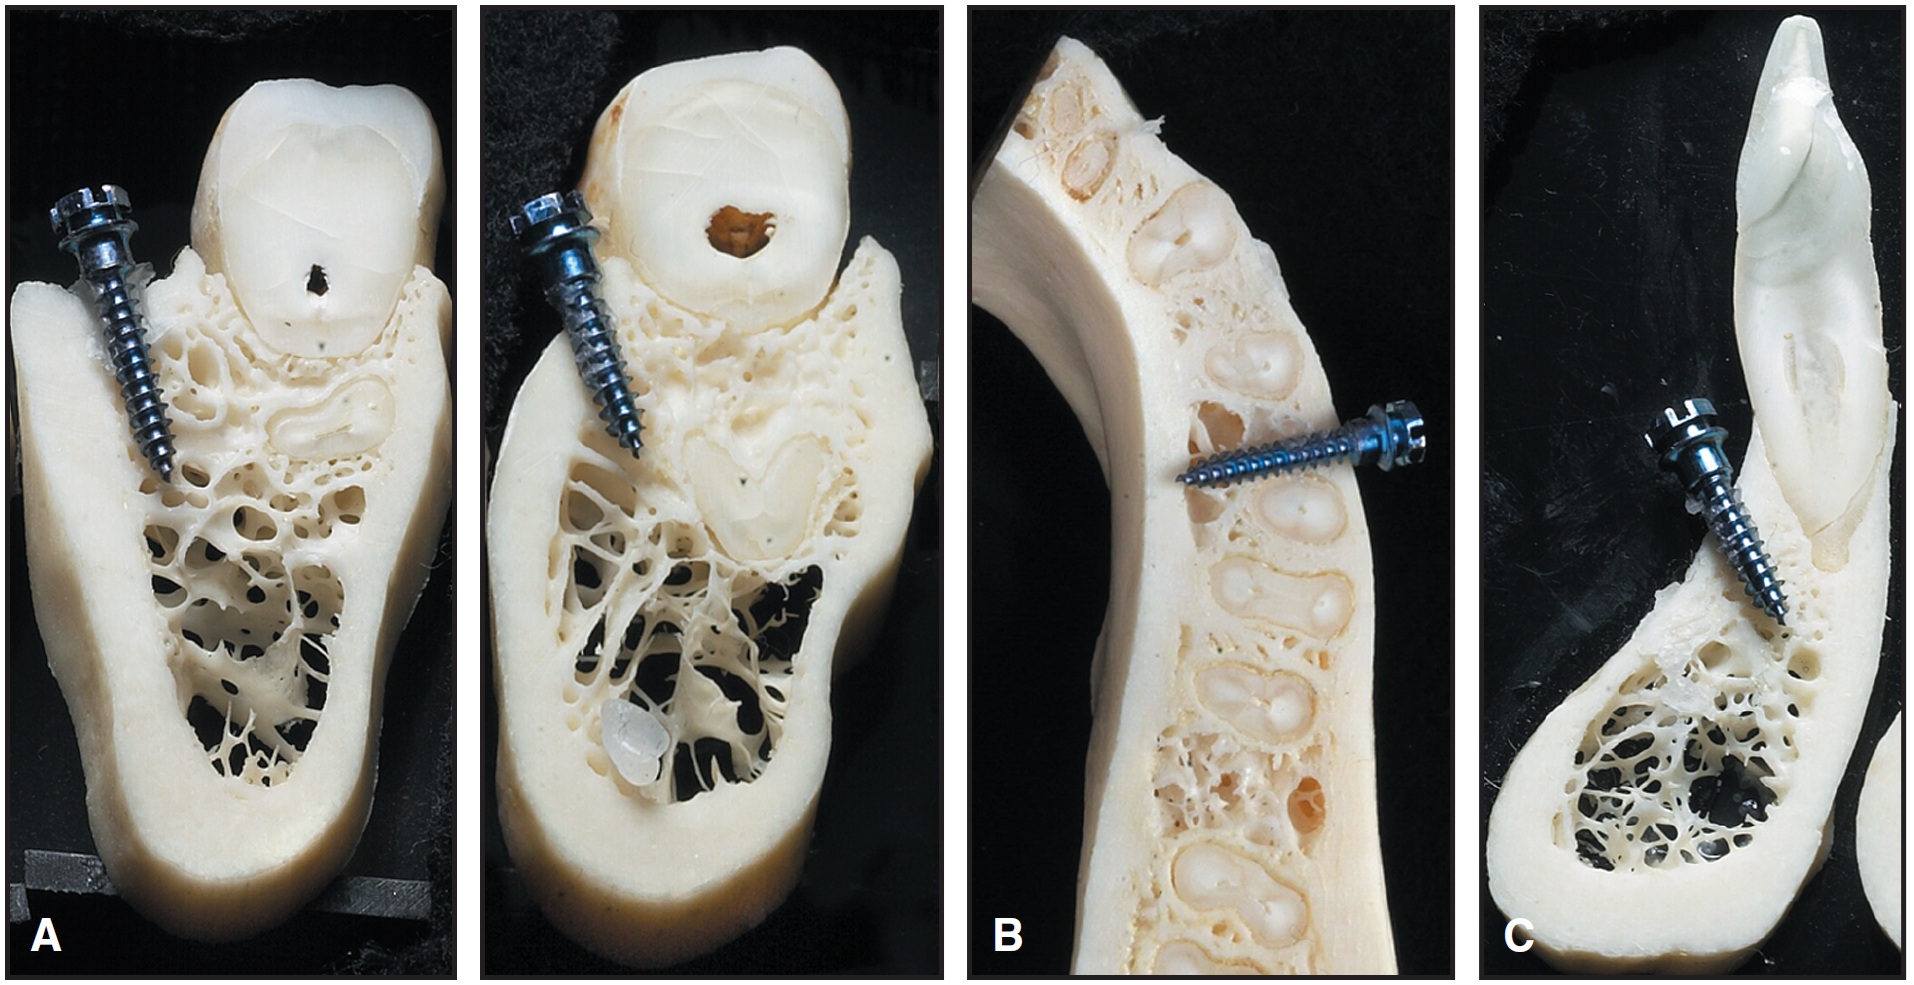
Fig. 8 Mandibular mini-implant locations. A. Retromolar area and molar region. B. Alveolar process. C. Symphysis.
An intraoral radiograph is required to determine the correct location. A small, ellipsoid template made of rectangular orthodontic wire can be attached to the teeth in the region with light-cured composite to facilitate this evaluation (Fig. 9).

Fig. 9 A. Template bent from rectangular wire and affixed with light-cured acrylic. B. Periapical radiograph of template. C. Mini-implant insertion.
Whenever possible, the mini-implant should be inserted through attached gingiva. If this is impossible, the screw can be buried beneath the mucosa so that only a wire, a coil spring, or a ligature passes through the mucosa. In the maxilla, the insertion should be at an oblique angle, in an apical direction; in the mandible, the screw should be inserted as parallel to the roots as possible if teeth are present (Fig. 8). A transcortical screw can be used for added stability in edentulous areas, where trabecular bone is usually scarce. We do not use surgical guides18 or special stents19 for screw placement.
Insertion
If no pilot drilling is necessary, I recommend that the orthodontist insert the mini-implant. Infection control is similar to that for an extraction. The doctor should wear a face mask and a surgical cap and, after a surgical hand wash, a pair of sterile gloves. After the local anesthetic is applied, the assistant washes the implant area with .02% chlorhexidine. The sterile kit is opened, and the correct screw is selected and inserted while the assistant keeps the lips apart and the mucosa tight (Fig. 9C).
Even when self-drilling screws are used, pilot drilling may be required where the cortex is thicker than 2mm, as in the retromolar area or the symphysis, because dense bone can bend the fine tip of the screw. The pilot drill should be .2-.3mm thinner than the screw and should be inserted to a depth of no more than 2-3mm. Pilot drilling should be done in a surgical environment, as with placement of a dental implant. If this is not feasible in the orthodontic office, the insertion should be performed by an oral surgeon.
If a manual screwdriver is used for insertion, it is immediately evident when a root has been contacted, and any damage will be minimal. In tests where notches were intentionally created, histological analysis showed spontaneous repair by the formation of cellular cementum. On the other hand, if the screw is inserted with a low-speed drill, there is a greater chance of not detecting a root due to the lack of tactile sensation.
Antibiotics have been recommended by several authors, but should not be routinely prescribed. The risk of infection is obviously greater when drilling is performed, especially when the same insertion site is entered repeatedly. As long as strict sterility is maintained, however, no infection will occur after placement of a mini-implant.
Force Loading
The timing of orthodontic force application can vary from minutes to eight weeks. When moderate force is used, there seems to be no reason not to load immediately. Dalstra and colleagues used finite element analysis to calculate the strain developed in various cortical thicknesses and densities of trabecular bone when a load of 50cN was placed perpendicular to the long axis of a 2mm-diameter mini-implant17(Fig. 10). They found that with thin cortical bone and low-density trabecular bone, the strain values may exceed the level of microfractures and thus lead to screw loosening.20 Therefore, immediate loading should be limited to about 50cN of force.
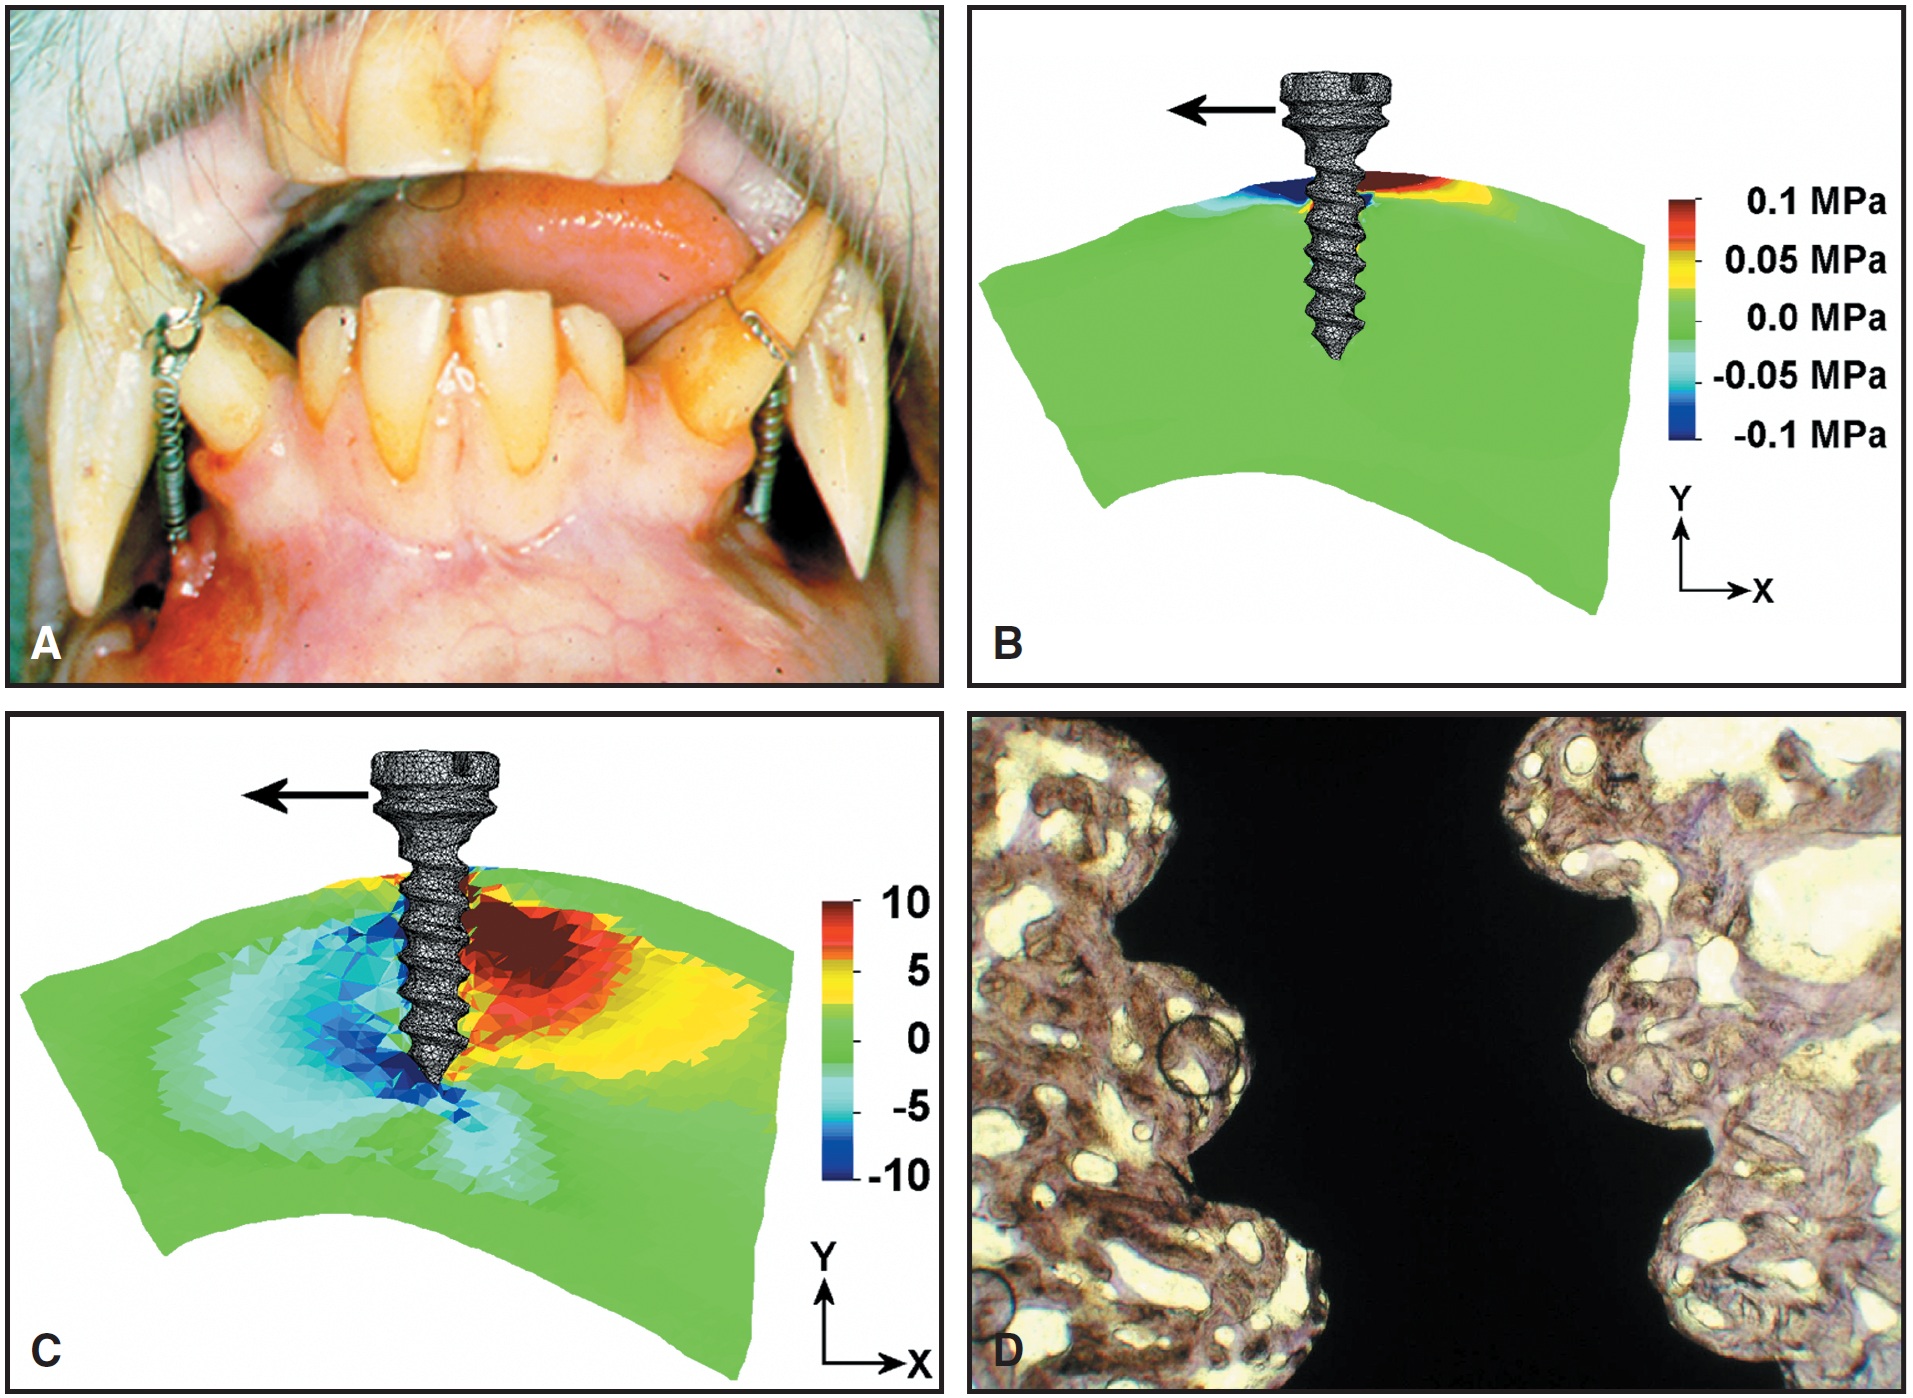
Fig. 10 A. Monkey with two mini-implants buried below mucosa in symphysis and loaded with force against lower canines. B. When force is loaded perpendicular to implants, stress is concentrated in cortex. (Reprinted by permission.17) C. Deformation is concentrated in trabecular bone because center of rotation is located near or within cortex. (Reprinted by permission.17) D. Histological section after three months of loading. Note bone density and high percentage of bone-to implant contact.
Mini-Implant Problems
In five years of experience with skeletal anchorage, I have noticed several common problems, which can be classified as follows:
Screw-Related Problems
- A screw can fracture if it is too narrow or the neck area is not strong enough to withstand the stress of removal. The solution is to choose a conical screw with a solid neck and a diameter appropriate to the quality of bone.
- Infection can develop around the screw if the transmucosal portion is not entirely smooth. If a screw system with variable neck lengths is used, the clinician can select one that suits the particular implant site.
Operator-Related Problems
- Application of excessive pressure during insertion of a self-drilling screw can fracture the tip of the screw.
- Overtightening a screw can cause it to loosen. It is crucial to stop turning the screw as soon as the smooth part of the neck has reached the periosteum.
- With a bracket-like screw head, the ligature should be placed on top of the screw in the slot perpendicular to the wire (Fig. 11). Turning the ligature around the screw will make it impossible for the patient to keep the area free of inflammation.
- It is important not to wiggle the screwdriver when removing it from the screw head. The screwdriver will not stick if the long extension is removed before the part surrounding the screw.
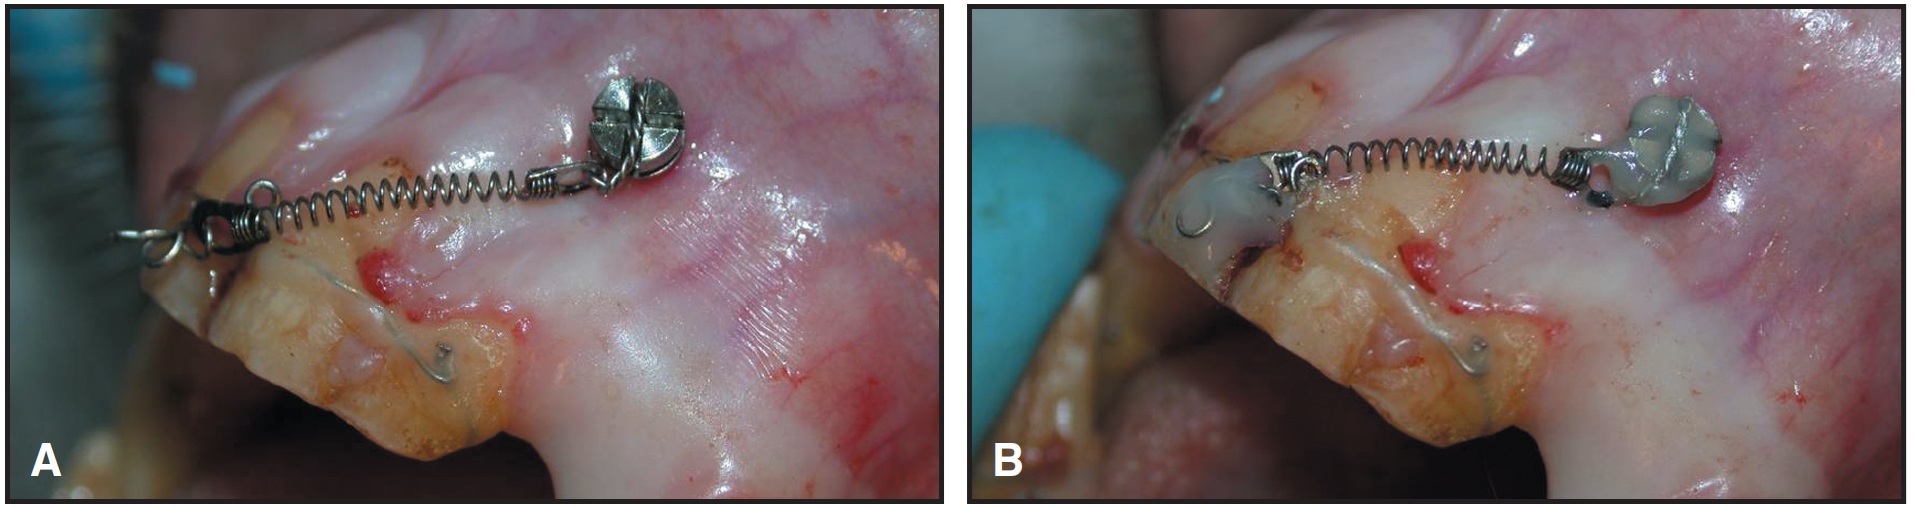
Fig. 11 A. Ligature wire for maxillary mini implant is not wound around bracket-like screw head, but placed in perpendicular slot. B. Screw head and bracket covered with light-cured composite for comfort.
Patient-Related Problems
- The prognosis for primary stability of a mini-implant is poor in cases where the cortex is thinner than .5mm and the density of the trabecular bone is low.
- In patients with thick mucosa, the distance between the point of force application and the center of resistance of the screw will be greater than usual, thus generating a large moment when a force is applied.
- Loosening can occur, even after primary stability has been achieved, if a screw is inserted in an area with considerable bone remodeling because of either the resorption of a deciduous tooth or post-extraction healing.
- Mini-implants are contraindicated in patients with systemic alterations in the bone metabolism due to disease, medication, or heavy smoking.
Conclusion
The present article was intended to answer some of the questions raised by an editorial in this journal.1 In my opinion, skeletal anchorage is clearly not a replacement for other proven anchorage systems. Skeletal anchorage should serve merely to expand the orthodontic services we can offer our patients.
FOOTNOTES
- *MEDICON eG, Tuttlingen, Germany; www.medicon.de. ScanOrto A/S, Charlottenlund, Denmark; www.aarhus-mini-implant.com.
- **Leone S.p.A., Via P. a Quaracchi 50, 50019 Sesto Fiorentino, Firenze, Italy. Distributed by LeoneAmerica, 501 W. Van Buren, Suite S, Avondale, AZ 85323; www.americantooth.com.
- ***Dentos, 258 BunJi, Dong-In Dong, Jung-Gu, Taegu, Korea; www.dentos.co.kr.
- †Jeil Medical Corporation, 775-3 Daesung B/D, Daelim 3 Dong Youngdeungpoku, Seoul, Korea. Distributed by RMO Inc., P.O. Box 17085, Denver, CO 80217; www.rmortho.com.
- ‡Mondeal Medical Systems GmbH, Moltkestrasse 39, D-78532 Tuttlingen, Germany. Distributed by Mondeal North America, Inc., 6895 Lake Bluff Drive, Comstock Park, MI 49321; tim@mondeal.com.
- ††Registered trademark of HDC, Via dell'Industria 19, 36030 Sarcedo, Italy; www.hdc-italy.com.
- ‡‡Dentaurum, Turnstrasse 31, D-75228 Ispringen, Germany; www.dentaurum.com.
REFERENCES
- 1. Keim, R.G.: Editor’s Corner: Answering the questions about miniscrews, J. Clin. Orthod. 39:7-8, 2005.
- 2. Roberts,W.E.; Marshall, K.J.; and Mozsary, P.G.: Rigid endosseous implant utilized as anchorage to protract molars and close an atrophic extraction site, Angle Orthod. 60:135-152, 1990.
- 3. Wehrbein, H. and Merz, B.R.: Aspects of the use of endosseous palatal implants in orthodontic therapy, J. Esth. Dent. 10:315-324, 1998.
- 4. Creekmore, T.D. and Eklund, M.K.: The possibility of skeletal anchorage, J. Clin. Orthod. 17:266-269, 1983.
- 5. Kanomi, R.: Mini-implant for orthodontic anchorage, J. Clin. Orthod. 31:763-767, 1997.
- 6. Costa, A.; Raffaini, M.; and Melsen, B.: Miniscrews as orthodontic anchorage: A preliminary report, Int. J. Adult Orthod. Orthog. Surg. 13:201-209, 1998.
- 7. Melsen, B.: Is the intraoral-extradental anchorage changing the spectrum of orthodontics? in Implants, Microimplants, Onplants and Transplants: New Answers to Old Questions in Orthodontics, ed. J.A. McNamara, Jr., University of Michigan, Ann Arbor, 2004, pp. 41-68.
- 8. Melsen, B. and Costa, A.: Immediate loading of implants used for orthodontic anchorage, Clin. Orthod. Res. 3:23-28, 2000.
- 9. Ohmae, M.; Saito, S.; Morohashi, T.; Seki, K.; Qu, H.; Kanomi, R.; Yamasaki, K.I.; Okano, T.; Yamada, S.; and Shibasaki,Y.: A clinical and histological evaluation of titanium mini-implants as anchors for orthodontic intrusion in the beagle dog, Am. J. Orthod. 119:489-497, 2001.
- 10. Deguchi, T.; Takano-Yamamoto, T.; Kanomi, R.; Hartsfield, J.K. Jr.; Roberts, W.E.; and Garetto, L.P.: The use of small titanium screws for orthodontic anchorage, J. Dent. Res. 82:377-381, 2003.
- 11. Kyung, H.M.; Park, H.S.; Bae, S.M.; Sung, J.H.; and Kim, I.B.: Development of orthodontic micro-implants for intraoral anchorage, J. Clin. Orthod. 37:321-328, 2003.
- 12. Park, H.S.; Bae, S.M.; Kyung, H.M.; and Sung, J.H.: Micro-implant anchorage for treatment of skeletal Class I bialveolar protrusion, J. Clin. Orthod. 35:417-422, 2001.
- 13. Umemori, M.; Sugawara, J.; Mitani, H.; Nagasaka, H.; and Kawamura, H.: Skeletal anchorage system for open-bite correction, Am. J. Orthod. 115:166-174, 1999.
- 14. Carano, A.; Velo, S.; Leone, P.; and Siciliani, G.: Clinical applications of the Miniscrew Anchorage System, J. Clin. Orthod. 39:9-24, 2005.
- 15. Joo, B.H.: A new era of orthodontic anchorage: Mini-anchorscrews (MAS), in Implants, Microimplants, Onplants and Transplants: New Answers to Old Questions in Orthodontics, ed. J.A. McNamara, Jr., University of Michigan, Ann Arbor, 2004, pp. 89-128.
- 16. Maino, B.G.; Bednar, J.; Pagin, P.; and Mura, P.: The Spider Screw for skeletal anchorage, J. Clin. Orthod. 37:90-97, 2003.
- 17. Dalstra, M.; Cattaneo, P.M.; and Melsen, B.: Load transfer of miniscrews for orthodontic anchorage, Orthod. 2004 1:53-62, 2004.
- 18. Morea, C.; Dominguez, G.C.; Wuo, A.V.; and Tortamano, A.: Surgical guide for optimal positioning of mini-implants, J. Clin. Orthod. 39:317-321, 2005.
- 19. Kitai, N.; Yasuda, Y.; and Takada, K.: A stent fabricated on a selectively colored stereolithographic model for placement of orthodontic mini-implants, Int. J. Adult Orthod. Orthog. Surg. 17:264-266, 2002.
- 20. Frost, H.M.: Perspectives: Bone’s mechanical usage windows, Bone Miner. 19:257-271, 1992.
-
 DR. MELSEN
Dr. Melsen is Professor and Head, Department of Orthodontics, Royal Dental College, Aarhus University, Vennelyst Boulevard 9, DK-8000 Aarhus C, Denmark, and an Associate Editor of the Journal of Clinical Orthodontics. She has a financial interest in the Aarhus Mini-Implant. E-mail: orthodpt@odont.au.dk.