This month's article takes the reader from the fundamentals of imaging and display technologies to digital data formats and video. A myriad of relevant information is simplified for the orthodontic audience with some practical clinical comments. The calculations and tables should prove to be useful in making decisions on computer hardware selection for the orthodontic office.
JAMES MAH, DDS, MS, DMS
Imaging in Orthodontics: Present and Future
Although digital cameras have been in common use since the mid-1990s, they have recently undergone an exponential growth in form and function. Their use in orthodontics began with compact digital cameras, at the same time that 35mm amateur cameras were being adapted to professional purposes. Because of the exorbitant price of a professional digital camera, alternatives such as mirrors and flashes or antireflex lateral screens began to appear.
The first reflex digital cameras with interchangeable lenses and ring flashes have entered the market only recently. At present, however, many companies are competing to develop such cameras, and prices are dropping. With these factors in mind, 2003 may be an ideal time to buy a semiprofessional digital camera.
Similar articles from the archive:
- Digital Models: A New Diagnostic Tool June 2001
- A Comparison of Three Digital Cameras for Intraoral Photography October 1999
- The DenOptix Digital Radiographic System July 1999
Compared to taking records with 35mm slide film, digital photography can save both time and money. If you have 200 new patients per year and need to take 36 slides for each patient, the cost can easily reach $3,000 a year, including film, processing, slide mounts and holders, and duplication for presentations, publication, or referrals. Moreover, it is difficult to make faithful copies of slides without sending them to a laboratory or purchasing a high-quality duplicator. Most presentations nowadays are multimedia, involving PowerPoint images and video projectors. Thanks to this new technology, it is no longer necessary to haul around carousels of slides to give lectures.
With digital photography, each image is simply transmitted to a file, saving time and money spent on film processing and, equally important, saving valuable storage space. Any image can be brought up on the computer screen by opening the file, which can also be directly associated with the patient's record. Backing up the image files or making copies for presentations or publication is easy, using compact cards or PCMCIA Type II cards that currently store as much as 5GB of information.
The Arithmetic of Digital Images
The terminology of digital image processing is often confusing and difficult to understand. The following is a brief clarification of some of the most important aspects of this technology.
Let's start with one surprising fact: A pixel has no size or shape. At the time it's born, it's simply an electrical charge. A pixel is only given size and shape by the device you use to display or print it.
The size of a digital photo sensor is determined by the number of photosites that it has on its surface. Even though the captured pixels have no physical dimensions, this size is usually specified in one of two ways--by the sensor's dimension in pixels, or by its total number of pixels. For example, the same image can be said to have 1,800 X 1,600 pixels (expressed as "1,800 by 1,600"), or to contain 2.88 million pixels (1,800 multiplied by 1,600).
When a digital image is displayed on the computer screen, its size is determined by three factors: the screen's resolution, the screen's size, and the number of pixels in the image.
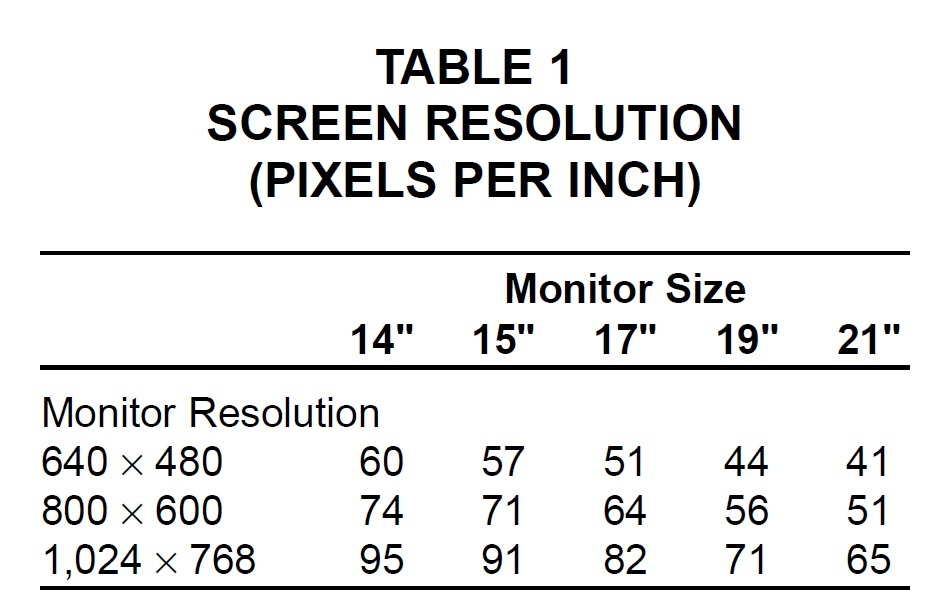
The size of each pixel on the screen is determined by the resolution of the screen. The resolution is almost always given as a pair of numbers that indicate the screen's width and height in pixels, with the horizontal dimension given first. For example, a monitor may be described as a low-resolution 640 X480, a medium-resolution 800 X600, or a high-resolution 1,024 X768 or more. Changing the screen resolution changes the size of displayed objects such as icons, text, buttons, and images. As the resolution increases, the objects decrease in apparent size, but appear sharper.
When displaying images on the screen, it's important that the viewer be able to see the entire image without having to scroll through it. Web designers usually assume that the lowest common denominator is a 640 X480 display. This is why most images to be sent by e-mail or posted on a website are sized so that they are no wider than 600 pixels (for landscape images) or deeper than 400 pixels (for portrait images).
Printing Digital Images
To simplify calculations, images on a computer screen are generally considered to be displayed at 72 pixels per inch (ppi). This is not an exact number for any resolution on any screen (Table 1), but it tends to be a good compromise. Printer resolutions, on the other hand, are usually specified by the number of dots per inch (dpi). Therefore, to determine the print size of a screen image, you have to convert from pixels to inches by dividing the image's dimension in pixels by the resolution of the device in ppi. For example, to convert the dimensions for a 1,500 X1,200 image being printed at 300ppi you divide as follows:
Width: 1,500 pixels ÷ 300ppi = 5"
Height: 1,200 pixels ÷ 300 ppi = 4"
The result is a 5" X4" print.
One thing to keep in mind is that if you enlarge a print too much, it won't be as sharp as you may desire. That's because a certain minimal number of dots per inch, usually about 300, are needed to get a good print. Pixels begin to show up as individual dots rather than an overall image when the print is enlarged to a point where the ppi fall too low. If your printer can print a sharp image only at 300 or more pixels per inch, you need to determine if the size of the image you plan on printing will fall below this level.
Let's say you have a scanned image and you want to reduce or enlarge it to print it at a certain size. First, you must convert the image's original size from pixels to pixels per inch. For example, if you print an image that's 1,600 pixels wide so that the print is 10" wide, there will only be 160 dots per inch (1,600 pixels ÷ 10" = 160 pixels per inch).
Understanding Image Files and Compression
JPEG (Joint Photographic Experts Group, pronounced "jay-peg") is by far the most popular format for display of photographic images on the Internet. Although these files have traditionally used a ".jpg" extension, the actual file format is called JFIF (JPEG File Interchange Format), and the latest standard calls for a ".jif" extension. The other popular Internet image format, GIF, has been optimized for the display of type and line drawings, but supports only 8-bit color on the computer screen, whereas JPEG supports the more detailed 24-bit color.
The JPEG format uses a "lossy" compression scheme that makes digital files smaller, but sacrifices image quality. Compression is performed on blocks of pixels, eight on a side. You can see these blocks when you use the highest levels of compression or greatly enlarge the image. Every time you open one of these files and then save it again, the image is compressed. As you go through a series of saves, the image becomes more and more degraded. Therefore, you should not use the JPEG format to save original images you expect to modify later. Be sure to save your originals in a loss-free format such as TIFF (Tag Image File Format) or BMP (bitmap) at maximum color depth.
TIFF is a non-compressed format that has been widely accepted and widely supported as an image transfer format not tied to specific scanners, printers, or computer display hardware. TIFF is also a popular format for desktop publishing applications.
A new JPEG 2000 format, not yet available in digital cameras, uses wavelet technology to allow higher compression with fewer image flaws. With this type of compression, the image is "streamed," or gradually filled in with more detail. JPEG 2000 images can be saved in "lossless" files and will have the same color scheme on any display system.
Optimal Image Sizes
Beware of claims about image sizes (often referred to as resolution) for cameras and scanners, because there are two kinds--optical and interpolated. The optical resolution of a camera or scanner is the actual number of the image sensor's photosites. This resolution can be improved to a limited extent by a process called interpolated resolution, which adds pixels to the image using software. The program evaluates the pixels surrounding each new pixel to determine what its colors should be. For example, if all the pixels around a newly inserted pixel are red, the new pixel will be made red. What's important to keep in mind is that interpolated resolution doesn't add any new information to the image--it just adds pixels and makes the file larger. Therefore, you should always refer to a device's optical resolution rather than its interpolated resolution.
Most digital cameras have a default resolution of JPEG 72dpi, which is good for displaying on computer screens or in presentations (although 90dpi would be ideal), but produces poor quality for publication (Fig. 1). Images of this resolution become completely distorted when enlarged, and most printed orthodontic journals will not accept them. Some camera models allow higher resolutions to be used in TIFF or BMP formats, which are more suitable for publication. These non-compressed images take up much more space, however, making it possible to fill the camera's memory with only four to six high-resolution photographs. High-capacity memory cards such as 1GB compact cards will solve this problem. Furthermore, the TIFF 300-350dpi is the ideal format for interpolating without noticeably distorting the photograph, thus occupying less memory.

Fig. 1 A. JPEG 72dpi image shows poor definition when printed. B. TIFF 300dpi image is much sharper.
What resolution does a digital image need to be to be "equal" to a typical 35mm image? There is no good way to answer this question scientifically. It depends on the print resolution we want and the size of the picture.
Film is an analog source made up of small, randomly placed, odd-shaped grains with an infinite potential resolution. You can scan it to zillions of megabytes of data to print a massive, wall-size poster. With a digital camera, if you want an 8" X 10" color print at 300dpi, you need a camera with 7.2 megapixels (MPix) of resolution (2,400 X3,000). If you print at 150dpi, a 1.8MPix camera is sufficient. The advantage of digital cameras, however, is that with interpolation, the final aspect is almost the same. And since you really only need to print at 150 dpi on today's best color inkjet printers, a camera of 4MPix or so will produce fine-quality 8" X10" color prints, equal to or better than 35mm film prints.
Evaluating Image Quality
When we look at a photograph, we make an overall appraisal on two levels of detail: content and quality. We get a first impression of what the photograph is seeking to convey and how it deals with its topic. Then we analyze the overall color and sharpness. This immediate appraisal allows us to say whether we like the photograph or not, or whether we like it better than another. Only then do we look at other criteria such as whether the object has been correctly positioned or whether anything of interest has been omitted.
In orthodontic photography, there are many details we can examine to determine the quality of an image. Using Figure 2 as an example, we should look for the edges of the rectangular wire, the contour of the rubber ligatures, the ends of the plastic separators, and the sharpness of the premolar brackets in the background. Other details in this type of photograph can be saliva bubbles, mucous veins, the hairs around the lips, and the palatal creases. In Figure 1B, the facial moles are sharp, whereas they are barely noticeable in Figure 1A. Also sharp in Figure 1B are the hair in front of the ear and the facial hair. Moving farther back, we can see the definition of the eyelashes, and at another distance we can see the definition of the nose skin.
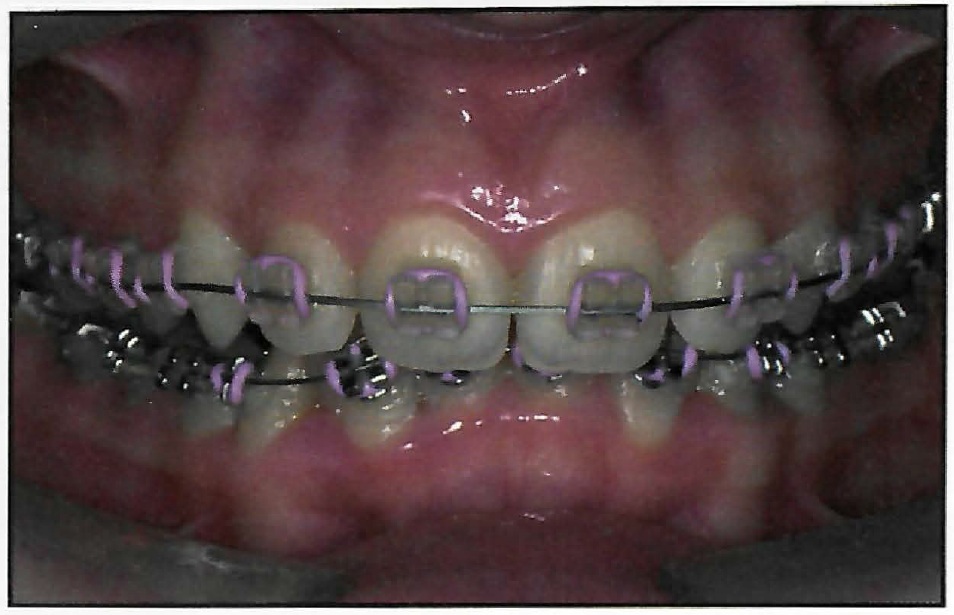
Fig. 2 TIFF 300dpi image shows many details of quality.
The camera itself comes into play in three areas that determine the overall quality of photography: Luminosity. An observer will perceive an image with better luminosity as superior to another image with identical resolution and focus. We are often misled about the relative quality of two photographs simply because the shades are different. The most accurate way to compare digital images is by having them output by a print shop without any computer-controlled color manipulation, so that shades of color can be evaluated and the luminosity of the flash can be adjusted to reproduce real conditions. This calibration should be carried out immediately after a camera has been purchased. Depth of field. It is important that the lens be able to focus on structures at different distances to provide sharp detail over the greatest possible area. This is one of the biggest problems with non-professional digital cameras. Digital reflex cameras allow lenses from analog cameras to be used, making it much easier to find suitable lenses for macro photography. Resolution. Lower resolution has a significant influence on the quality of the printed image (Fig. 1). Photographs taken at a resolution of 72dpi will only achieve reasonable quality on inkjet printers, which work by an entirely different process from that of commercial offset printers.
Video
No one would question that a video image has the potential to convey much more information than a still photograph. The latest digital cameras can now record small video files, and these sequences are starting to appear in multimedia presentations. There is no doubt that the next stage of digital evolution will be the introduction of video and audio into patient records.
Video offers a number of advantages for orthodontists:
- Practical explanations of specific clinical or laboratory procedures can be taped and played back when needed.
- Dynamic movements of dentofacial structures can be visualized in three-dimensional detail.
- Treatment options can be assessed by, for example, studying the patient profile through forward and backward movement of the mandible in Class II cases.
- Smile dynamics can be analyzed during the complete smile cycle.
- Teleconferencing can be used for presentations or study clubs.
- Still images can be extracted for publication a computer image editing program.
- File transfer is carried out in the same way as with digital photography, through an IEEE lead that allows high-speed transmission.
MPEG (Moving Picture Experts Group) is an international work group responsible for defining digital audio and video compression standards. A conventional AVI video file or noncompressed MPEG file would be too big for the applications listed above. The new MPEG 4 standard, however, uses high levels of information compression so the file can be transmitted more quickly through communication networks with poor bandwidth. Instead of recording all the photograms, which make up the moving image, in the video file, the MPEG 4 standard only stores the changes from one photogram to the next. This technique, called loss compression, allows much smaller audio and video files to be created without any visible loss of quality.
The new MPEG 4 DV cameras have replaced videotapes with compact cards. It is now possible to save one hour of video on a 32MB compact flash card. A patient video record with four sequences (one before treatment, two during treatment, and one after treatment) takes about 1.5 minutes of space, which corresponds to approximately 7MB in MPEG 2 format. If digital photographs were used, assuming four photographic sequences with a total of 32 slides and an average of 1MB per photograph, the disk space required would be 32MB.
Besides the digital video camera, the equipment required includes a digital video card, a video light, and a video editor (Fig. 3). The total price is currently about $1,500, considerably less than that of a digital reflex camera. The best way to take records is to have the patient sit on a swivel chair and to use a tripod to avoid the effect of shaky images (Fig. 4).
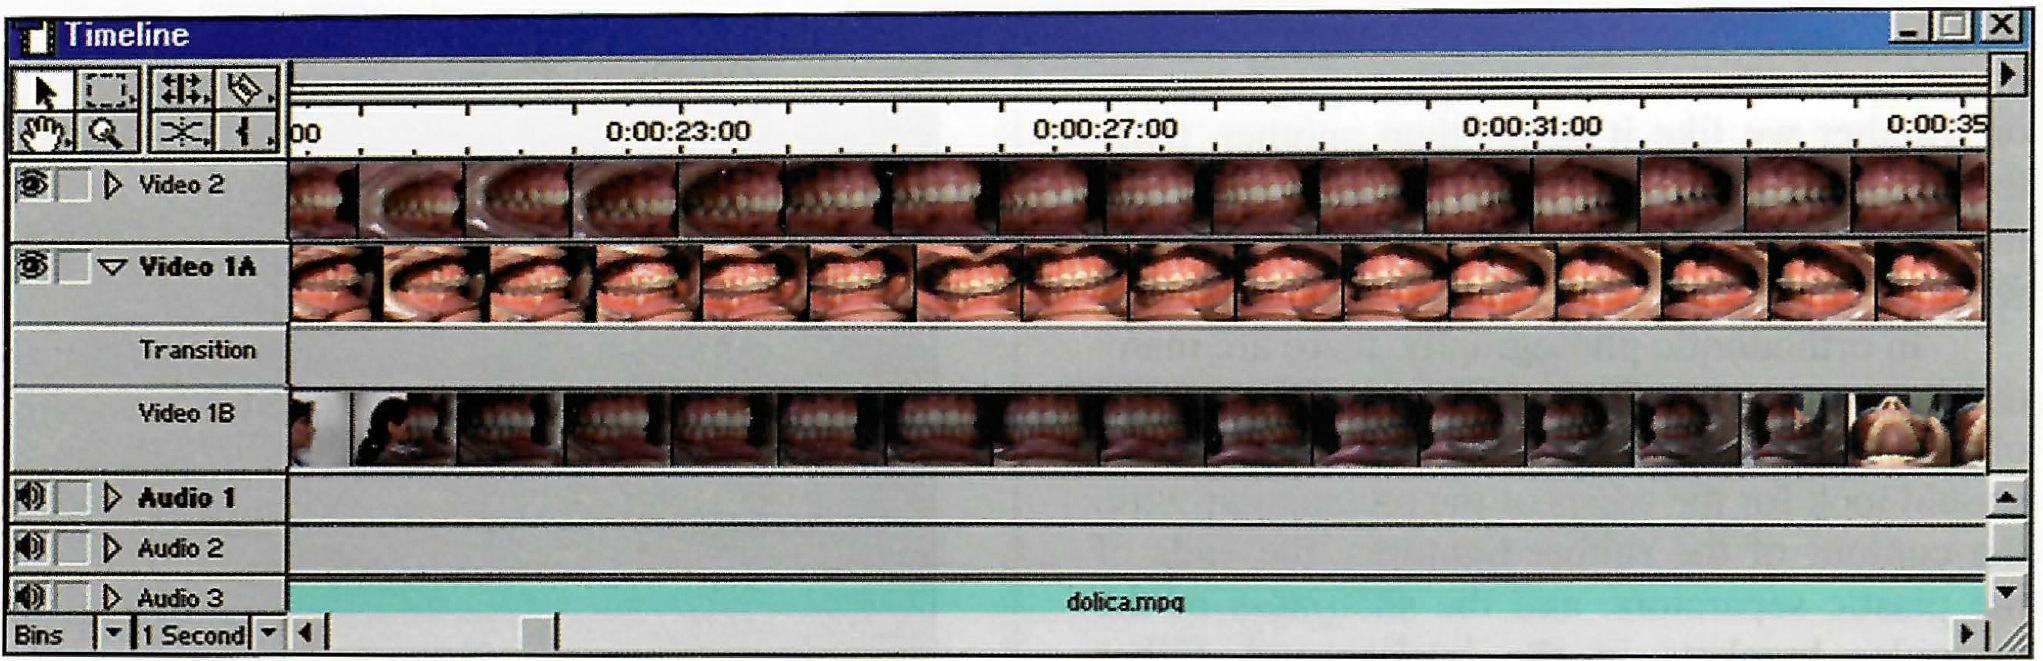
Fig. 3 Video editor program.
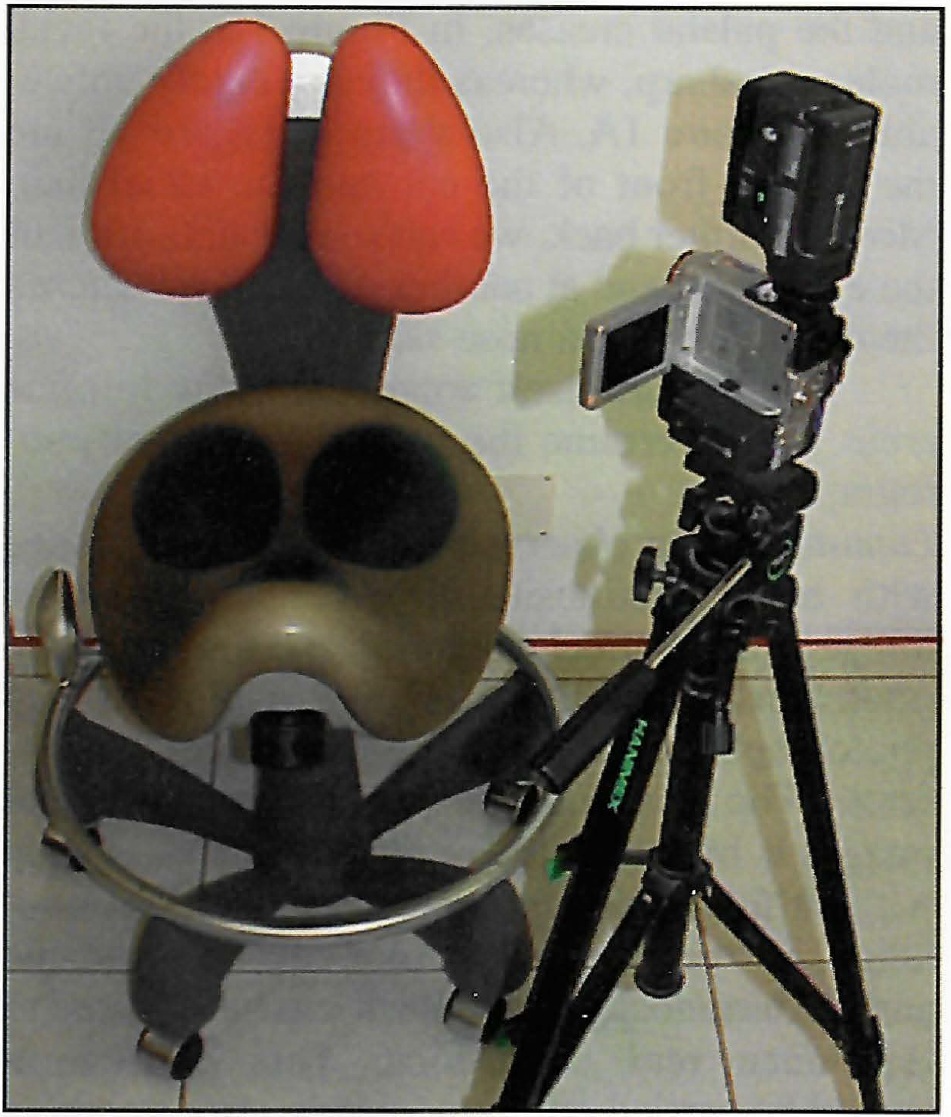
Fig. 4 To avoid shaky video images, seat patient on swivel chair and use tripod.
REFERENCES
- 1. Korrodi Ritto, A.: The future of the image in orthodontics, Rev. Ortod. 6:84-139, 2001.
- 2. Korrodi Ritto, A.: The future of the image in orthodontics, Rev. Ortod. 7:69-75, 2002.
- 3. Sandler, P.J.; Murray, A.M.; and Bearn, D.: Digital records in orthodontics, Dent. Update 29:18-24, 2002.
- 4. Sandler, J. and Murray, A.: Digital photography in orthodontics, J. Orthod. 28:197-201, 2001.
- 5. Scholz, R.P.: Orthodontic technolocity, Am. J. Orthod. 119:325-326, 2001.
- 6. Doldo, T.; Fiorelli, G.; and Patanè, B.: A comparison of three digital cameras for intraoral photography, J. Clin. Orthod. 33:588-593, 1999.
- 7. Hutchinson, I.; Ireland, A.J.; and Stephens, C.D.: Digital cameras and orthodontics: An overview, Dent. Update 26:144-149, 1999.
- 8. Quintero, J.C.; Trosien, A.; Hatcher, D.; and Kapila S.: Craniofacial imaging in orthodontics: Historical perspective, current status, and future developments, Angle Orthod. 69:491-506, 1999.
- 9. Fiorelli, G.; Pupilli, E.; and Patanè, B.: Digital photography in the orthodontic practice, J. Clin. Orthod. 32:651-656, 1998.
- 10. Coimbra, O. and Lomheim, C.: Digital imaging and orthodontics, Am. J. Orthod. 115:103-105, 1999.
- 11. Scholz, R.P.: Considerations in selecting a digital camera for orthodontic records, Am. J. Orthod. 114:603-605, 1998.
- 12. Miller, M.C.: Expanding dental practices with computer technology, Dent. Today 14:72-81, 1995.
-
 DR. RITTO
Dr. Ritto is in Private Practice, Mouzinho Albuquerque 115 - 1o, 2400-194 Leiria, Portugal.