The Precision Lingual Arch: Hinge Cap Attachment
The usefulness of lingual and transpalatal arches, either as primary mechanisms or as adjuncts to multibanded appliances, has long been recognized. Although I used and recommended horizontal sheaths with folded .036" steel wires for more than 30 years, it became apparent in the mid-1980s that the old lingual arch mechanisms did not meet the needs of modern orthodontics.
With this in mind, a new Precision Lingual Attachment was designed--a lingual bracket that would accommodate an .032"X.032" square wire. 1,2 Using a bracket rather than a tube permitted easy insertion and removal of a lingual arch. Built-in 3rd-order angulation (torque), a precision fit, and simplicity of design make the lingual arch effective in a wide variety of applications.
The latest development in the Precision Lingual Arch system is the Hinge Cap Attachment (Fig. 1). When the cap is closed over the archwire, the bracket becomes a tube. This design is more user-friendly, since lingual ligation can be difficult, and the secure locking mechanism is safer for the patient. With tie wings and sharp edges eliminated, the hinge cap is more comfortable than previous lingual sheaths or brackets, which could cause tongue irritation even without a lingual arch.
Opening and Closing the Hinge Cap
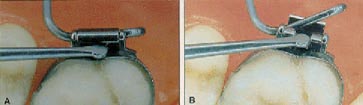
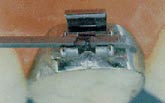
The hinge cap is designed to withstand strong lingual forces, so it is important to know how to open and close the cap properly. To open the cap, place an opening instrument with a disc-shape end in the well at the occlusal end of the bracket. Twist the instrument with a torquing movement, and the cap will open easily (Fig. 2).
To close the cap, place a band pusher or similar instrument as far occlusally from the gingival hinge as possible, and apply a firm, direct pressure. The cap should close easily with a definite click. Be sure that both the mesial and distal portions of the bracket are locked; it is possible to lock only one side with substantial activations such as upper first molar rotation.
In cases where access is restricted so that the band pusher is at an angle to the attachment, the cap can be closed with a curved How plier. Place the plier on the buccal or occlusal of the tooth and at the center of the hinge cap. Slide the plier slightly occlusally, exerting a very light lingual pressure. Since the How plier is a more efficient lever than a band pusher, it is important not to use excessive force. Both opening and closing of the hinge cap should require minimal force or effort.
Basic Lingual Arch Designs
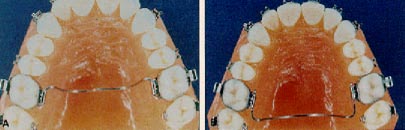
The Precision Lingual Arch system offers many possibilities for both active and passive applications. A maxillary transpalatal arch (Fig. 3) can be inserted from either the anterior or the posterior direction, as convenience and patient comfort dictate. Unlike the earlier lingual sheath appliance, the hinge cap bracket allows easy insertion from either direction. If the patient has a large torus or lingually erupted bicuspids, the arch should be inserted from the distal. If the first molars are to be rotated mesial-out, distal-in, and simultaneously expanded, a mesial insertion would be preferable. However, if the same rotation is to be combined with arch narrowing, there is a mechanical advantage to entering from the distal.
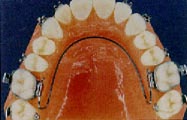
Another maxillary design is the "W"-shape lingual arch, which can be used for expansion (Fig. 4). This type of appliance has a long history in orthodontics, from the Coffin spring to the W-arch to the more recent quad helix. Using an .032"X.032" TMA wire eliminates the need for helices, and the hinge cap allows greater flexibility in adjustment.
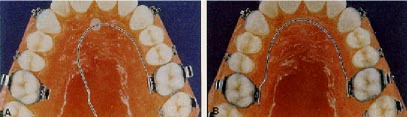
The "U"-shape or horseshoe design can be used in either the maxilla or the mandible in the Precision Lingual Arch system, even though it was once considered unsuitable for the upper arch because of difficulty of insertion. Maxillary horseshoe arches have several advantages (Fig. 5). Transpalatal arches are difficult to bend around the soft-tissue contours in patients with high palatal vaults. At the other extreme, patients with low palatal vaults cannot wear transpalatal arches because of impingement on the tongue. Patients with maxillary tori can also be problematic.
The horseshoe arch also has biomechanical advantages in some situations. A horseshoe is more efficient in correcting crossbite. Unlike the transpalatal arch, the horseshoe's buccal and lingual forces are not altered by the placement of torque. When axial inclinations are to be corrected by root movement, the independence of the force and the torque makes more precise adjustments possible. Furthermore, a horseshoe arch can be fabricated faster and more easily than a transpalatal arch.
The horseshoe design has long been used for mandibular arches. A "W"-shape arch can also be used in the mandible, if lower cuspid expansion is required (Fig. 6).
Selection of Wire Cross-Section
The first decision to be made in selecting an archwire is whether to use square or round wire. Round wire allows one degree of freedom, so that the tooth is free to rotate buccolingually around the bracket. For example, in a case of simple dental crossbite, round wire is preferable because it allows the teeth to tip. Even passive lingual stabilizing arches do not always require 3rd-order control. Round lingual arches of any design are far easier to construct, since 3rd-order activations and passivity are not concerns.
The second decision is the choice of TMA or stainless steel. In general, TMA is more useful in active applications due to its lower force levels and range of action.
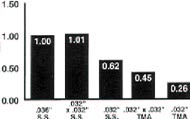
Because orthodontists are more familiar with stainless steel wires, it is helpful to compare the different lingual wire choices with .036" stainless steel (Fig. 7). An .032"X.032" steel wire has about the same stiffness, but an .032" round steel wire is only 62% as rigid. An .032"X.032" TMA wire has 45% of the stiffness of .036" stainless steel, and .032" round TMA is 26% as stiff.
An .032"X.032" square TMA wire is equivalent to about .029" round steel wire (Table 1). An .032" round TMA wire is the equivalent of about .026" round stainless steel. The Precision Lingual Arch system allows a good fit with a wide range of wires--from low stiffness for active tooth movement to high stiffness for anchorage control.
Fabrication of Lingual Arches
Both transpalatal and horseshoe lingual arches can be fabricated directly in the mouth or from study casts. An indirect technique is not required. The length of the arch is determined from the cast, and a prefabricated arch can then be selected of the appropriate material (stainless steel or TMA) and cross-section (round or square).
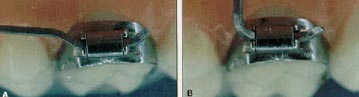
A mesiodistal stop must be placed to keep the lingual arch from sliding mesially or distally. One method is to weld an .016"X.022" wire occlusally between the mesial and distal portions of the bracket (Fig. 8). Like materials must be welded (TMA to TMA or stainless steel to stainless steel), and the welded stop must be smoothed on its lingual and buccal surfaces so it does not interfere with the cap function. A larger wire should not be used for the stop, because it also might obstruct the cap's locking mechanism.
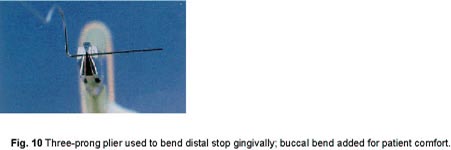
Alternatively, the mesiodistal stop can be bent into the wire (Fig. 9). With a horseshoe arch, a small step is placed mesial to the bracket; with a transpalatal arch, a gentle curvature is placed mesial to the bracket. A bracket with the hinge cap open is used to mark the position of the bend on the wire outside the mouth. Two bends are made with a three-prong plier: one about 30° to the buccal and the other about 30° to the gingival (Fig. 10). The plier should be placed about half a millimeter distal to the mark to allow a little mesiodistal play in the system. If less play is called for, the plier can be moved slightly mesially and the wire bent further gingivally. Since a ligature is not required, the distal end of the lingual arch can be cut close to the bracket. Together with the buccal bend, this ensures excellent patient comfort.
Special Applications
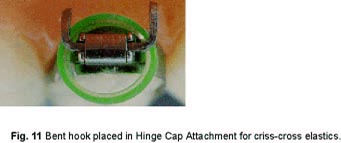
The hinge cap bracket can be used for attachment of criss-cross elastics by bending a short segment of .032"X.032" square wire into a hook (Fig. 11).
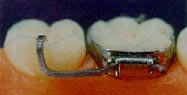
A square wire can be bent occlusally to prevent the supraeruption of an upper or lower second molar. This wire can be a lingual segment with or without a continuous buccal arch (Fig. 12), or it can be bent from a transpalatal or horseshoe arch.
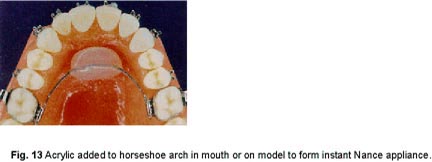
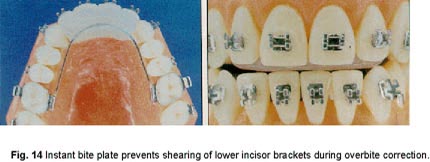
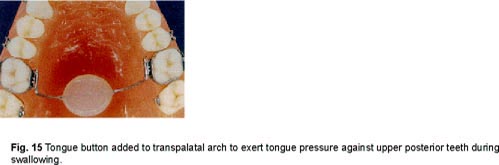
Instant acrylic appliances can be made easily with the hinge lock mechanism. For an instant Nance appliance, a horseshoe lingual arch is placed passively in the mouth, and cold-cure or light-cured acrylic is added (Fig. 13). The appliance is then removed and polished. Instant bite plates can be used at the beginning of treatment to prevent shearing of lower brackets or to help correct a deep overbite (Fig. 14). A lingual button can be added to a transpalatal arch so that tongue pressure will minimize the eruption of posterior teeth in a patient with a large vertical dimension or open bite (Fig. 15).
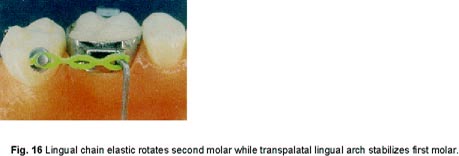
A simple way to rotate a second molar mesial-out without side effects is to use an elastic or spring on the lingual. A chain elastic can be attached to a transpalatal arch to rotate the second molar while the lingual arch keeps the first molar from rotating mesial-in (Fig. 16).
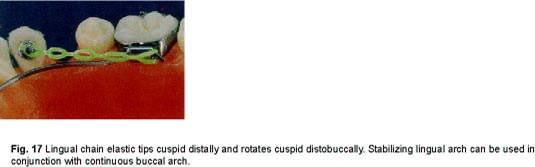
It might also be desirable to use an elastic or spring on the lingual during cuspid retraction. If the cuspid is tipped forward, an elastic force can tip the crown distally. The elastic has the additional advantage of rotating the cuspid distal-out, which is desirable in many patients (Fig. 17). Such an elastic is typically combined with a continuous buccal arch if the cuspid is in good position, or with a cuspid bypass if the cuspid is flared.
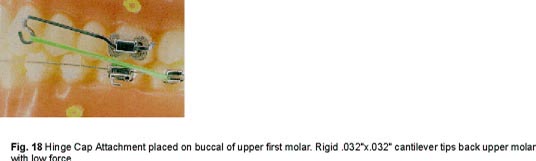
In correcting a unilateral Class II malocclusion, one strategy is to use a long arm or cantilever to the molar. However, the largest wire that can be used in an .022" X.028" edgewise tube is .0215"X.028". With this wire, Class II elastics produce large deflections during chewing that can be annoying to the patient and can result in breakage. If a hinge cap bracket is placed on the buccal, a stiffer .032"X.032" stainless steel wire can be used, and the Class II elastics will then tip the molar distally and rotate it mesial-out (Fig. 18). The long cantilever not only permits a more horizontal force application, but also produces a large tipback moment in respect to the molar's center of resistance. It is this large moment, more than the magnitude of the force, that is responsible for a rapid unilateral tipback of the first molar.
The same mechanism can be used for bilateral molar tipback, with or without a lingual arch. The large moment allows the force level of the Class II elastics to be kept low.
Conclusion
The Precision Hinge Cap Attachment is easy to fabricate, place, activate, and remove. The system offers a wide choice of precision-fitting wires for passive and active applications.1,2 The design of the lingual arch opens up possibilities not available with lingual sheaths.
Best results can be achieved when the clinician fully recognizes how the appliance can be adapted to meet the patient's individual needs, and how optimal force systems can be produced with the new precision lingual mechanism.