THE READERS' CORNER
This month's topics are staff meetings and debanding sequences.
1. Describe typical staff meetings in your office. How often do you hold them?
Most offices reported holding their staff meetings once a month. A few held meetings twice a week, and others every few weeks as needed.
Meetings were generally held at or around lunch time (11 a.m. to 2 p.m.) and averaged about one hour. In most offices the orthodontist provided lunch, although ordering out and brown-bag meetings were mentioned.
An agenda was often typed in advance based on recommendations from the doctor and staff. Some practices said they had suggestion sheets posted somewhere in their offices.
Rarely did the orthodontist run the meeting. In some offices this task fell to the office manager or clinic coordinator; in others it rotated among the staff. One person was usually appointed to take minutes, concentrating particularly on suggestions for improvements.
Comments included:
2. What is your usual debanding sequence? What are the exceptions to the usual sequence?
Two debanding sequences dominated the responses. The first involved removing all bands and bonds except either the first or second molars and usually the canines (occasionally the four incisors were excepted to hold rotations). The archwire was left in and a light elastic or chain worn for about a week (usually full-time, sometimes just at night). Debanding was then completed.
The second sequence involved sectioning the archwires, frequently distal to the maxillary lateral incisors and the mandibular canines. Light zig-zag elastics (such as ¾", 2oz) were then worn with a slight Class II or Class III vector as required. Many clinicians used the elastics for about three weeks full-time and then three weeks at night. In some cases both upper and lower posterior archwires were removed; in others one of the archwires was left as a stabilizing arch.
Several respondents suggested that the archwires be left in when the remaining bands and brackets were removed, because this minimized luxation of the teeth with the band-removing pliers.
In a case requiring a bonded cuspid-to-cuspid retainer, it was suggested that impressions be taken a week prior to debanding and that the retainer be delivered immediately before or immediately after removal of the incisor brackets. When a Hawley-type retainer was to be placed, clinicians using the first debanding sequence often took impressions when most of the bands were removed and then fitted the retainer the following week. Those using the second sequence were likely to fit the Hawley retainer the day of or the day after debanding.
The major exception to the normal sequence involved keeping bands on the-teeth on both sides of pontic spaces until the patient was ready for restorative work.
Suggestions included:
JCO wishes to thank the following contributors to this month's column:
Dr. Kenneth Albinder, Virginia Beach, VA
Dr. Floyd J. Dickson, Muskogee, OK
Dr. Joseph D. Distasio, Revere, MA
Dr. Ronald G. Heiber, Lancaster, OH
Dr. Earl Johnson, Mill Valley, CA
Dr. DeWayne B. McCamish, Chattanooga, TN
Dr. Paul J. McKenna, West Hartford, CT
Dr. Roger C. Nettune, Basking Ridge, NJ
Orthodontic, Inc., Chesterton, IN
Dr. Eric L. Smith, Halifax, Nova Scotia
Dr. Van R. Speas, Fort Myers, FL
Dr. Terrell F. Tingey, Boise, ID
Dr. Lloyd Truax, Rochester, MN
Dr. Thomas P. Weirich, Oklahoma City, OK
Dr. David H. Werking, Greeley, CO
Two particular methods of using zig-zag elastics were mentioned by many respondents. The developers of these techniques have graciously provided the following detailed descriptions.
Countdown to Retention
RICHARD G. ALEXANDER, DDS, MS
The "countdown to retention" begins when orthodontic treatment is complete. Ten criteria must be met for a case to be deemed ready for retention:
1. Coincidence of centric relation and centric occlusion.
2. Class I cuspid relationship with normal cuspid function (unless cuspids are missing).
3. Maintenance of mandibular cuspid width.
4. Interincisal angle close to the norm, with proper torque in both maxillary and mandibular incisors.
5. Normal anterior overbite and overjet.
6. Normal buccal overjet.
7. Leveled upper and lower arches.
8. All spaces closed; all rotations eliminated.
9. Roots parallel near extraction sites.
10. Cusp interdigitation.
Posterior settling is accomplished by sectioning the archwire in one of three ways: mandibular arch only, maxillary arch only, or both arches.
To section a mandibular arch, cut the archwire distal to the cuspids on both sides. The wire remains in the brackets from cuspid to cuspid. Section the maxillary archwire distal to the laterals if more settling of the cuspids is desired, or else distal to the cuspids.
In each instance the posterior sections of archwire are completely removed. This leaves these teeth free to move vertically as settling takes place. The anterior sections remain in the arch so that torque control and rotations are managed.
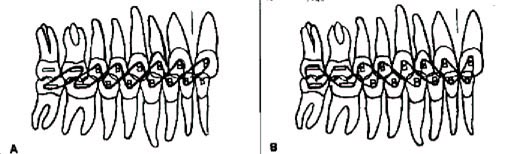
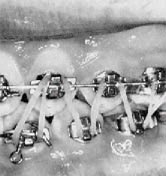
If the case was a Class II deep bite, section the lower arch only and bend the archwire distal to the cuspids. Attach a ¾", 2oz round elastic in each posterior segment. In a Class II case, these up-and-down elastics are attached in a configuration known as "W with a tail" (Fig. 1). The elastic begins on the maxillary lateral incisor (extraction case) or the maxillary cuspid (nonextraction) and continues to the mandibular cuspid, maxillary cuspid, mandibular bicuspid, maxillary bicuspid, etc. This phase of treatment lasts six weeks and provides a smooth transition between active treatment and retention.
The original deep bite malocclusion most likely demonstrated a severe curve of Spee in the lower arch. Using posterior up-and-down elastics without a mandibular archwire will deliver an extrusive force to the lower bicuspids and molars and improve or maintain a level lower arch. The bite is stabilized so the overbite will be less likely to relapse. If a retractor (headgear) is being worn, its use continues during this period.
The patient should wear the up-and-down elastics 24 hours a day for three weeks. Motivation is simple. Tell the patient that if the teeth look good at the next appointment, the appliances will be removed shortly thereafter. The patient might be scheduled for band and bond removal in six weeks, but told that if the teeth don't look good after three weeks the appointment will be canceled.
Warn the patient that placing these elastics is difficult. The elastics will slip off and break occasionally, but the patient shouldn't get discouraged--the results will be worth the effort. Encourage the patient to chew sugarless gum during this phase, because the mastication activates the elastics and allows the posterior teeth to settle beautifully.
In an open bite or Class III case, section the upper arch rather than the lower arch. Some curve of Spee should have been placed in the lower arch. After sectioning the wire and removing the posterior portions, place up-and-down elastics in the design of an "M with a tail" (Fig. 2). This creates a Class III vector to help close down the buccal segments.
In a Class I case, both arches may be sectioned and an "M without a tail" or "W without a tail" worn as required. After checking the posterior segments, the clinician decides whether the maxillary or mandibular teeth or both need to be extruded, then sections the appropriate archwires.
While the posterior occlusion is being detailed, the anterior overbite-overjet relationship should be finalized. If additional overbite correction is desired, anterior up-and-down elastics (Class II or Class III vector) or box elastics can be used.
The Five-Cent Tooth Positioner
J. MICHAEL STEFFEN, DDS
F. TUCKER HALTOM, DDS
Most orthodontists try to arrive at a dentition that satisfies all criteria for functional occlusion--criteria that have greatly expanded in recent years. Often, however, those criteria are not met when completing a case. Our premise is this: Why turn loose of the teeth before you have placed them as close as possible to where they should be?
We have devised a technique to finish dentitions with a high degree of accuracy in accordance with these functional requirements:
1. Anteroposterior dental correction.
2. Coordination of arches to eliminate lateral slides on closure.
3. Lack of working and non-working (balancing) interferences.
4. Incisal guidance and lack of protrusive interferences.
5. Adequate buccal root torque of maxillary molars.
6. Alignment of contact points (not necessarily marginal ridges).
7. Sufficient centric holding cusps (centric stops).
Our finishing procedure is a six-week sequence of controlled settling that has been most gratifying for the authors, because of the degree of refinement it produces, and for the patients, because it signals the end of treatment. If you want to establish credibility with your patients, tell them the appliances come off in six weeks if they follow instructions--then keep your word.
At the beginning of the sequence, maxillary and mandibular arches carry ideal finishing wires. Both are removed and sectioned. The maxillary wire is cut 3mm distal to each lateral incisor bracket, the mandibular wire 3mm distal to each canine bracket. Both are bent lingually on the ends to avoid irritation.
The posterior sections are discarded, and the anterior sections are replaced. "O" ties are placed on the upper and lower laterals and lower canines. "K" ties are placed distogingivally on the upper and lower centrals.
If the maxillary buccal cusps are striking mandibular brackets at this time, the brackets should be ground down. This step is critical, because teeth will not settle against interferences.
Elastics should be worn day and night for three weeks. If the teeth fit properly after three weeks, the patient then wears the elastics at night only for three more weeks. If all goes as planned, the bands and brackets are removed at the end of six weeks.
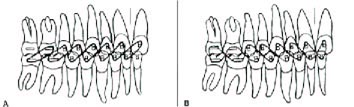
For a Class II pull (Fig. 3A), a ¾", 2oz elastic is started over the lower second and upper first molar. The upper second molar is not included. The elastic is twisted and engaged over the next two teeth, and the sequence is repeated to the maxillary central incisor on the opposite side of the midline. An elastic begun on the left side will end on the maxillary right central incisor and mandibular left central incisor, stretching across the midline.
For a Class III pull (Fig. 3B), a ¾", 2oz elastic is started over the upper and lower second molars. The elastic is twisted between each pair of teeth and ends on the central incisors on opposite sides of the midlines.
Numerous variations are possible--for instance, Class II pull on one side and Class III on the other. Another effective technique is to use light crossbite elastics in the molar and bicuspid areas to help eliminate centric slides. These are placed before, but in conjunction with, the up-and-down elastics.
Why does the "five-cent positioner" work so well? The elastics provide a controlled force that changes neither the arch form nor the rotations of the teeth. There is no significant contraction of the arches, but rather a slight extrusive force that uses inclined planes to guide teeth into centric stops.
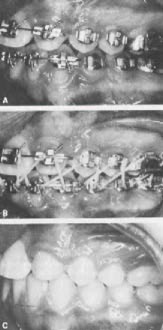
A tooth's position in the mouth is determined by a combination of eruptive force, function, and anatomy. Cusps and inclined planes aid in mastication, but more important, they are road maps for occlusal contact. Therefore, controlled settling accomplishes the same purpose as nature does when teeth first erupt. Figure 4 shows a typical case.
Use of this technique will help assure the stability, function, and beauty of well-treated cases. It will also improve those that, for one reason or another, are not so well treated.