Practical Methods of Bonding: Direct and Indirect
Table of Contents
I Advantages and Disadvantages of Bonding
A. Advantages
B. Disadvantages
II Requirements of a Good Adhesive
A. Introduction to Protecto
III Theoretical Considerations
A. Principles of Prophylaxis
B. Principles of Etching
C. Use of Adhesive
IV Bonding Failures
V Direct Method of Bonding
A. Bracket Preparation
B. Tooth Preparation
C. Use of Adhesive
VI Indirect Method of Bonding
A. Bracket Preparation
B. Bracket Positioning
C. Impression
D. Tooth Preparation
E. Use of Adhesive
VII Varied Uses of Bonding
VIII Bond Removal
Advantages and Disadvantages of Bonding
Advantages
The authors have found bonding more practical and attractive than banding because of several significant advantages. Some of these are:
Disadvantages
It is difficult to enumerate disadvantages. Perhaps there are two:
REQUIREMENTS OF A GOOD ADHESIVE
The bonding agent an orthodontist selects for use on his patients should have certain qualities:
These were some of the considerations the authors pondered, and it was proven that Protecto and Enamelite fulfilled these requirements. The orthodontist should develop confidence in whatever bonding adhesive he uses. Every time a bonding is completed, there should be the same feeling of security as when cementing a well-fitting band.
Introduction to Protecto
Protecto was introduced to one author by Dr. Jack Weisser of Fair Lawn, New Jersey. This adhesive was demonstrated at the most important place-- right at chairside. Patients were inspected who had bonded brackets for long periods of time-- and they were holding well. The method of securing attachments was illustrated-- and this was impressive because of the comparative ease. The retention seemed so solid. Later on Dr. Weisser introduced the same author to Enamelite, and this agent appears equally successful and dependable. Protecto and Enamelite are products of Lee Pharmaceuticals. It seems they were never intended to be used for bonding purposes, and it was quite by accident that their adhesive properties f o r brackets was discovered. Both of these products are easy to work with. Their creamy consistency enables the clinician to work at a comfortable pace and apply greater or lesser amounts exactly where desired.
THEORETICAL CONSIDERATIONS
Principles of Prophylaxis
A thorough prophylaxis of the tooth surfaces to be bonded is essential. It is recommended that all accumulated organic plaque on the surfaces of the teeth be removed. Pumicing the teeth eliminates the soft organic layers and thus increases the wettability. A laboratory pumice is suggested, as this is free of any flavoring agent or oil.
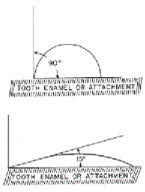
The importance of increasing the wettability of the enamel surface should not be underestimated. The degree of wettability of a surface can be measured in terms of the "contact angle" formed by the wetting fluid and the receiving surface (Fig. 1). The smaller the angle the better the wettability and the greater the surface area of contact between the two substances. The greater the wettability the greater the tendency for the fluid to spread and the less its tendency to bead on the surface. A good analogy is the difference seen when water drops on a simonized car, as opposed to when it falls on an unwaxed automobile.
Principles of Etching
After thorough prophylaxis, the tooth surfaces are now ready to be etched. As Buonocore noted in 1955, phosphoric acid and other acid preparations were used in industry to treat metal surfaces so
that better adhesion of paint and resin coatings could be obtained. Surface contaminants were removed by this method. Buonocore felt that by applying these acid preparations to teeth, the enamel would be cleaned of organic material and its surface would be better prepared to receive bonding agents (adhesives).
The principle behind the method was that the acid would remove microscopic amounts of enamel leaving hills and valleys. A tremendous increase in surface area was created, and the wettability of the enamel was increased, allowing for better contact between adhesive and tooth.
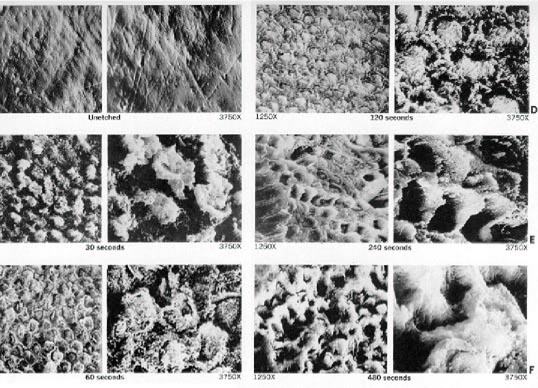
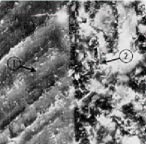
Just what is a proper etch? Practitioners are informed that when the enamel has lost its luster, the tooth may be considered etched, ready for bonding. This is only a partial truth. A tooth may be overetched whereby too much enamel is removed, leaving rather wide, flat valleys and narrow weakened ridges (Fig. 2F); or a tooth may be underetched, not removing enough enamel (Fig. 2B).
The etching that the authors found most effective was the same that Gwinnett and Buonocore prescribed in 1965, a 50% - 60% phosphoric acid solution applied for two minutes. They demonstrated enamel crevices of approximately 10 microns in depth following the etching. In experiments conducted for us by Lee Pharmaceuticals, similar results were obtained. Human enamel was etched (in vitro) with 50% phosphoric acid for 30, 60, 120, 240 and 480 seconds. Scanning electron micrographs were taken at magnifications of 1250x and 3750x of the prepared surfaces and of a control unetched sample. All the etched teeth appeared dull and lifeless to the naked eye, but the photomicrographs show the difference (Fig. 2).
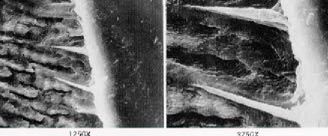
Extracted teeth were then etched and coated with a layer of the bonding material that we have found most effective, Protecto. Following polymerization, the teeth were sectioned longitudinally. Figure 3 shows a control tooth that was unetched before the Protecto was applied, and Figure 4 shows etched enamel surfaces with Protecto applied. The spearlike projections of Protecto that fill the valleys created by etching indicate the strong bonding capabilities. The tags measured 5-10 microns in length, and there may be 10,000 to 20,000 tags per square centimeter, depending on the age, type and hardness of enamel and the degree of etching.
Etching should be done carefully and in accordance with the manufacturer's instructions because this step is one of the most critical factors in successful bonding. Improper etching is probably the single most major cause of failure in bonding.
One of the fears that we have as dentists is causing permanent scarring of enamel by the application of acids. This fear is apparently groundless. Most researchers agree that etching causes no permanent damage. There are numerous published investigations to confirm this fact, some of which are Miura (1972), Retief (1973) and Albert and Grenoble (1971). They all agree that remineralization is quite rapid. The term remineralization is used to describe the "return to normal appearance". It is not meant to imply any mineral deposition or uptake.
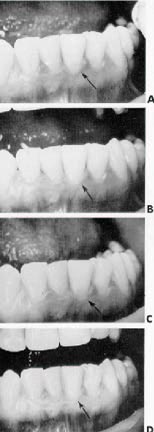
To illustrate the return to normal appearance, the incisal portion of a central incisor was etched with a 50% phosphoric acid solution for two minutes. Serial photographs were taken at 4, 24, 48, and 72 hours after etching (Fig. 5). There were no oral environmental changes that occurred during the period of return to normal appearance. The diet remained essentially the same, and the twice per day toothbrushing routine was maintained. Tests like this provide clinical evidence that "in vivo" remineralization takes place quite rapidly. Some studies suggest that the younger the patient, the more rapid the return to normalcy (Arana, 1974). Other factors that may influence the speed of remineralization are salivary composition, dietary and toothbrushing habits and various metabolic reactions. The exact way this phenomenon works is not fully understood and remains, as should be, a subject of investigation.
Etched enamel under bonded brackets does not remineralize until the overlying adhesive is removed, exposing the tooth surface to the oral environment. The etched tooth surface covered by the adhesives remains essentially the same until it is exposed. In fact, it is this sealing of the tooth surface by the bonding agent that is responsible for the lessened likelihood of decalcification.
Use of Adhesive
How can this information be harnessed and utilized so that it can benefit the orthodontist with his chairside procedures? Following are some conclusions that should prove helpful.
BONDING FAILURES
More times than not, the cause of bond failures can be linked to poor operating procedures, either a faulty technique or not following the manufacturer's specific instructions. Some of the reasons why bonds may fail are:
manipulate brackets prior to bonding. If the fingers are greasy or carry dirt particles, these can be easily transferred to the base of the brackets, and this will result in a less secure union with the enamel surfaces. A strong recommendation when handling brackets is to support them along the edges only, or hold them with an instrument. Another suggestion is to clean the base with ethyl alcohol or acetone just before bonding.
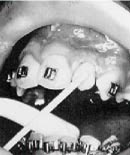
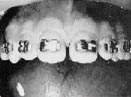
DIRECT METHOD OF BONDING
The following section describes step-by-step procedures for direct application of metal brackets to the teeth employing a "paint-on" technique.
Bracket Preparation
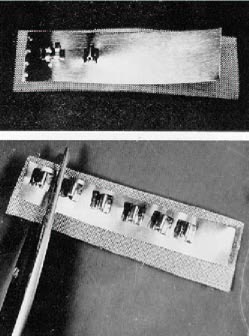
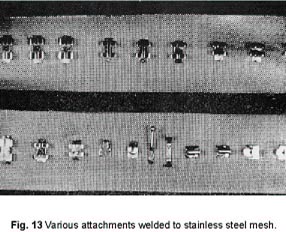
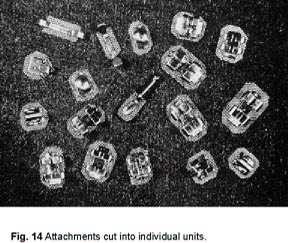
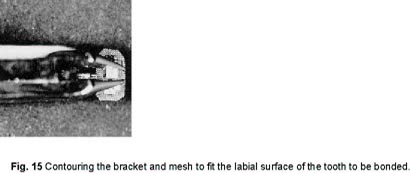
The authors' experience with plastic brackets has been quite dismal. Until stronger units are manufactured, and no doubt they will be soon, metal brackets are recommended. These are modified in a specific manner as prescribed by Retief and Weisser. In order to prepare these brackets properly, the following materials are required: brackets, a strip of .002 metal matrix material, and a piece of 120 gauge stainless steel mesh. The recommended procedure is to spot weld a series of brackets to the metal strip and mesh. The metal strip against the bracket base prevents the adhesive from flowing into the bracket slot. The mesh is a major source of retention. The brackets are then cut into individual units and trimmed to the preferred size (Fig. 6).
The mesh should be trimmed to cover as much of the tooth surface as comfortable, to maximize the adhesive potential. When Begg brackets are thus modified, they are stronger and better able to resist displacement forces, increasing their potential for stability. Edgewise units may be modified in similar fashion. If there is a vertical slot present, a piece of .002 matrix material welded between the bracket and mesh is required to keep the slot free of adhesive. If the Edgewise bracket does not have a slot, a piece of 120 gauge mesh securely welded to the bracket base may be sufficient preparation.
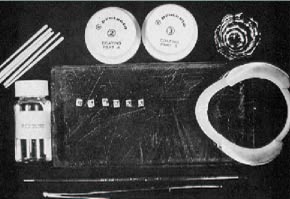
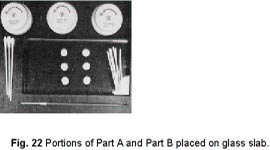
In order to operate at maximum efficiency, it is suggested that all the necessary materials and instruments be gathered and placed within easy reach before anything is done to the patient (Fig. 7).
Collect the following:
Protecto or Enamelite kit Modified brackets Pumice Glass mixing slab Lip retractor Size 0 or 1 sable brush Acetone in dappen dish Toothpicks Hair dryer
Tooth Preparation
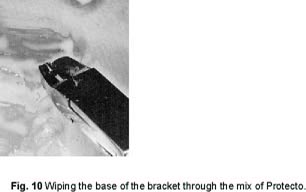
Use of Adhesive
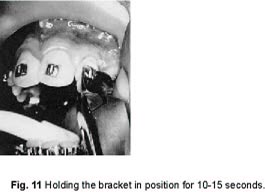
Immediately dip the hairs of the brush into acetone, which will clean it and prepare it for the next application. Otherwise, the adhesive will set and ruin the brush. Keep a constant flow of warm air on this base layer.
The holding instrument can be removed; the bracket will not slide around.
The warm air is continued until setting has occurred. This is a most essential step and can be the difference between success and failure. If the beading should happen to build up too high, it can be easily reduced with a sandpaper disc. The orthodontist is now free to insert the archwire of his choice. With some experience, it should not take more than 10 minutes to bond brackets directly on six anterior teeth, working at a comfortable pace.
INDIRECT METHOD OF BONDING
It is the purpose of this section of the paper to describe and demonstrate a method of indirectly applying orthodontic attachments to teeth using Protecto as the adhesive agent. The technique involves only a minimum of chair time with most of the effort being expended in the laboratory by the orthodontist or auxiliaries. The technique insures accuracy in bracket positioning and is applicable to both whole arches or to segments. The step-by-step procedures involved in fabricating and indirectly bonding the bracket assembly to a dentition follows:
Bracket Preparation
Bracket Positioning
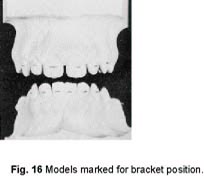
This step is included for demonstration purposes only. The bracket position may be selected by eye inspection. There is no need to mark the models. In fact, polished study models can be used since their surface gloss will not be affected.
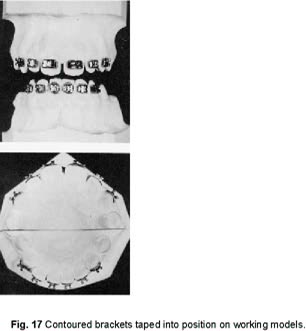
Add a small piece of the double-sided tape on the back of the screen mesh, then compress bracket to position on the model tooth. The tape can be applied to the model teeth first and then position the prepared brackets, if preferred. Using only a small amount of tape, it is possible to easily remove and replace brackets any number of times to obtain ideal positioning. The tapes employed by the authors are Carpetak Tape (Arno) and Doubletak (Jersey) which can be purchased either in hardware or carpeting stores.
Impression
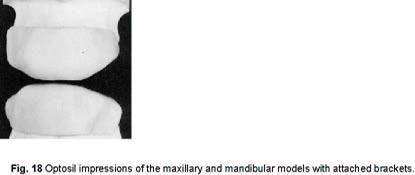
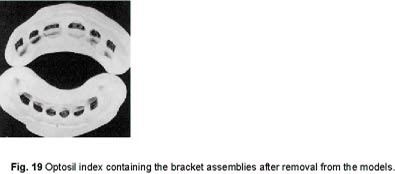
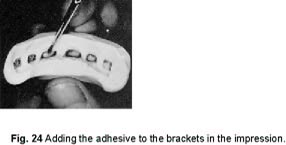
Roll the edges over the depression containing the liquid and then pick up and knead the material until the liquid has been dispersed throughout the putty material. Be sure to add enough activator to insure a firm set. The actual measures used or the time mixed are not critical. Roll the Optosil into a short oval shape and press onto the brackets using firm finger pressure. It is important that the Optosil material be placed over the brackets from the labial so that the brackets will not be dislodged. After covering the brackets, roll the excess over the incisal edges and down the lingual surfaces to give a good index (Fig. 18).
This impression material is ideal for the purpose of indirect bonding because it flows into the undercut areas and yet is resilient enough to be removed without tearing. It snaps right back into the undercut areas in the mouth and is, therefore, a reliable mechanism for positioning brackets for bonding. We are constantly discovering other impression materials that appear equally reliable.
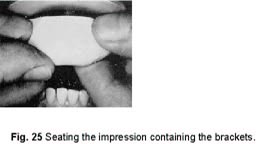
In most instances, the bracket and screen will come off free of the model and remain imbedded in the impression. If not, remove the bracket from the model tooth and seat it into its index within the impression.
Another positive feature of the Optosil impression material that bears mentioning at this point is its stability in storage. After the index has been prepared, i.e., the brackets and screen incorporated in the Optosil, it can be stored for long periods of time before bonding in the mouth. The critical factor in waiting lies in the movement of the teeth to be bonded and not in the distortion of the impression. We store the impression with the contained brackets on the model and have done so in one instance for longer than two months and experienced no problem in seating the index in the mouth for bonding. While there may be some dimensional changes in the set Optosil that has been stored for prolonged periods of time, it is apparently not of sufficient degree to affect the accuracy of bracket positioning.
The procedures just described can be completed in the laboratory by the orthodontist or an auxiliary. From this point on the patient is needed.
Tooth Preparation
It is important from this step on that the surfaces to be bonded are kept dry and saliva-free. If the labial surfaces of the teeth become contaminated with saliva, it is probably better to re-etch to insure a more successful bond.
Bonding Procedures
Dental floss can be passed between teeth to insure that no neighboring teeth are bonded together. The rationale in covering the entire labial surface with a coat of Protecto prior to the bonding of attachments is twofold. As was alluded to earlier, the more tags incorporated into the etched enamel surface, the stronger the bond, and one way to insure the greatest number of tags is to involve the greatest amount of surface area as possible. The second reason for covering the entire labial surface is that instances of decalcification will be considerably reduced. Any food or debris caught on the wires or brackets, instead of lying in contact with enamel, will be in contact with the covering layer of adhesive.
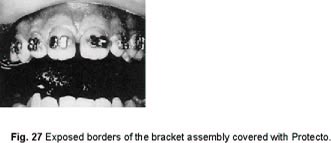
This step not only gives additional strength to the bond by forming a screen sandwich between two layers of Protecto, but adds considerably to the esthetics. Also, it has been our experience that exposed screen, even though a high grade stainless steel, will break down or begin to corrode under certain dietetic situations such as heavy tea or cola drinking. Painting over the screen with a light coat of Protecto prevents this corrosion.
It might be well to point out some of the positive features of Protecto at this point. Steps 3 and 4 can be accomplished with the same mix. As the light coat is being painted on the teeth, an auxiliary can be painting the screen areas in the impression. On the other hand, a week's time or more can pass between steps 3 and 4. After the light coat has been painted on the labial surface of the teeth, the patient can be sent home. When the patient rereturns, the Protectorized teeth need only be washed and dried before painting the screen areas and carrying the impression to place. In other words, Protecto can always be bonded to Protecto regardless of timing without forming a detectable interface because the layers fuse chemically. Another feature that makes Protecto the adhesive of choice for this indirect bonding system is its flow property. It is fluid enough to draw through the screen mesh and hold it securely upon setting. Other adhesives have been tried with this system, and it is this flow factor where most of them fail. Protecto is opaque so when the screen is painted over, it does not show through. It is also stain resistant and keeps its luster in the oral environment. These last features all add to the esthetics of the system. Archwires can be placed immediately, for there is no time-related process taking place that adds significantly to the strength of the bond.
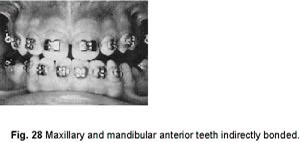
For ease of demonstration, in this article only the anterior teeth were bonded (Fig. 28). However, this indirect method of bonding has been employed by the authors for bonding entire arches mesial to the molars. Lingual attachments can also be placed using this technique with no additional difficulty. They need only be attached to the model teeth using the double-faced tape prior to impression taking. The only problems that have been experienced with whole arch bonding and with lingual attachments on mandibular buccal teeth is lip and tongue retraction so that the teeth surfaces do not become saliva contaminated after etching. It may prove beneficial, when bonding entire arches mesial to the molars, to do it in quadrants rather than attempt to retract the lips and cheeks from the premolars on both sides simultaneously.
The described indirect bonding technique works equally well with both Begg and Edgewise attachments. It can also be employed with plastic attachments. The procedure would be essentially similar except that a bonding adhesive designed for use with plastic should be employed. Although the authors have found success in the bonding of plastic attachments, the instances of broken bracket wings are all too frequent and thus, until stronger plastic attachments are manufactured, it is our recommendation that metal attachments be utilized. Regardless of the technique used or the type of brackets employed, this indirect bonding technique has application.
The technique is very simple, offering the advantages inherent in any indirect system, that of ideal bracket positioning. After only a few practice runs just to gain a feel for the materials, the operator becomes quite comfortable with its use. There is no special equipment required, and no costly course of instruction is necessary to become proficient with the use of this technique.
The system is very economical in terms of both time and money. Approximately 15 minutes of chair time is necessary to bond the entire maxillary and mandibular arches mesial to the molars. The welding of the brackets to the screen mesh, the trimming of the screen, the contouring of the brackets, the placement of the brackets on the model, and the impression taking can all be accomplished by auxiliaries in the laboratory. The materials necessary for this technique are relatively inexpensive, so that the cost per case is much less than that of banding or other bonding systems.
VARIED USES OF BONDING
When the authors began bonding, most procedures were restricted to the maxillary incisor teeth. As confidence grew and experience broadened, bonding was done all over the mouth: lower incisors in those cases where the bite was favorable, many bicuspids, lingual cleats where they are required, and in selected cases, molar tubes. This type of service is constantly expanding.
Protecto and Enamelite have proven strong enough that they are relied upon in all stages of Begg treatment. There is no hesitation in placing auxiliaries that are required to increase control over root movement. This includes torquing sectionals, root paralleling springs, etc. (Fig. 29).
In edgewise cases there is no hesitancy in placing finishing arches with built-in torque or torquing auxiliaries (Fig. 30)
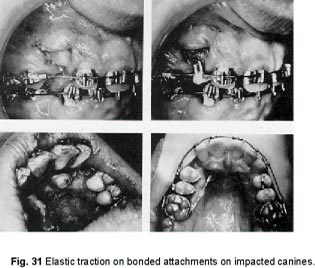
Another situation where bonding can be helpful is with impacted or blocked out canines. Such teeth, regardless of position, can be exposed and attachments directly bonded to which directive forces can be applied (Fig. 31).
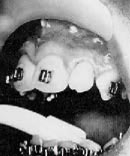
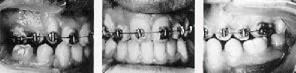
Fig. 32 shows photographs of a dental student who needed some retreatment. There were no bands cemented at all. Bonding the brackets, tubes and pinning the archwire was all done in less than one half-hour.
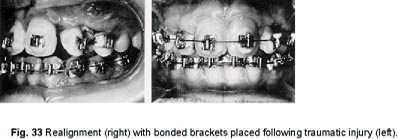
A patient in our school clinic met with a traumatic injury, and a maxillary lateral incisor was bashed out of position. The adjacent teeth were loosened, and the cemented appliances became distorted. Metal brackets were quickly and comfortably bonded onto the displaced lateral incisor and the nearby teeth, using Protecto (Fig. 33). There was a rapid realignment. The prognosis for the lateral incisor remains guarded, but the ease of gaining control over its position in the arch, with a minimum of discomfort to the patient, reveals another valuable indication for bonding.
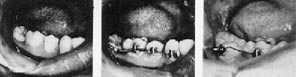
Many times the orthodontist is confronted with the complication of a locked second molar. In the past, this problem was treated with a variety of methods-- cemented pins, finger springs from linguals, etc. Bonding has simplified the treatment. A bracket or tube is secured directly onto the exposed surface of the locked molar. This enables the clinician to secure control more readily. The mechanotherapy should be designed to apply pressure to tip the tooth distally, which should free it. Then it is raised and aligned into proper position (Fig. 34).
Yet another use for bonding is in the retention phase of treatment. Fig. 35 demonstrates a fixed mandibular canine-to-canine retainer bonded in place.
BOND REMOVAL
It is when an orthodontist begins to remove the bonded attachments that a fuller appreciation of the adhesive strength of Protecto is gained. Several pliers that are specifically designed for bond removal are now available.
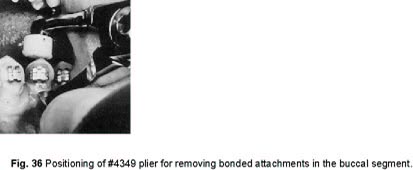
A good plier to shear a bonded bracket from a tooth in the buccal segment is manufactured by Aledyne Corp. The 4349 plier should be supported with a cotton roll on the occlusal surface of the tooth, then seat the blade under the bracket and close the plier beaks (Fig. 36).
The bracket will be freed with continuous pressure. For the anterior bond removal, there are now several pliers that work very well. Their edges are not beveled at all, and this facilitates cutting through the adhesive. Surround the bracket from the mesial and distal. Then bring the blades together.
In most cases the bond will break and the bracket will come right off. The residue is the major problem. Start chipping away chunks of the Protecto with a sharp pin and ligature cutter. When there are isolated areas of adhesive remaining, a sharp scaler can be effective in their removal. For very resistant parts, sandpaper discing may be necessary. As an operator gains more experience, bond removal becomes an easier task.
When a bond breaks at the interface of enamel and adhesive, if the surface of the adhesive is examined microscopically, in most instances there will be edges of enamel attached. This simply means some of the enamel rods have fractured. This is not a significant loss, nor will it become a potential area of carious involvement.
Similarly, spicules of the adhesive which had penetrated the etched enamel surfaces remain embedded in the enamel after the bond had been removed. The surface remains quite smooth. The tooth surface is actually strengthened. It is a form of artificial remineralization. The adhesive will abrade at about the same rate the enamel does, approximately 1 micron per annum.
CONCLUSION
In this article the authors have attempted to deal with the many facets of bonding. If theoretical aspects are better understood, they can be translated to chairside procedures resulting in more effective and successful bonding. As far as bonding in orthodontics is concerned, the surface has just been scratched, and undoubtedly better adhesives and techniques will be developed. However, at this point, it is the authors' firm belief that Protecto used in accordance with the de scribed techniques is an excellent, if not the best available bonding system, and therefore merits the attention of those orthodontists interested in providing this service to their patients.