Directional Edgewise Orthodontic Approach, Part 2
This is the second in a series of articles by Dr. Hickham in which he is presenting the directional edgewise approach in detail and several adjunctive techniques. Part 1 appeared in the November issue of JCO.
I'd like to show three cases treated with the directional edgewise approach. The first one is a growing boy twelve years of age, the second is an adult girl, and the third is a younger girl in the mixed dentition. (The archwires that I have described are the ones I now routinely use in my practice. In the cases to follow there will be some archwire variations, since some of these cases were started four years ago.)
CASE 1
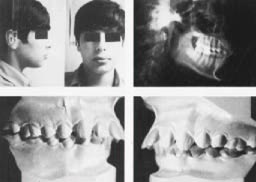
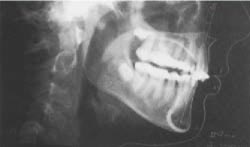
This first case is a 12-year-old boy with a bimaxillary protrusion and an end-on occlusion (Fig. 1).
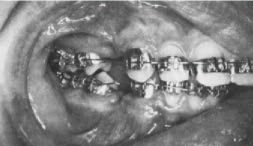
On the second appointment, all the teeth were banded and .016 round archwires were placed (Fig. 2).
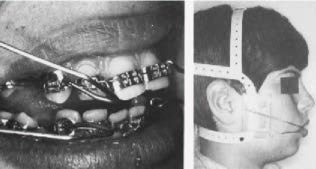
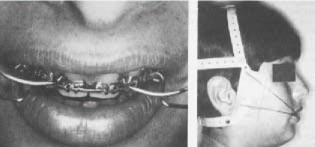
Alastiks are used for teeth that are too far from the archwire to be tied with ligature wire. Cuspid retraction is started at this appointment using the directional headgear (Fig. 3).
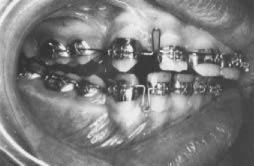
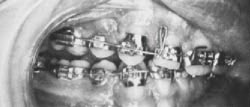
When the cuspids were halfway back, the .016 X .022 working archwires were placed (Fig. 4).
Note that the coil spring cuspid stops mentioned in the treatment outline (Part 1) were not used in this case. I have found that if a patient will wear the headgear 12 to 14 hours a day, the stops are not necessary. When the headgear is worn that much, the posterior segment of the archwire is supported by the friction of the cuspids sliding along the arch. Also, the anchorage value of the posterior teeth is increasing due to the tremendous depressing force to these teeth provided by the tipping action of the cuspids. The coil spring stops would definitely be needed if this patient wore the headgear only at night.
In adjusting the directional headgear, I select the direction of pull not from habit, but from the relationship to the occlusal plane. No headgear fits every patient the same, because the contour of the head is different. Also, the occlusal plane is different in every case and you have to get into the habit of having the patient open so that you can have a look at the occlusal plane. I like to start off with the lower J hooks paralel to the occlusal plane and the upper J hooks 15° above the occlusal
plane. This can be anywhere on the headgear depending on the patient. You just cannot routinely put the J hooks in the same holes for all patients .
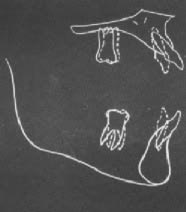
Seven months into treatment, the lower spaces are just about closed and the upper spaces almost so. On the progress ceph (Fig. 5), note that the lower incisors are occluding with the palate and there is no posterior occlusion. Some critics have claimed that the tipping of the cuspids raises the anterior portion of the archwire and extrudes the incisors. This is not true. What is happening is that the anterior teeth are uprighting. This is seen in the superimposition of the 7-month progress ceph (Fig. 6).
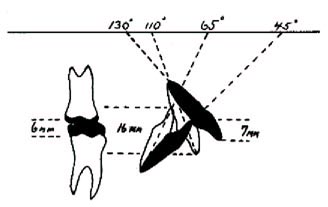
The diagram (Fig. 7) demonstrates what is actually happening.
If the upper incisors were uprighted from 130° to 110° and the lower incisors from 45° to 65°, there would be 9mm added to an existing 7mm overbite for a total of 16mm. Of course, because the palate acts as a stop, this is anatomically impossible. With the lower incisors occluding on the palate, the posterior teeth will be separated about 6mm. In bimaxillary protrusion cases, the angle of protrusion of the incisors can be extreme and the most difficult part of treating bimaxillary protrusions ends up being the deepness of the bite when the teeth are upright. The amount of intrusion necessary for the upper incisors is now tremendous.
The better the patient cooperation, the faster the retraction and the faster bite closure. With less cooperation, the bite will not close as rapidly because there would be some intrusion of the upper incisors. It is amazing that I have yet to have a patient complain about biting on the palate. The condition only lasts a few months anyway. If you didn't know better, you might want to use up-and-down elastics to close the posterior open bite which would be just wrong. In fact, the tongue getting in there and helping to keep the posterior teeth depressed contributes to the counterclockwise rotation of the mandible that we are looking for when treating the so-called "poor growers". If traumatization were a factor, I would not hesitate to add a third set of J hooks for a high pull mode to begin getting some intrusive action on the upper anterior teeth. With the type of headgear I use, two more hooks doesn't mean anything. With other types of headgear you would need separate complete headgears and the patient may feel all covered up. When all the space was closed in the lower arch, the third and final archwire was inserted (Fig. 8).
This was the .017 X .025 archwire and it can be seated in the brackets without permanent distortion because it is replacing an undistorted .016 X .022 archwire. The teeth should never be dumped enough to permanently distort the final archwire.
In this case, I decided that the lower anterior teeth were back far enough and I wanted to work on just the upper where there was still some spacing. I continued to use four J hooks, but instead of the J hooks to the lower cuspids, I replaced them with high pull hooks to the upper centrals and continued those to the upper cuspids (Fig. 9).
In this way, I am supporting the upper posterior teeth while intruding and retracting the upper
anterior teeth.
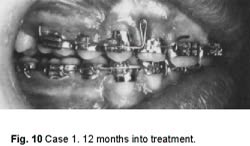
Here we are twelve months into treatment and we are still retracting the upper and the bite is still very deep (Fig. 10).
You can see how the lower arch is beginning to level out. We have 0° torque on the lower anteriors and gradual reverse torque on the posteriors.
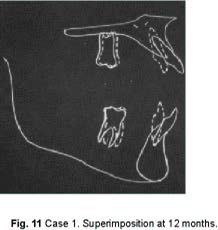
On the superimposition, you can see that the lower molar has not moved forward at all and we did get 100% retraction in the lower arch (Fig. 11).
You can see the overtreatment of the lower incisors which are now 77° to Frankfort. This is like money in the bank to me. With the finishing archwire and a little Class II elastic action, that will turn out very well.
Most of the intrusion of the upper anteriors up to this point must be from the curvature of the archwire because the pull has been mostly to the cuspids and at a 15° angle to the occlusal plane, not in a high pull direction.
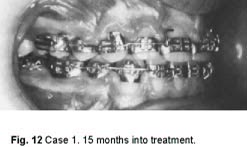
The final archwire was now placed in the upper arch. It was the .017 X .025 ideal archwire with omega tiebacks. The headgear hooks on this archwire are dead soft stainless steel electrosoldered to the archwire. I found that brass was too soft and wore out too easily. Here is the case 15 months into treatment (Fig. 12).
You can see how the overcorrection has worked out of the lower incisors; the case leveled a little more; and there has been a little Class II elastic action.
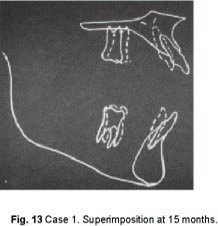
The superimposition shows the intrusion of the upper incisors (Fig. 13).
This is the way I want the bite to be opened, by intrusion of the upper incisors. Once you get the last archwire on, you have to be patient, because it takes a long time to do that-- about five months.
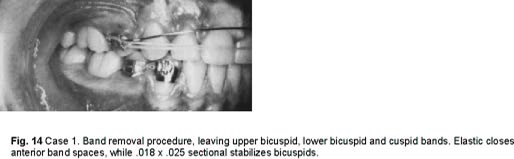
When I am ready to remove the bands, I strip most cases as I did this one (Fig. 14).
On the upper I leave only the second bicuspid bands. I have preformed .018 X .025 stripping arches that run from bicuspid to bicuspid. Their main purpose is to stabilize the bicuspids and keep them from rotating when I place a rubber band on the anterior teeth, running from bicuspid to bicuspid, to close band spaces and allow the cuspids to settle. We are off the upper posterior teeth. I want them to settle in.
I want the lower teeth to function without retention. Generally, you don't have to worry about the lower. The band spaces are going to close by themselves. I never worry about band spaces in the lower. I worry about overclosing and crowding. This is a case that I feel will be stable without a lower retainer. In such a case, I leave the lower cuspid and bicuspid bands on and let it go for about six months. They are tied together here, but I do not usually do that. I see if the extraction space will
open. If the space does open, then I will tie them together and leave them tied for six months. But, if the space does not open in four to six months, then I feel that it is stable and I take the bands off, and that is the end of the case. If the lower incisors become crowded, as they may over a period of time, I have a technique that I will show later on to correct that very easily.
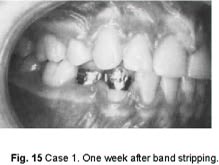
One week after band stripping, all the teeth have settled in and the case looks better (Fig. 15).
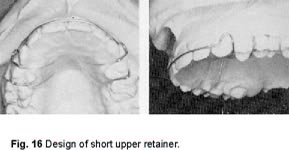
We are now ready to make an upper retainer. I feel very strongly that posterior teeth should be allowed to settle. I don't believe in making a retainer immediately after the bands are removed. It is a short retainer to give the molars that freedom (Fig. 16).
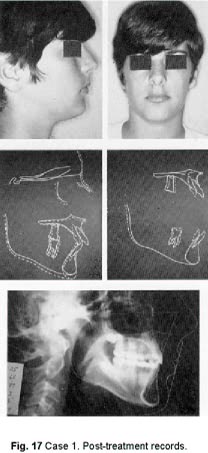
Post-treatment records (Fig. 17) show a good face with a 5mm pucker. The MPA did open one degree and the IMPA was 68°. The patient was almost entirely a vertical grower and in a vertical grower it is very difficult to maintain the mandibular plane. We retarded the growth of the posterior teeth, especially in the upper. There was no intrusion of the lower incisors, but a large amount of intrusion of the upper incisors. Almost 100% of the extraction site was utilized. Treatment time was 17 months.
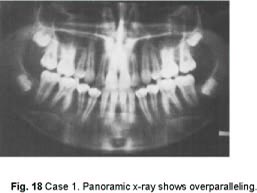
The panoramic x-ray shows the overparalleling of the roots in the extraction sites (Fig. 18).
Many times we take credit where growth was the big factor in improvement, but in this type of case Nature is not going to do it for you. You've got to do it all.
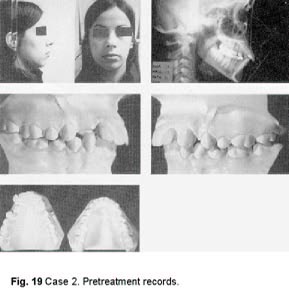
CASE 2
This is an adult case, a non grower. The patient is 17 years and 7 months of age, with a high MPA and not much chin ( Fig. 19).
In this case, the treatment goals will be a little different from those for the boy. I like girls' teeth to be a little forward, so the anchorage situation in this case is not going to be quite as critical. In an adult I feel it is important to treat the case in a reasonable length of time. So, we may forego total bite opening by intrusion of the upper incisors, and get some of it by intrusion of lower incisors. Toward the end of treatment, you can continue with the high pull headgear on the upper incisors along with up-and-down elastics in the anterior to bring the occlusal plane up and recover the amount that you intruded the lower incisors. Ideally, when the MPA has been kept constant, you'd like to have the lower incisors end up at the point at which they started, with all the bite opening on the upper.
I have been extremely pleased working with adults, using headgears. They are enthusiastic and generally cooperate well. I treat adults just like children. I make no special arrangements for them. They are right in the middle of the open bay operatory and they seem to enjoy it. If their teeth are dirty, we make them go and brush.
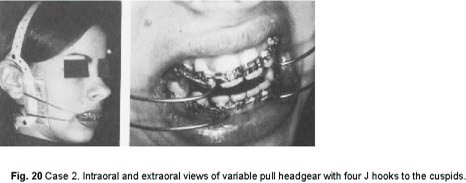
I started this patient's treatment with cuspid retraction using four J hooks and the variable pull
headgear (Fig. 20).
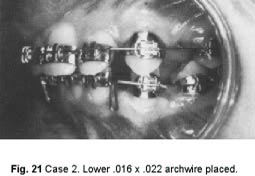
With the lower cuspids halfway back and beginning to dump, it is time to change the lower archwire and begin bringing the lower anterior teeth back. We placed the second archwire in the lower, the .016 X .022 with closing loops distal to the laterals (Fig. 21).
The headgear was continued to the cuspids, and the lower archwire was activated to the distal to begin retracting the lower anteriors. There is no coil spring in the extraction site and activating the lower arch is going to let the posterior teeth come forward a little as the anteriors go back. This conforms to the treatment plan for this case.
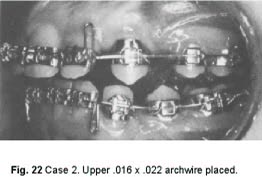
When the upper cuspids were halfway back, the second archwire was installed in the upper arch (Fig. 22).
This was the .016 X .022 closing arch. Again, headgear was maintained to the cuspids and the archwire was activated by bending it over distal to the molar tubes. The combination continued the retraction of the cuspids and the anteriors. As the retraction nears completion, the bite deepens (Fig. 23).
With these teeth uprighting, the bite gets very deep. Since this was a pretty good patient, I activated the Bull loops quite a bit. You might call that a "two-bit activation" instead of the usual "one thin dime". This is not too good an idea with this loop, because you can permanently distort the archwire. For this reason, standard closing loops are preferable to Bull loops.
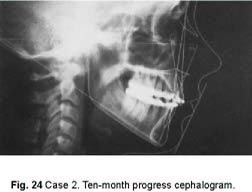
On the 10-month progress head x-ray (Fig. 24) we notice that the MPA stayed about the same, the profile looks good.
One thing I didn't like here is that the apices of the lower anterior teeth are forward of where they should be. They should be between the cortical plates. The lower arch will have to be reactivated to bring the apices back.
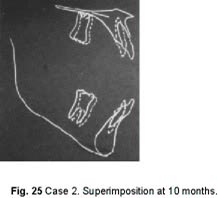
Superimposition at 10 months (Fig. 25) showed depression of upper anterior teeth and some depression of the lower molars and lower anterior teeth and we hope to recover from this as the case gresses .
In the late stages of this case, I used a method of recovering from the rotated upper molars (Fig. 26).
The archwire is cut distal to the bicuspids and Alastiks used from the lingual of the upper cuspid to the lingual of the upper molar for about three weeks. As a rule, the molars are rotated in that time to the point where an ideal .017 X .025 arch can be placed.
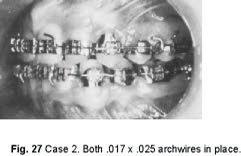
At this point, both ideal arches were in place (Fig. 27).
In this case, where we removed the upper molar rotations, we can afford to substitute a soldered hook for the omega loop, and an Alastik from the soldered hook to the distal of the molar tube keeps closing pressure on the archwire. Most of the time. I prefer to have the omega loop to get the rotations out. The upper archwire has the soldered stainless steel high pull headgear hooks. The lower archwire has the up-and-down brass hooks.
The main order of business now was to intrude upper incisors to open the bite. At this point in this case, I discarded the variable pull headgear. When only two J hooks are required and the pull is mostly from a high pull direction, the variable pull headgear is a little bit too much of a headgear to use and it is simpler to use the run-of-the-mill garden variety of high pull headgear. From here on, we were working to rotate the occlusal plane counterclockwise by intruding the upper anterior teeth.
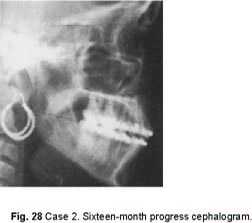
The progress head x-ray at 16 months (Fig. 28) shows how the apices of the lower incisors went distally. The apices were overcorrected and can be brought forward a bit so that they will again be between the cortical plates. The profile looked good; MPA had actually decreased one degree.
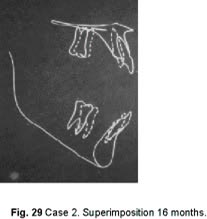
Superimposition (Fig. 29) showed the slight depression of the upper and lower molars and lower incisors, with a great deal of depression of the upper incisors. The bite has opened real well. It would be a mistake to remove the appliances at this point, because the bite is not stable. Also, the lower incisors were depressed some and this is not desirable. So, we must continue with the high pull headgear and use up-and-down elastics to slowly rotate the occlusal plane counterclockwise. We did not achieve the ideal in this case, which is to return the lower incisors to their original level, because the patient was getting married and it was decided to terminate treatment a little earlier than I normally would.
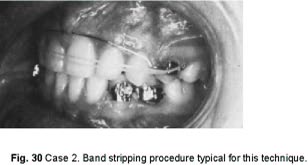
As before, the case was stripped leaving the upper bicuspid and the lower bicuspid and cuspid bands on (Fig. 30).
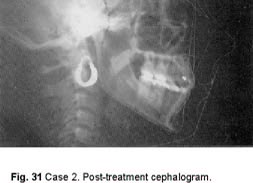
The finished headplate (Fig. 31) shows that the Tweed triangle was satisfied with an IMPA of 65° and that the apices of the lower incisors are properly located between the cortical plates. The profile looks good with Holdaway's line showing a 5mm pucker.
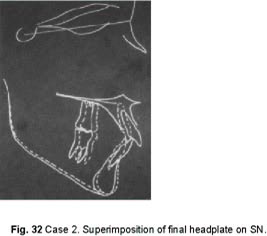
Superimposition of the final headplate on SN (Fig. 32) reveals what appears to be growth of the mandible, but it is not. What we see is a reduction of the vertical which rotated the mandible in a counterclockwise direction, which brings the chin forward. So, we have actually increased the chin point in this case by decreasing the vertical.
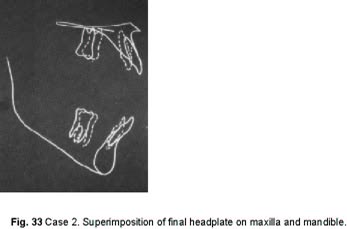
Superimposition on the maxilla (Fig. 33) shows some depression of the upper molar and a great depression of the upper incisor. Superimposition on the mandible shows some depression of the lower molar and some undesirable depression of the lower anterior.
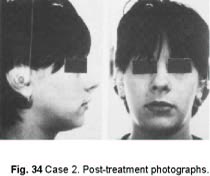
The after-treatment photographs show a good facial improvement in this case (Fig. 34).
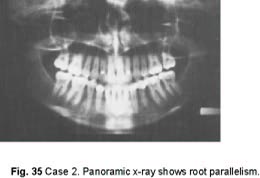
The post-treatment panoramic x-ray shows the root parallelism achieved in treatment (Fig. 35).
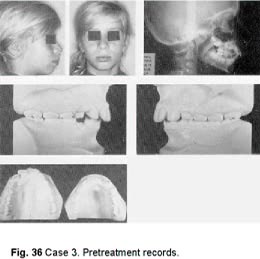
CASE 3
This is a mixed dentition case-- a typical bimaxillary protrusion (Fig. 36).
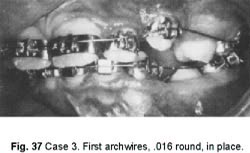
Following a serial extraction procedure, the case was started after the first bicuspids were extracted and the cuspids were able to be banded (Fig. 37).
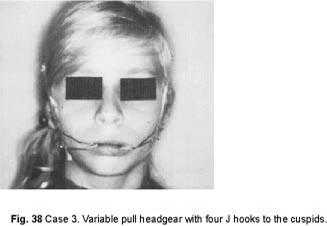
The beauty of the directional edgewise orthodontic approach is that we do not need the posterior teeth for anchorage. All we need them for is to stabilize the archwire. The headgear is what will retract the teeth.
On the first appointment, the headgear was placed to the cuspids to begin their retraction (Fig. 38).
By the time the lower cuspids were well back, the lower bicuspids were erupted, and had to be banded. Because of their position, they cost us an extra archwire (Fig. 39).
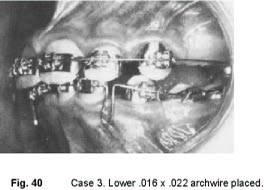
We then went to the lower .016 X .022 archwire activated by bending it over the distal of the molar tubes (Fig. 40).
The headgear hooks were still to the four cuspids.
Superimpositions of a 4-month progress head x-ray on SN and on maxilla and mandible (Fig. 41) shows that the teeth have moved very little. There has been a little anchorage loss. But, the main thing that has happened is that we have gotten some good growth and the case is looking good, even though the child is really not cooperating that well. Her growth has taken care of a lot of problems and will continue to do so.
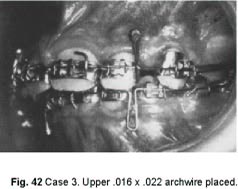
When the upper cuspids were well back, I inserted the upper .016 X .022 closing loop archwire (Fig. 42).
The upper closing loop shown is the type that I prefer over the Bull loop. I placed a tube stop between the molars and cuspids to maintain the space between them for the second bicuspids which are coming in well and which I probably will not band because they don't need it and I don't need them for anchorage. Actually I prefer a closed coil spring as a stop because it is easier to adjust.
The high pull headgear hooks are on this archwire between the upper centrals and laterals and, in this case, I started to use them at this stage.
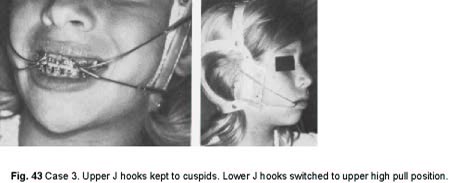
I kept the lower J hooks to the cuspids and switched the upper J hooks from the cuspids to the high pull position, higher on the headgear and attached to the high pull hooks on the archwire (Fig. 43).
The reason for using the high pull mode at this time was because the patient was not too cooperative and the headgear action was going slowly. I wanted to get some bite opening at this
point.
As the spaces closed, the .017 X .025 ideal archwires were installed. Since I did not intend to band the upper bicuspids, the upper ideal arch had a stop mesial to the molars. While the spaces were closed, the correction was not completed. Therefore, low pull headgear hooks were soldered to the upper arch between the laterals and cuspids. The headgear pull was now to be to the low pull hooks instead of to the cuspids, to obtain en masse movement of the upper teeth.
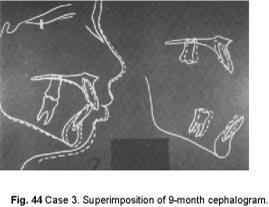
A 9-month progress head x-ray superimposed on SN, and on maxilla and mandible (Fig. 44) showed that the teeth had moved but not considerably. The profile looked better because of growth. MPA stayed about the same. The chin was coming forward. The nose was coming forward. We were more or less holding the midface back, holding the denture back, and therefore the lips. There was some intrusion of the upper incisors. There was some anchorage loss. This was a poor patient, who would continue to be a poor patient.
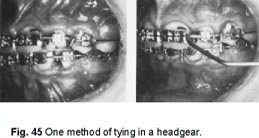
One way to make a poor patient into a super patient is to tie in the headgear. One way of doing this is to bend the on-the-arch headgear hooks over on themselves, locking in the J hooks (Fig. 45).
Whenever you see a patient with dirty teeth and bloody gingivae as you have begun to see through the series of illustrations of this patient, you know that you have an uncooperative patient who is not wearing the headgear. So, after I tied the headgear in, I no longer had a problem of cooperation in wearing the headgear, but I still had the problem with hygiene.
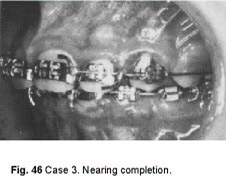
With the teeth still dirty and the cooperation still poor, we finally got the case to Class I (Fig. 46.)
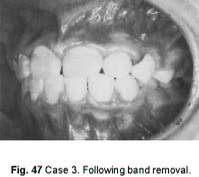
When the case was stripped of bands (Fig. 47), note the decalcification of the teeth from poor oral hygiene.
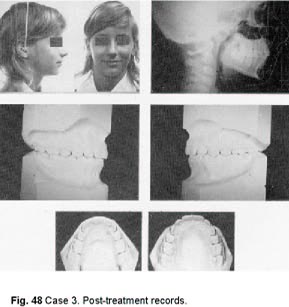
The finished records of the case show a good occlusion and a good profile (Fig. 48).
The finished head x-ray shows the lower incisors satisfying the Tweed triangle and with their apices between the cortical plates. The Holdaway profile line is just about the position that I like.
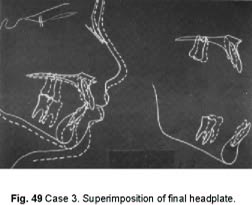
Superimposition of the finished head x-ray on SN (Fig. 49) shows how growth has really done a job for us. Superimposition on the palate shows some intrusion of upper incisors. Superimposition on the mandible shows the retrusion of the lower anterior teeth and some anchorage loss. The case came out very well because of growth. If growth were not favorable in this case, it could never have been a well-treated case, due to the lack of cooperation.