Standardized Intraoral Photography
The use of intraoral photography in orthodontic practice has been increasing. It is considered that records of an orthodontic patient are not complete without intraoral photographs at least at the beginning and the end of treatment. They are useful for presentation and documentation. Intraoral photographs taken during treatment have an additional advantage in affording us an opportunity to double-check on such things as errors in band placement and in archwire construction.
X-ray equipment and techniques have been highly standardized. In most orthodontic offices, a routine x-ray examination requires only a few minutes and, in many cases, can be done by qualified auxiliary personnel. Intraoral photography equipment and technique have not been similarly standardized with the result that, in many offices, intraoral photography is time-consuming or inadequate. In order to produce uniformly good intraoral photographs we must be able to focus precisely under the required conditions. All camera settings such as aperture, focal distance and exposure time should be standardized in order to save time and to work efficiently.
Several special camera setups are available for taking intraoral photographs. Roughly they may be divided into two groups:
The photographic equipment that we shall describe has been developed in daily orthodontic practice. It meets our requirements and has the following advantages:
standardized.
Details of equipment
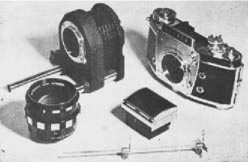
Camera: Exacta VX 1000, 35 mm single lens reflex camera with quick-return mirror (Ihagee, Dresden, Germany). Similar cameras can be used.Focusing: Interchangeable prism or waist-level viewfinder. Lens: Travenar 2.8/90 mm, fully automatic diaphragm (Schacht, Germany). A short-mount lens is required. A regular lens will not do.Bellows: Exacta minor extension bellows.Release bridge: Exacta. (Fig. 1)
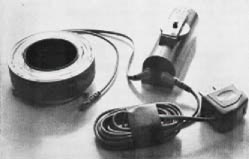
Flash: Standard Equipment Universal Ringflash, with capacitor (¼ single) (AC/DC Pack), AC Adapter Cord and Adapter Ring to mount flash unit on all lenses from 48-60 mm diameter, Minicam, Japan (USA-- Prinz-Minicam, 212 West Hubbard St., Chicago, Ill. 60610). (Fig. 2)
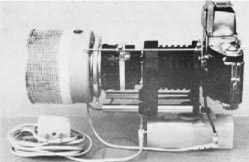
The equipment is assembled as shown in Fig. 3. The connecting part has been removed from the front end of the rails of the bellows in order to allow for free movement of the ringflash head. If a Travenar lens is used, the Adapter Ring of the ringflash unit can be omitted.
Taped to the housing of the Minicam unit is a section of an ordinary tin can. It is lined with off-white construction paper for correct color reproduction. Its purpose is to concentrate the ringflash light. Without it our films would be underexposed at a lens opening of f22 with the amount of light our ringflash capacitor unit produces and for the ASA rating of the film that we use (80-125 ASA) . With this homemade reflector, the light value is just right for us. If the ASA rating were higher and we were getting overexposure, we would use a gray filter in front of the ringflash. This can be made from a piece of exposed black and white film negative. The reason for using an aperture of f22 is that this opening guarantees a maximum depth of field and sharp focus from the front teeth to the distal aspect of the first molar. As the f-stop is made smaller and the lens aperture made larger to let in more light, the depth of field decreases.
Thanks to a lucky coincidence, the capacitor of the Minicam standard ringflash (¼ power) produces just enough light when enhanced with the tin-can reflector to permit the use of an f22 aperture with 80-125 ASA rated film. Since both color and black and white film are available in this range, there are no problems.
Routine intraoral photography
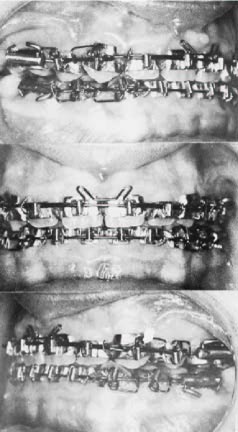
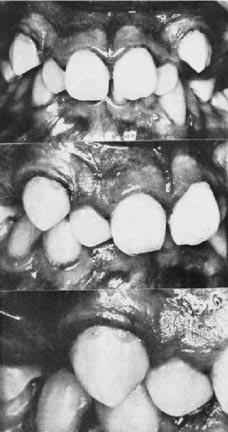
For standard front and lateral intraoral views (Fig. 4) the following settings are used:
Exposure time-- 1/60 second.
Focal distance-- infinity. Lens aperture-- f22.
The adjustment rings of the lens are taped in order to avoid movement during use. The bellows is extended about 20 mm until the image of the subject is filling the viewfinder. This extension of the bellows is marked. You can always return to the mark to produce the same standard shot. All that is necessary is to move in toward the subject until it is in focus in the viewfinder and shoot.
At the beginning, we have to make a pilot or test film to check the equipment and the adjustments.
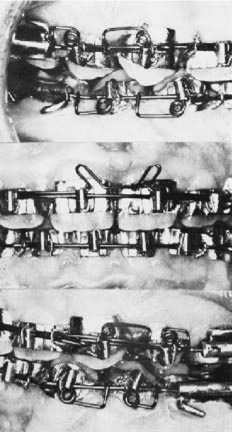
Extreme close-up photography
To make close-ups of special regions or items (Fig. 5) after we have made our routine intraoral photographs, it is only necessary to extend the bellows and release-bridge until the image of our tiny subject again fills the viewfinder. Bellows and release-bridge are fixed in the new position and, without changing any of the other settings, the exposure can be made. Experiments have proven that the loss of light intensity due to the extension of the bellows is compensated for by coming nearer to the subject with the camera.
After some experience, even extreme close-up pictures (Fig. 6) can be made by hand without the use of a tripod. The use of a prism viewfinder is recommended.
If color and black and white exposures are required for the same subject, two camera houses are used. Exchange of camera houses will take only one minute. The speed (ASA number) of both the black and white and color film must be about the same, because otherwise it would be necessary to alter the settings.
For the most part without any change in settings (except bellows and release-bridge) the same equipment can be used for taking photographs of study models, appliances, archwires etc. After removing the bellows, of course, it is possible to use this lens and camera for face and profile photography, but we recommend using a second camera for this purpose. We feel that the equipment as described above should always be immediately available for its main purpose-- taking high standard intraoral pictures in a minimum of time. If the equipment is always ready for use, it is possible to record every step in treatment including details of tissues and appliances, useful in teaching and writing, without taking more time than is needed for a routine x-ray exposure.