Begg Series, Part III: The Begg Technique
The Begg Technique is based on the principle of differential forces whereby light forces applied on anterior teeth will move them rapidly without disturbing anchor teeth. Conversely, heavier forces will inhibit movement of anterior teeth and displace the posteriors.
At the start of treatment, the six maxillary anterior teeth are tipped distally over basal bone with Class II elastics while the molars are controlled by incorporation of anchor bends in the archwire mesial to the molar tubes. No anchorage preparation or headgear is necessary. Anchor bends will also open the bite by intruding the incisors. After the crowns of anterior teeth have been tipped into position, their roots are finally paralleled and torqued to proper angulation.
Every type of tooth movement (such as bite opening, correction of rotations, torquing, root paralleling) is overdone in order to prevent relapses.
Bands and attachments
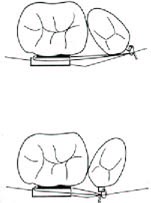
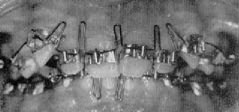
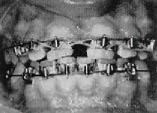
In this technique, modified ribbon arch brackets are used on the six anterior teeth and bicuspids which allow free tooth tipping due to one-point bracket and archwire contact yet still maintain good rotational control. C-clamps are used on bicuspid brackets as described by Lyman Wagers in the September 1967 issue of JPO. Bands are placed in the middle third °f the crown gingivo-incisally with the brackets centered mesio-distally except for rotated bicuspids and cuspids where the brackets are offset to maintain overcorrections (Fig. 1).
Molar tubes (.036" X ¼'') with mesial hooks are placed on maxillary molars at the same level as the rest of the bands, and as close to the gingiva as possible on mandibular molars, to avoid the patient chewing on the archwire and distorting it.
Lingual buttons are welded, one on the lingual of the cuspids and bicuspids, and two on the molars. These are used to hold Class II elastics and/or to hook cross elastics to correct posterior cross-bites. They are also used for elastic thread to correct rotations of bicuspids or to ligate cuspids to molars with steel ligatures to prevent the crowns of the teeth from separating during uprighting procedures in the final stage of treatment.
The Begg Lightwire Technique is divided into three stages of treatment.
FIRST STAGE OF TREATMENT
The following corrections are accomplished simultaneously during the first stage of treatment:
1-- mesio-distal corrections
2-- correction of rotations of posterior teeth
3-- bite opening
4-- alignment of anterior teeth or closing of anterior spaces
5-- bucco-lingual corrections
Mesio-distal corrections
The upper anterior teeth are retracted with Class II elastics (2 oz. of pressure) at the same time as the bite is opened. Elastics should be worn full time and the patient is instructed to discontinue elastics when the maxillary incisors come edge-to-edge with the mandibular incisors. The same instructions apply during the rest of the treatment.
As more experience is gained with this technique, the operator should be able to detect any interferences that may prevent free tipping of maxillary anterior teeth and free sliding of the archwire in the posterior segments; for example: mandibular cuspid brackets may interfere with distal movement of maxillary cuspids. This situation should be rectified as soon as it presents itself to prevent anchorage loss or deviation of the midline. Beveling the bracket of the mandibular cuspid should take care of this problem.
As the upper incisors are retracted to an edge-to-edge relationship with the lowers, molars that were in a Class I relationship at the start of treatment will correct to an overworked Class I and then towards a Class III relationship. Class II cases are handled the same way as Class I. With the mesial movement of the lower molars due to some expenditure of anchorage, the Class II relationship converts to a Class I by the end of the first stage of treatment. With favorable mandibular growth, this is augmented.
Correction of rotations of posterior teeth
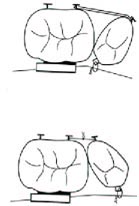
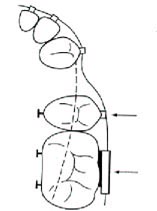
Bicuspids that are rotated mesio-buccally can be corrected by an elastic thread running from the molar tube to the C-clamp (Fig. 1). Bicuspids that are rotated mesio-lingually can be corrected with an elastic thread that runs from the button of the bicuspid to the mesial button of the molar. This approach to correction of rotated bicuspids is an assurance that no spacing will develop between the molar and the bicuspid as the rotation is corrected. This action requires the incorporation of toe-in or toe-out at the anchor bend level of the archwire to prevent rotation of the anchor molars (Fig. 2).
The bicuspid is over-corrected and the elastic thread replaced by a steel ligature until engagement later on in the third stage.
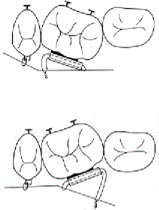
A mesio-lingually rotated molar can be corrected with a steel ligature attached to the distal aspect of the archwire through the buccal tubes and tied on the archwire mesially. Some toe-in incorporated in the archwire will compensate for the force necessary to rotate the tooth. If a molar is rotated the opposite way, the same procedure, as described above, will apply but in reverse (Fig. 3).
Bite opening
The bite should be opened to an edge-to-edge relationship by the end of the first stage. This is accomplished with anchor bends incorporated in the archwires in front of the molar buccal tubes. The amplitude of the anchor bend should be sufficient to deflect the anterior portion of the archwire to the muco-buccal fold when the archwire is engaged in the buccal tubes (Fig. 4).
The light force delivered by the .016" resilient wire on the anterior teeth is the optimal force necessary to depress upper and lower anteriors without distal tipping of anchor molars.
Anchor bends tend to compress molars lingually, especially mandibular molars. The vertical component of forces of Class II elastics applied on mandibular anchor molars contribute to cause this phenomenon. The problem is solved by expanding the archwire bilaterally approximately ½" on the lower and ¼" on the upper.
After expansion has been incorporated in the archwire, its shape should be checked against the model. By simulating engagement of the archwire in the buccal tubes. The archwire should then present the following characteristics: (a) no contraction or expansion should be present in the cuspid area because the cuspids should be kept in the cancellous trough during their distal movement and (b) the archwire should be in a straight line at the anchor bend level when seen from an occlusal view or the archwire will roll in the buccal tube and produce a rotational effect on the molar (Fig. 5). Some toe-out generally has to be incorporated in the archwire.
In open bite cases, anchor bends are used to keep the molars from moving mesially and the patient is instructed to wear up and down elastics from maxillary cuspids to mandibular cuspids to close the bite.
Alignment of crowded teeth or closing of anterior spaces
Alignment of anterior teeth is accomplished with vertical loops incorporated in the archwire (Fig. 6). The loops add to the span of wire between the teeth and produce a more gentle pressure to move them. The looped arch is constructed with a round cuspid hook resting on the mesial aspect of the cuspid bracket on either side. The loops are then activated to produce overcorrection of rotations, labio-lingual or mesio-distal movement.
[f possible, the brackets of all anterior teeth should be engaged in the looped arch. As soon as the looped archwires have aligned the teeth, they are discarded and replaced with plain archwires with bayonet bends to maintain over-corrections produced by the loops. In cases of mild crowding, an initial straight arch can be used without discomfort to the patient. Bayonet bends are then incorporated on the second appointment to accomplish over-corrections. Of course, in cases where the anterior teeth are straight, a plain archwire is used and no bayonet bends are necessary.
Rotated cuspids should not be corrected with loops because the presence of a loop distal to a cuspid would break the continuity of the archwire in the posterior segment and stability of the archwire would be affected. Cuspid rotations can be easily corrected with an elastic thread running
from the lingual button of the cuspid to the archwire mesial or distal to the cuspid depending on the rotation.
A combination of seating lug and hook welded on the lingual aspect of the cuspid band will prevent the thread from moving incisally and neutralizing the rotational effect of the thread (Fig. 7). The cuspid is not engaged, but tied lightly to the archwire with a steel ligature. As soon as the cuspid is rotated, the archwire is engaged in the bracket. Many cuspids are rotated disto-lingually and forced engagement of their bracket on the archwire can result in a contraction of the archwire in the posterior segment which may compress the anchor molars lingually (Fig. 8).
Spaces between anterior teeth are closed with a light 3/8" elastic running from the pin of one cuspid to the pin of the cuspid on the opposite side. The elastic is laced in order to prevent tissue irritation between the teeth (Fig. 9).
Sufficient space should be allotted between cuspid brackets and hooks to allow for mesial sliding of the six anteriors on the arch. The archwire should be bent gingivally distal to the buccal tubes to prevent the archwire from moving sideways.
Bucco-lingual corrections
A posterior cross-bite of the whole posterior segment cannot be corrected only by contracting one arch and expanding the opposite arch on the same side. The force delivered by the .016" archwire is too gentle to accomplish this type of movement. Cross elastics (3/16 heavy) are necessary. These are hooked on the lingual button of one molar to the buccal tube of the opposite molar. Once the correction is completed, a certain amount of contraction in one arch and expansion on the opposite arch has to be retained for the rest of the treatment.
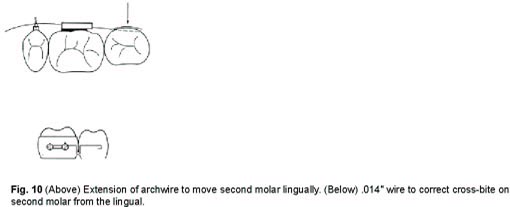
Cross-bites of second molars can be corrected by extending the archwire past the buccal tube of the first molar and incorporating pressure on that extension. An .014" wire hooked on the lingual buttons of the first molar and activated before the band is cemented will take care of mandibular second molars that are erupting lingually to the first molar (Fig. 10).
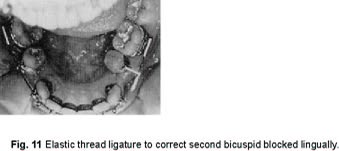
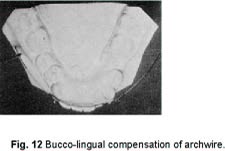
Bicuspids that are blocked lingually can be moved buccally into line with the molars by the use of an elastic thread running from the bracket of the bicuspid to the archwire (Fig. 11). The force necessary to move a bicuspid buccally should be compensated by expanding the archwire more on that side to prevent molar compression (Fig. 12).
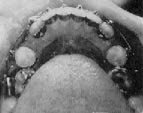
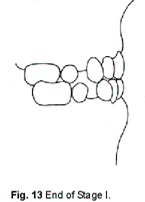
At the end of the first stage (Fig. 13), the maxillary incisors should be at an edge-to-edge relationship with the lower incisors, the bite should be opened, molars should be in an overworked Class I relationship, crowding or spacing of the anteriors eliminated and bucco-lingual discrepancies and all rotations should have been corrected.
SECOND STAGE OF TREATMENT
In the second stage of treatment, residual extraction spaces are closed with horizontal elastics.
Class II elastics are maintained to keep the maxillary incisors edge-to-edge with the mandibular incisors. The operator now has the choice of closing spaces by retracting the upper and lower incisors or by moving the posterior segments mesially to lose anchorage. The decision will depend on the torquing requirements anticipated in the third stage, apical base difference, and profile requirements of the patient. i.e.:
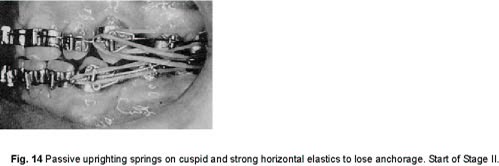
1-- cases exhibiting large apical base differences at the start of treatment will require lingual root torque of maxillary incisors in the third stage in order to reduce the SNA angle and finish with an acceptable angulation of the upper incisors. As the torquing procedure will consume some anchorage, the upper and lower incisors should be tipped lingually by using horizontal elastics (around 1½ OZ. of pressure). Patient and parents should be made aware of the temporary inclination of the anterior teeth that will take place in this stage. 2-- if the profile of the patient was good at the start of treatment (with a small ANB difference) the spaces should be closed by moving the posterior segments mesially to avoid flattening the patient's profile. Stronger elastics will, according to the principle of differential forces, keep the incisors in place and favor mesial movement of posterior teeth. Converting the one-point contact bracket of the cuspids into a two-point contact bracket by the use of a passive uprighting spring will help further in keeping the anterior teeth stationary as the posterior segments are brought forward (Fig. 14). This is an example of the versatility of this technique.
Arch form is basically the same as Stage 1 with the difference that toe-in bends should be incorporated at the anchor bend level to compensate for the additional force applied on the buccal of the molars with horizontal elastics. Anchor bends are retained.
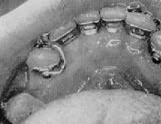
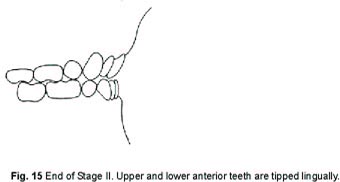
At the end of the second stage (Fig. 15), the bite has remained open, incisors are edge to edge, all spaces closed, the bicuspids may be tipped mesially if anchorage was lost purposely or the cuspids may be tipped severely if anchorage was maintained.
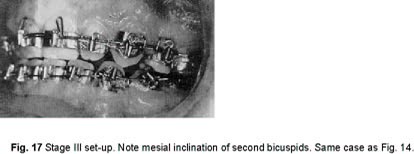
THIRD STAGE OF TREATMENT
In the third stage, our objectives are to parallel the roots of bicuspids, cuspids and incisors with root-tipping springs and to torque the maxillary incisors to an acceptable angulation (in the vicinity of 102° to SN plane). Labial root torque may also be necessary on certain teeth. Midline discrepancies will automatically correct themselves in the third stage if there is no tooth-size discrepancy. As in Stage 1, all the above-mentioned operations are done simultaneously.
Arch form modifications of the main arch
Uprighting
Roots of cuspids and bicuspids in extraction cases require the most uprighting (Fig. 17). The action of uprighting springs is of a reciprocal nature and practically no anchorage is consumed in the process. The new .014 instant uprighting springs with a large helix and a short lever arm are already made and easy to use, but care should be taken so that they are not accidentally deformed and made passive when they are hooked on the archwire. .012" springs can be used on laterals or centrals that need correction of their axial inclination. The brackets of the teeth to be corrected are always tied to the archwire whenever an uprighting spring is used. These ligatures should be tied occlusally on the same side as the apex of the tooth.
Steel ligatures (.012") running from the mesial button of the molar to the cuspid button will keep the crowns of the bicuspids and cuspids from separating while the roots are uprighted.
After four or five months of uprighting, a panoramic x-ray film is taken and reactivation or deactivation of the springs is done according to the need. The springs are left in place until such time as bands are removed.
Torquing
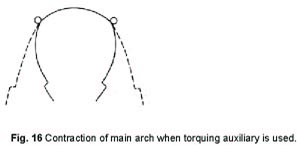
Lingual root torque is usually necessary on maxillary central incisors only. Torquing spurs are incorporated in an .014" archwire and angulated at about 45° pointing gingivally. The torquing auxiliary arch is engaged in the brackets gingivally to the main arch and may extend as much as 2 or 3 mm. past the bicuspid brackets (Fig. 18). The distal ends of this auxiliary torquing arch should be contracted so that they almost touch before the arch is inserted. This contraction of the auxiliary arch will counteract the tendency of the posterior segments to expand buccally under the influence of the torquing arch. This torquing procedure has to be supported by Class II elastics to control anterior movement of the crowns of the upper incisors during the third stage.
Labial root torque or reverse torque is applied on maxillary lateral incisors that were blocked-in lingually at the start of treatment. Maxillary impacted canines may also require labial root torque. The crowns of these teeth have been moved into place during the first stage of treatment, but the roots now need labial root torque for better post-treatment retention. A new main archwire is fabricated with torquing spurs incorporated on either side of the bracket of the laterial or cuspid with approximately 25° of activation. The force delivered by these spurs is applied at the incisal edge of the tooth. If necessary, uprighting springs are used on these teeth and lingual root torque can be applied at the same time on the central incisors with an auxiliary torquing arch.
Labial root torque
Labial root torque may also be indicated on mandibular incisors to reinforce anchorage during the third stage or to position the roots of the incisors in a more favorable labio-lingual position in the mandible. Pressure is applied at the labio-incisal edge of the lower incisors. The spurs are set in between the teeth from cuspid to cuspid and the archwire is hooked between the bicuspid and cuspids. This auxiliary arch, if needed, is used towards the end of the third stage and can be fabricated and inserted in a matter of a few minutes without even removing the main archwire (Fig. 19).
The efficiency of the Begg technique in accomplishing rapid and simultaneous tooth movement does not imply that treatment is automatic. Constant reassessment of the actions and reactions that occur during tooth movement should be made in order to take full advantage of the possibilities of this versatile technique.